30 Creative Christmas Crafts for Kids: Fun and Easy Holiday Projects
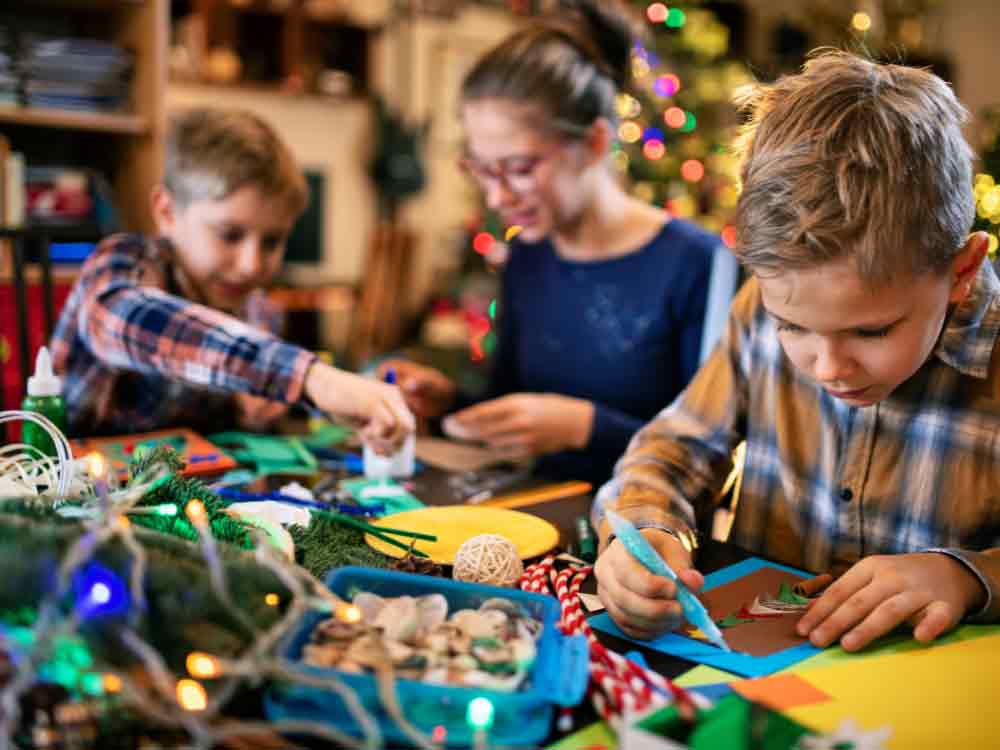
Making Christmas crafts with kids is more than just a fun activity; it’s a wonderful way to create lasting memories, spark creativity, and celebrate the holiday season together. Crafting helps children develop fine motor skills, express their imagination, and feel the joy of making something special with their own hands.
The world of Christmas crafts offers endless possibilities, from simple paper ornaments to more elaborate decorated projects that bring festive cheer to any home.
This article explores a variety of creative and engaging Christmas craft ideas for kids, showcasing projects that cater to different age groups and skill levels. From toddler-friendly activities to more detailed crafts for older children, each project has its own unique charm while maintaining the spirit of Christmas fun.
Join us as we discover 30 delightful Christmas craft ideas, each offering step-by-step guidance and helpful tips for creating magical holiday memories with your little ones.
1. Paper Plate Santa Claus
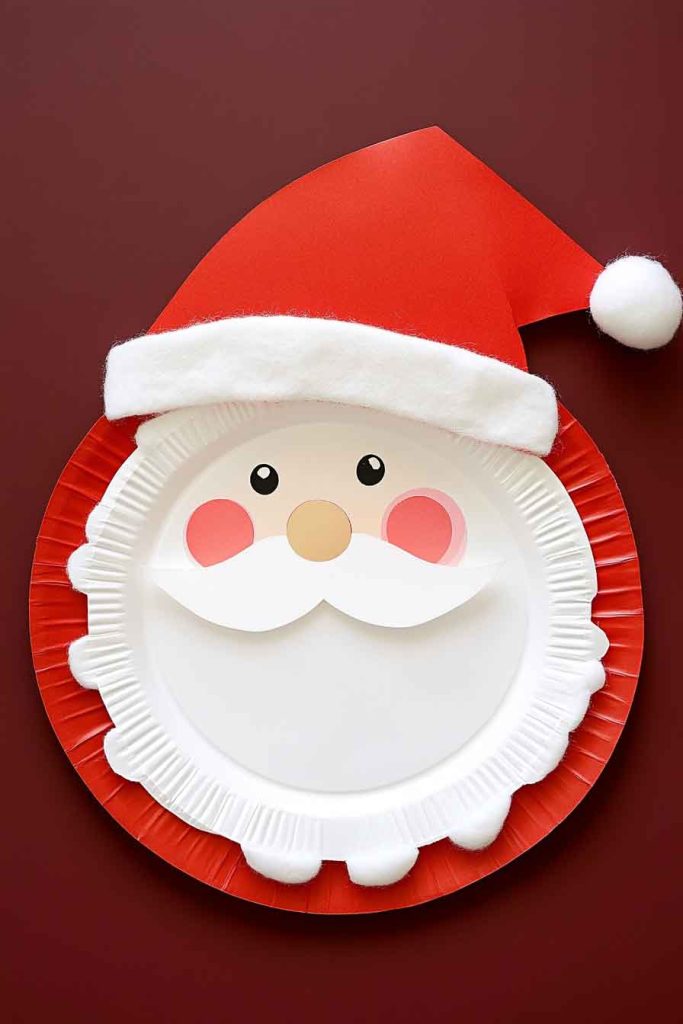
Imagine the delight on your child’s face as they transform a simple paper plate into jolly Santa Claus! This classic craft uses a paper plate as the base, cotton balls for Santa’s fluffy beard, red construction paper for his hat, and markers to draw his rosy cheeks and twinkling eyes.
A pom-pom at the tip of the hat adds the perfect finishing touch. This craft is perfect for preschoolers and kindergarteners, requiring minimal supplies and offering maximum creativity.
The joy of this project lies in its simplicity and the immediate results. Children love gluing the cotton balls to create Santa’s beard, and the tactile experience of working with different textures helps develop their sensory skills.
This craft is ideal for classroom activities or family crafting sessions, creating adorable decorations that can hang on walls or doors throughout the holiday season.
Tips for Success:
- Use white glue or glue sticks for easy application by small hands.
- Pre-cut the hat shape for younger children to make assembly easier.
- Let kids personalize their Santa with different expressions and beard styles.
- Display the finished Santas as a festive garland across the room.
2. Handprint Christmas Tree Card
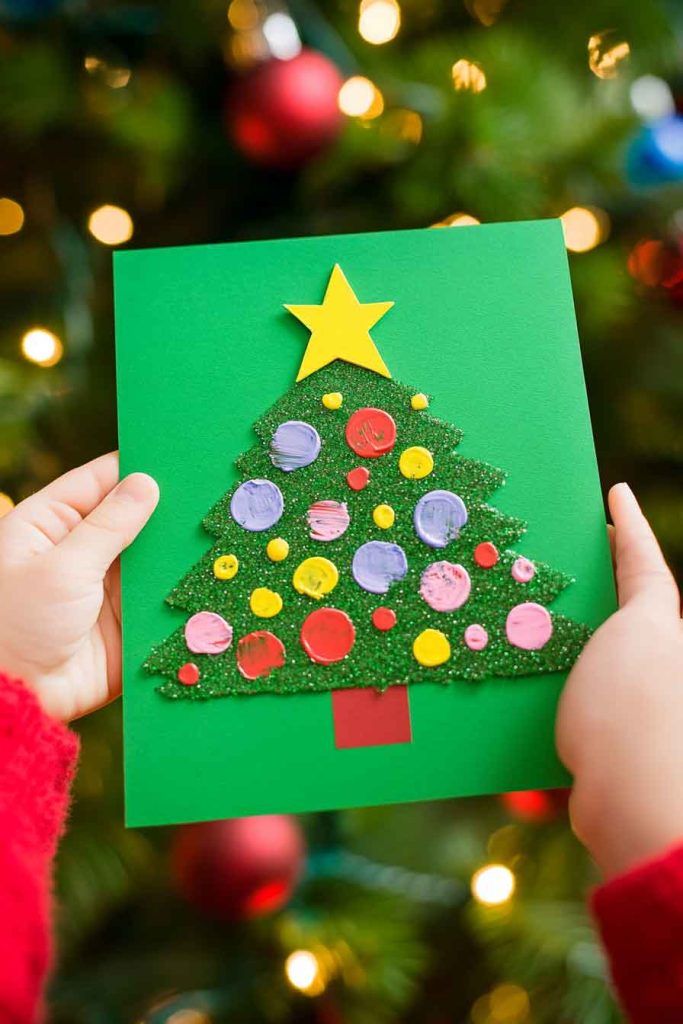
A handprint Christmas tree card becomes a treasured keepsake that captures your child’s tiny hands at this special moment in time. Using green paint and construction paper, children press their hands onto cardstock to create a tree shape, then decorate with colorful fingerprint ornaments and a bright yellow star on top.
Adding a personalized message inside makes this the perfect homemade gift for grandparents, teachers, or family friends.
This craft combines art and sentiment beautifully. Parents and grandparents cherish these handmade cards because they preserve a memory of how small their child’s hands were during that Christmas.
The process is simple enough for toddlers with adult supervision, yet meaningful enough to become a yearly tradition.
Tips for Success:
- Use washable paint for easy cleanup.
- Make multiple prints to create cards for several recipients.
- Write the child’s name and date on the back for a lasting memory.
- Let each finger become a different colored ornament on the tree.
3. Popsicle Stick Snowflakes
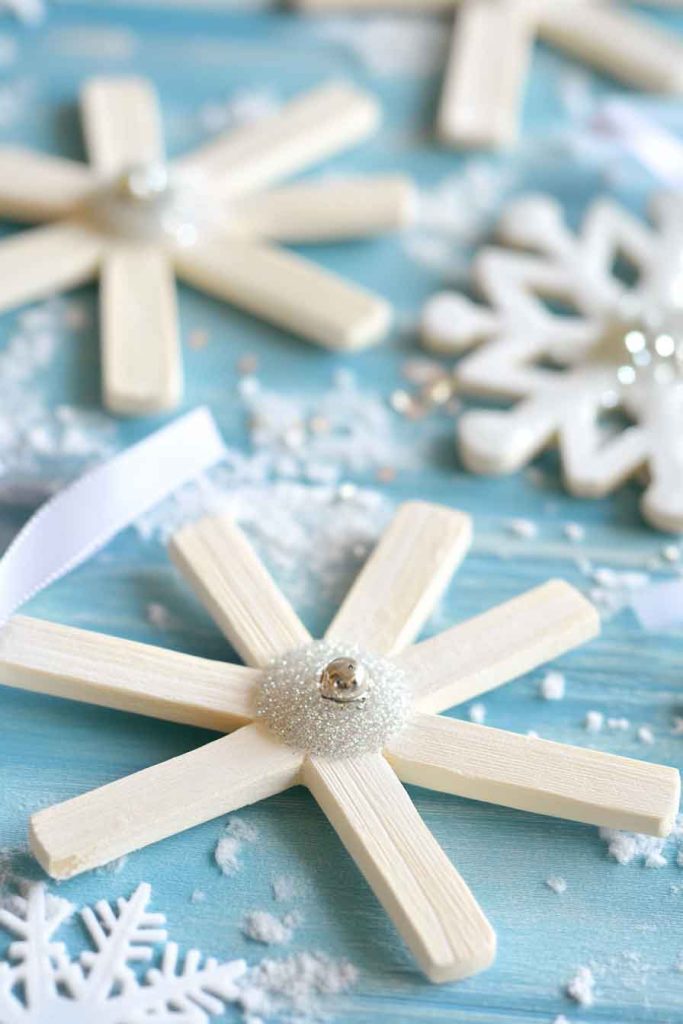
These beautiful popsicle stick snowflakes bring winter magic indoors with their sparkly, frosty appearance. Children arrange popsicle sticks in a snowflake pattern, glue them together at the center, and decorate with white paint, glitter, and small beads.
A ribbon loop at the top makes them perfect ornaments for the Christmas tree or window decorations that catch the winter light.
The geometric nature of this craft introduces children to patterns and symmetry in a fun, hands-on way. As they arrange the sticks and add decorations, they learn about balance and design.
The finished snowflakes look professional and impressive, giving children a sense of pride in their creation.
Tips for Success:
- Pre-glue the basic snowflake shape for younger children.
- Use craft glue for stronger hold between sticks.
- Apply glitter over wet paint for maximum sparkle.
- Create snowflakes in different sizes for varied display options.
4. Toilet Paper Roll Reindeer
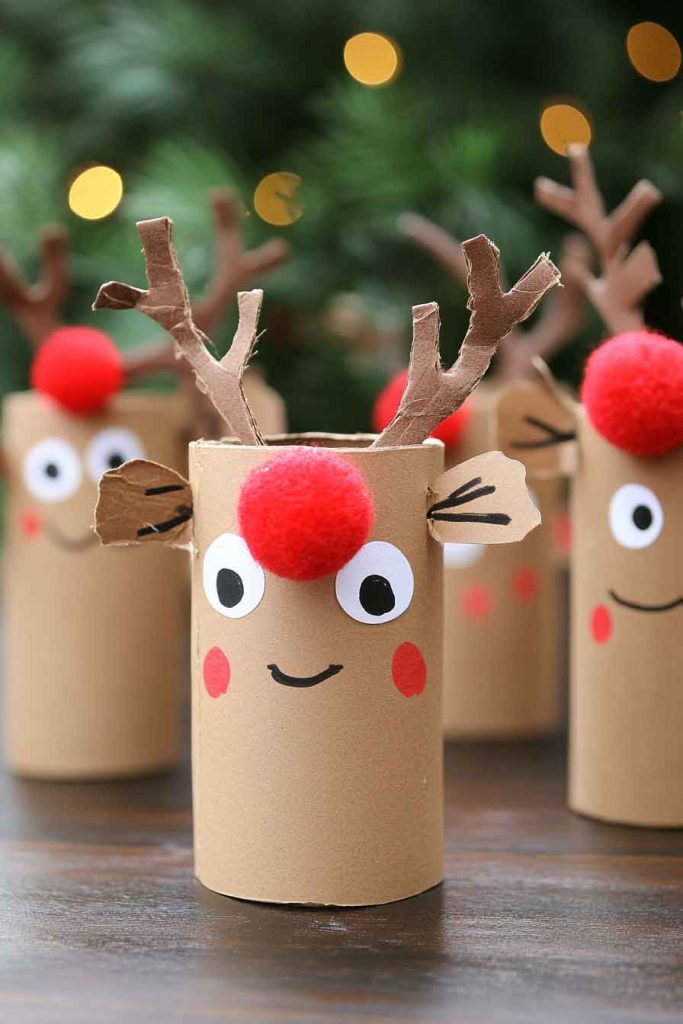
Turn humble toilet paper rolls into an adorable herd of reindeer with this eco-friendly craft! Children paint the rolls brown, add googly eyes, a red pom-pom nose, and pipe cleaner antlers to create Rudolph and his friends.
These charming reindeer can stand on their own, making them perfect decorations for mantels, windowsills, or holiday centerpieces.
This craft teaches children about recycling and reusing materials while creating something special. The transformation of an everyday item into a festive decoration sparks imagination and shows kids that craft supplies are everywhere.
The three-dimensional nature of the project makes it engaging for children who enjoy hands-on building activities.
Tips for Success:
- Use brown paint or wrap the roll in brown construction paper.
- Secure pipe cleaners with hot glue (adult supervision required).
- Create different expressions for each reindeer’s personality.
- Make a whole reindeer family with varying sizes of cardboard tubes.
5. Paper Chain Christmas Countdown
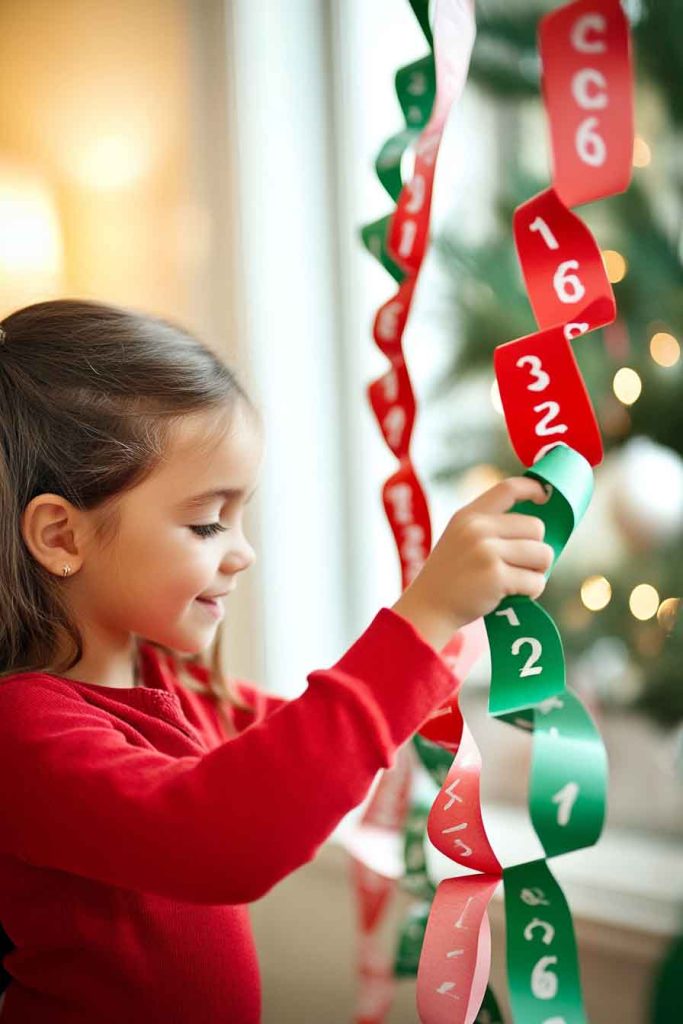
A paper chain countdown to Christmas builds excitement throughout December as children remove one link each day. Kids cut strips of red, green, and white construction paper, write numbers from 1 to 25, and link them together in a colorful chain.
Decorating each link with stickers, drawings, or glitter adds personal flair to this interactive decoration.
This craft serves a dual purpose: it’s both a decoration and an activity that helps children understand the concept of time and anticipation. Each morning, removing a link becomes a special ritual that marks progress toward Christmas Day.
The process of creating the chain also helps develop counting skills and fine motor coordination.
Tips for Success:
- Make strips about 1 inch wide and 6 inches long for easy handling.
- Use a glue stick instead of tape for a neater appearance.
- Number the links in reverse so you remove link 1 on December 1st.
- Hang the chain in a special place where it’s easy to reach daily.
6. Salt Dough Ornaments
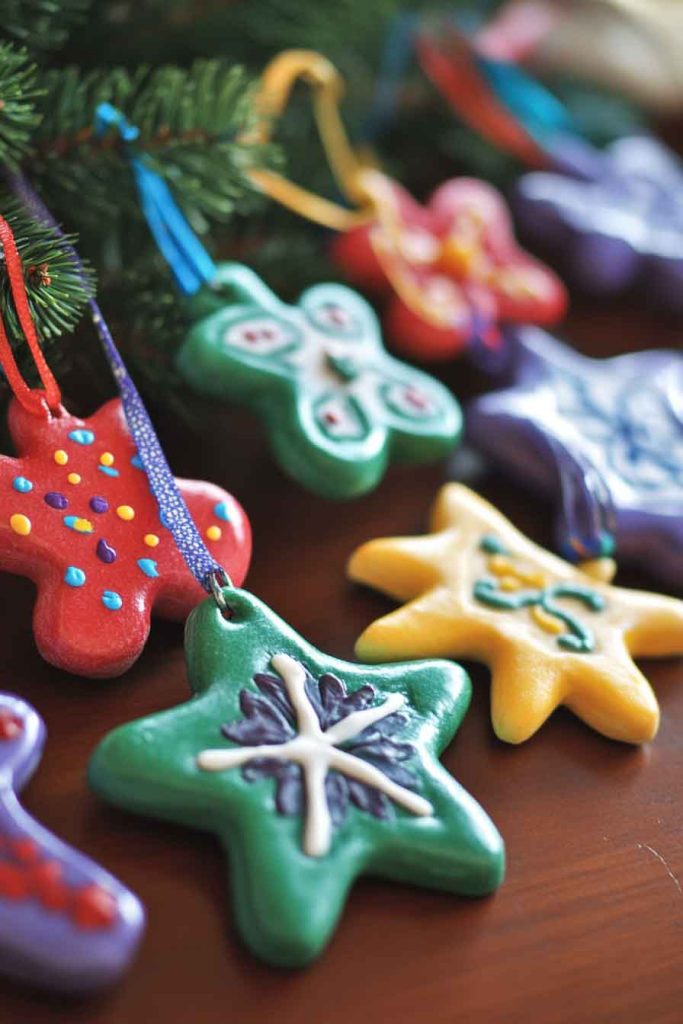
Homemade salt dough ornaments become family treasures that can be enjoyed for years to come. Children mix flour, salt, and water to create dough, roll it out, and use cookie cutters to make festive shapes.
After baking and cooling, they paint the ornaments in bright colors, add details with markers, and finish with a clear sealant for durability.
The hands-on experience of making the dough from scratch teaches children about measurements and following recipes. Kneading and rolling the dough provides excellent sensory input and strengthens hand muscles.
The finished ornaments are substantial and beautiful, often becoming cherished decorations that families bring out year after year.
Tips for Success:
- Use the recipe: 2 cups flour, 1 cup salt, 1 cup water.
- Poke holes for ribbons before baking.
- Bake at 200°F for 2-3 hours until completely hard.
- Store in airtight containers to prevent moisture damage.
7. Pinecone Christmas Trees

Nature meets craft in these charming pinecone Christmas trees that bring the outdoors inside. Children paint pinecones green, sprinkle glitter while the paint is wet, and add tiny pom-poms as colorful ornaments.
A small star or bead glued to the top completes these miniature trees that look beautiful displayed on tables or shelves.
Collecting pinecones can be an adventure in itself, making this craft start with an outdoor exploration. The natural texture of pinecones creates interesting visual effects when painted.
This project works well for children of all ages and can be adapted to different skill levels by varying the decoration complexity.
Tips for Success:
- Choose pinecones that are open and dry.
- Use acrylic paint for better coverage on the rough surface.
- Let paint dry completely before adding embellishments.
- Create a forest of trees in different sizes for a magical display.
8. Cotton Ball Snowman
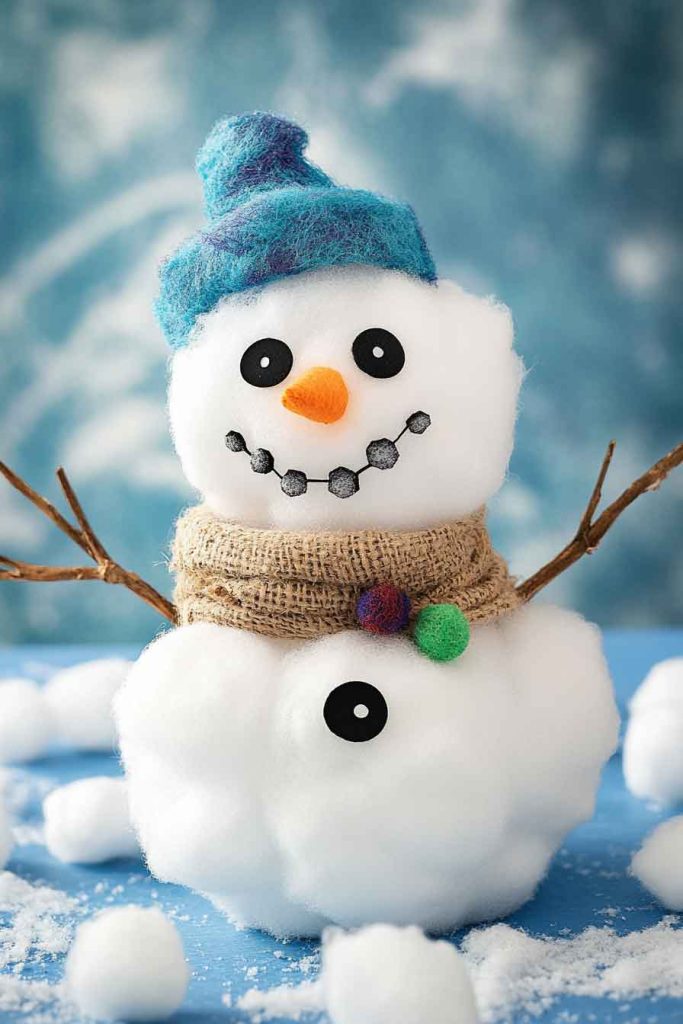
These puffy snowmen are as soft as real snow and absolutely adorable! Children glue cotton balls onto blue construction paper to form a snowman shape, add button eyes and mouth made from black paper, and create arms with small twigs or brown paper.
A colorful paper scarf and hat complete this cozy winter character.
The fluffy texture of cotton balls makes this craft especially appealing to young children who love tactile experiences. Arranging the cotton balls to create the snowman’s body helps develop spatial awareness and planning skills.
The finished artwork has a three-dimensional quality that makes it stand out from flat paper crafts.
Tips for Success:
- Draw a light pencil outline of the snowman first.
- Use plenty of glue to secure the cotton balls firmly.
- Pull cotton balls slightly apart for fluffier coverage.
- Frame the finished snowman for a special keepsake.
9. Jingle Bell Bracelet
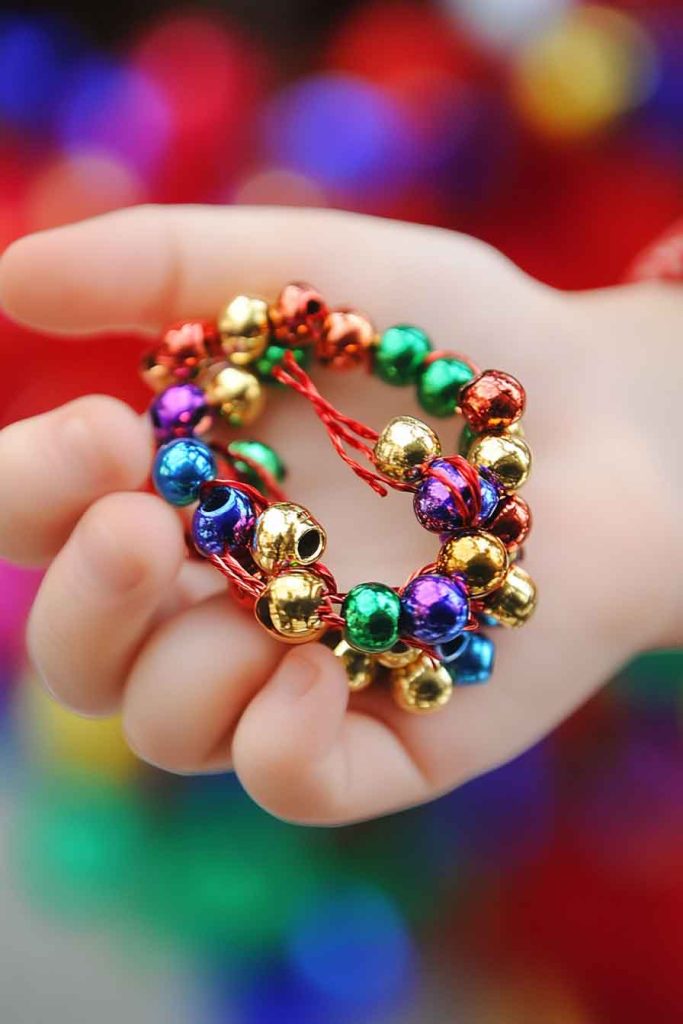
These festive jingle bell bracelets turn children into walking music makers! Kids thread jingle bells onto pipe cleaners along with colorful beads, then twist the ends together to create a wearable bracelet.
Every movement creates delightful tinkling sounds that capture the spirit of Christmas.
This craft combines jewelry making with sensory play, as the bells provide immediate auditory feedback. Threading beads and bells helps develop fine motor skills and hand-eye coordination.
Children love wearing their creations and showing them off at holiday gatherings.
Tips for Success:
- Measure the pipe cleaner around the child’s wrist before starting.
- Alternate bells and beads for visual interest.
- Twist ends securely to prevent bells from sliding off.
- Make matching sets for friends or siblings.
10. Yarn-Wrapped Christmas Tree
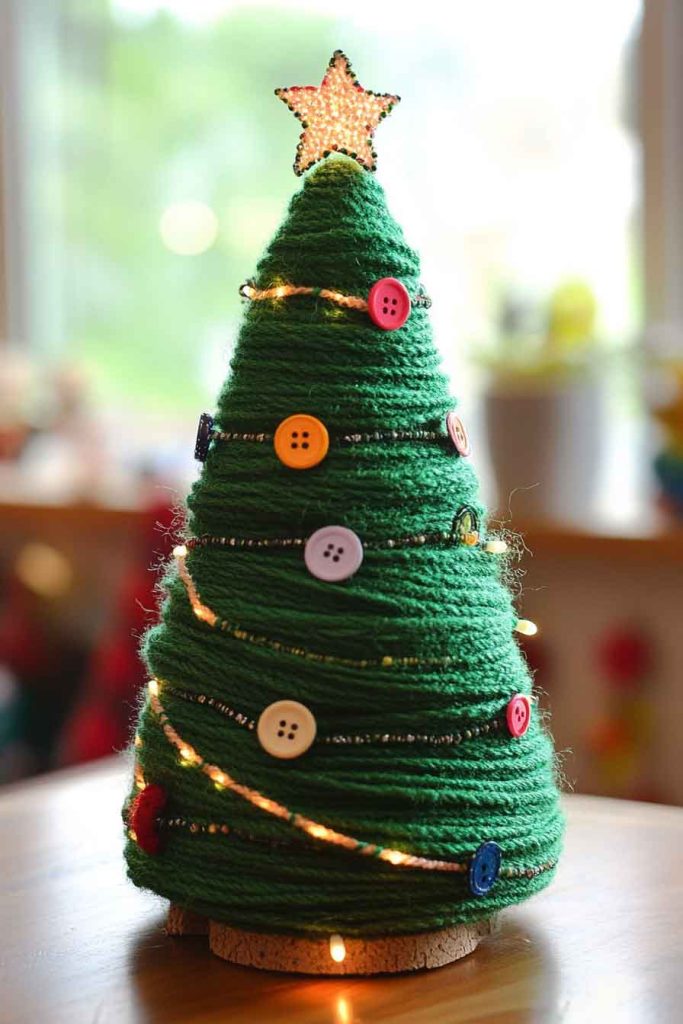
A yarn-wrapped Christmas tree creates a textured masterpiece that’s both simple and stunning. Children cut a triangle from cardboard, wrap green yarn around it in various directions, and secure the ends with tape on the back.
Small buttons, sequins, or beads glued on as ornaments add color and sparkle to the fuzzy tree.
The repetitive motion of wrapping yarn is calming and meditative for children while building their concentration and patience. Watching the plain cardboard transform into a colorful, textured tree is incredibly satisfying.
This craft works well for developing fine motor control in preschoolers.
Tips for Success:
- Cut small notches along the triangle edges to help keep yarn in place.
- Use tacky glue to secure yarn ends on the back.
- Try different wrapping patterns for unique looks.
- Add a small star sticker at the top for the perfect finishing touch.
11. Egg Carton Christmas Wreath
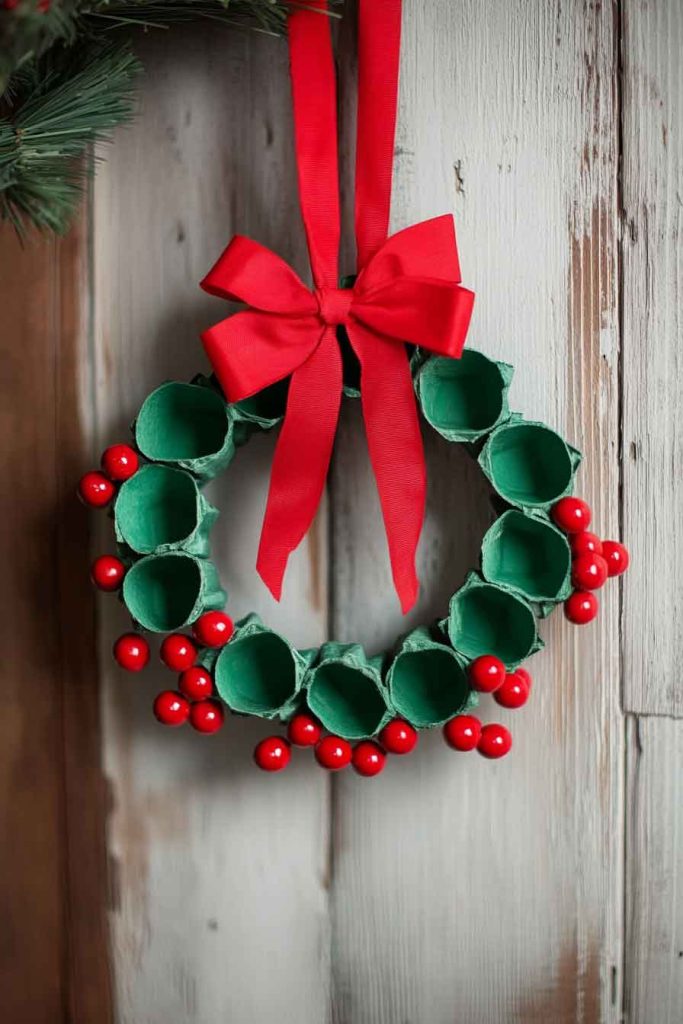
Upcycling egg cartons into a festive wreath teaches children about sustainability while creating beautiful decorations. Kids cut individual egg cups, paint them green or red, and arrange them in a circle on a paper plate base.
Adding a bright red bow and small decorative berries creates a wreath that rivals store-bought versions.
This craft demonstrates how ordinary objects can become extraordinary with creativity. The different shapes and angles of the egg cups create interesting texture and dimension.
Working with unusual materials encourages children to think creatively about everyday items.
Tips for Success:
- Use a sturdy paper plate as the base for stability.
- Paint egg cups before cutting for easier handling.
- Layer the egg cups for a fuller, more dimensional wreath.
- Hang with a ribbon loop attached to the back.
12. Candy Cane Reindeer
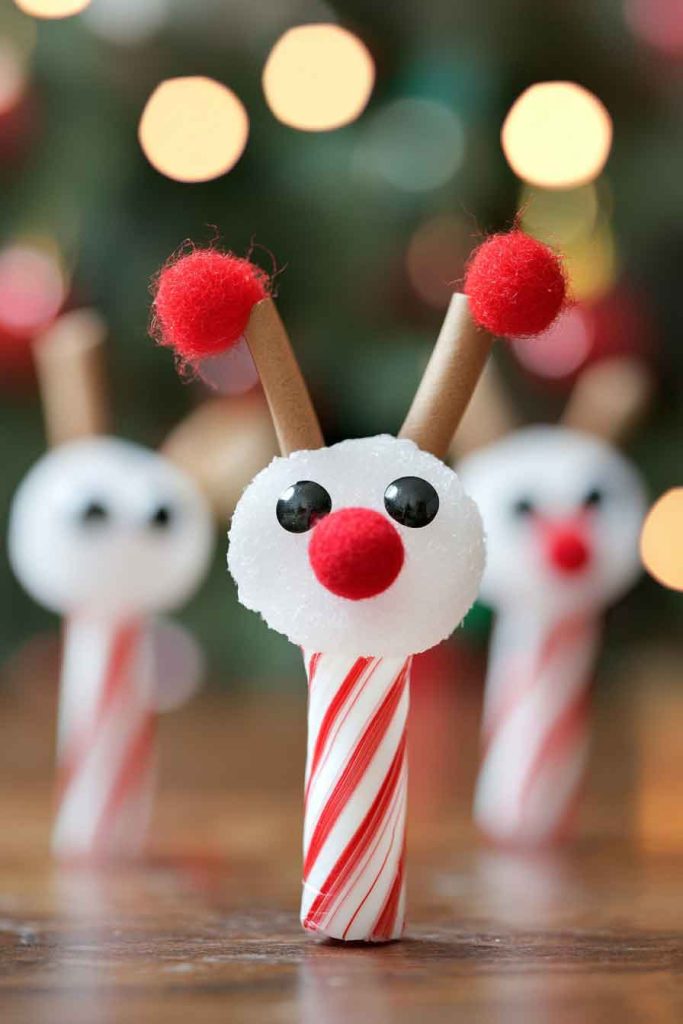
These adorable candy cane reindeer combine a sweet treat with a cute craft! Children glue googly eyes, a red pom-pom nose, and small antlers cut from brown pipe cleaners onto a candy cane.
A tiny red ribbon tied at the neck adds a festive collar, creating a decoration that’s almost too cute to eat.
This quick and easy craft is perfect for classroom parties or last-minute gift additions. The instant gratification of the finished product keeps young crafters engaged and excited.
These reindeer make excellent party favors or gift toppers for presents.
Tips for Success:
- Use wrapped candy canes to keep them fresh and clean.
- Apply glue carefully to avoid getting it on the candy.
- Make several at once for party favors or class gifts.
- Attach to gift packages as edible ornaments.
13. Handprint Wreath
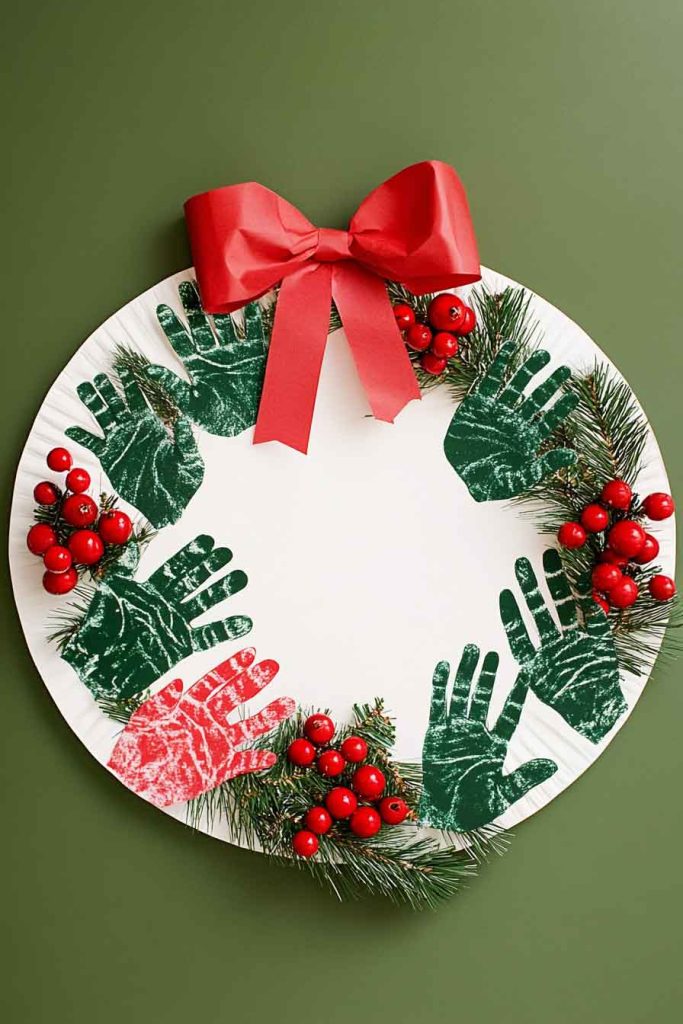
A handprint wreath captures multiple memories in one beautiful decoration! Children trace and cut out several handprints from green construction paper, arrange them in a circle overlapping slightly, and glue them onto a paper plate with the center cut out.
Red paper berries and a bow complete this personal wreath that families treasure for years.
This craft is especially meaningful when made with multiple family members’ handprints, creating a collaborative family project. Seeing all the different hand sizes arranged together celebrates the family unit.
The wreath becomes a time capsule, showing how small hands were at that particular Christmas.
Tips for Success:
- Use different shades of green for visual depth.
- Overlap handprints generously for a full wreath appearance.
- Write each family member’s name on their handprint.
- Create one every year to show growth over time.
14. Clothespin Angel

Transform simple clothespins into heavenly angels with this charming craft! Children paint wooden clothespins, add a small wooden bead for the head, and glue on paper doily wings.
A gold pipe cleaner halo and a tiny ribbon dress complete these miniature angels that can clip onto Christmas trees or stand on surfaces.
The small scale of this craft teaches children about working with delicate materials and paying attention to detail. Creating something beautiful from basic supplies sparks imagination.
These angels make wonderful gifts for neighbors, teachers, or church friends.
Tips for Success:
- Use regular wooden clothespins, not plastic ones.
- Apply paint in thin layers to prevent dripping.
- Secure the halo with a dot of hot glue (adult supervision needed).
- Display a choir of angels on a shelf or mantel.
15. Paper Bag Gingerbread House
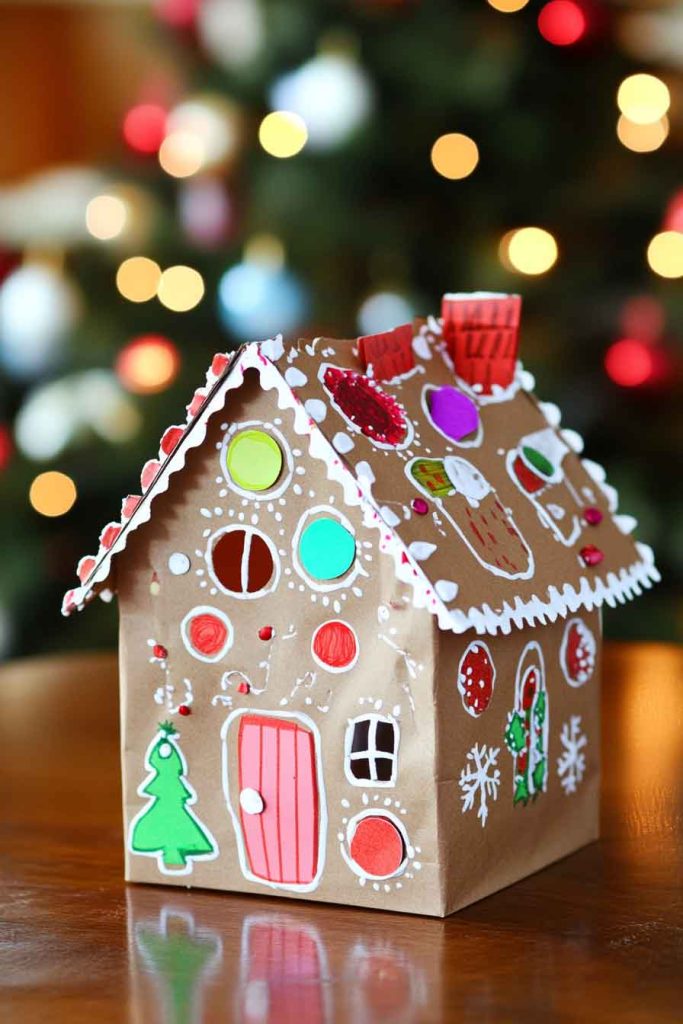
A paper bag gingerbread house brings the classic Christmas tradition to life in an easy, mess-free way! Children decorate a brown paper lunch bag with cut-out paper windows, doors, and candy shapes.
Drawing icing details with white markers or paint pens adds the finishing touches to this three-dimensional house that can be stuffed with treats.
This craft eliminates the frustration and complexity of real gingerbread house construction while maintaining all the creative fun. Children can design their dream house without worrying about walls collapsing.
The bags can be filled with small toys or candy as special surprises.
Tips for Success:
- Open the bag fully for easier decorating.
- Use templates for windows and doors for consistent shapes.
- Add glitter glue for sparkly snow effects.
- Fill with tissue paper to help the house stand up better.
16. Pom-Pom Garland
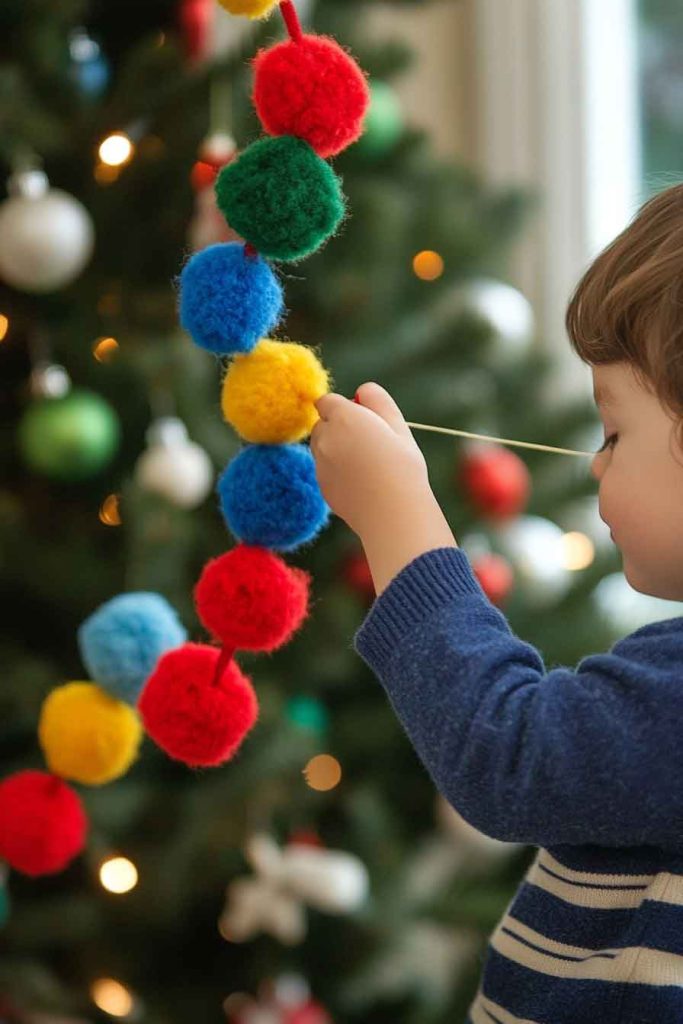
Creating a pom-pom garland is simple, colorful, and perfect for little hands! Children string purchased pom-poms in Christmas colors onto yarn or ribbon using a plastic needle.
Alternating colors and sizes creates a festive decoration that can drape across mantels, windows, or Christmas trees.
Threading pom-poms develops fine motor skills and teaches pattern recognition. The forgiving nature of pom-poms makes this craft less frustrating than traditional beading.
The finished garland adds instant cheer to any room and can be reused for many Christmases.
Tips for Success:
- Use a plastic darning needle with a large eye.
- Tie a large button or pom-pom at the string end to prevent sliding.
- Make garlands several feet long for dramatic impact.
- Store by rolling around cardboard for next year.
17. Cupcake Liner Christmas Tree
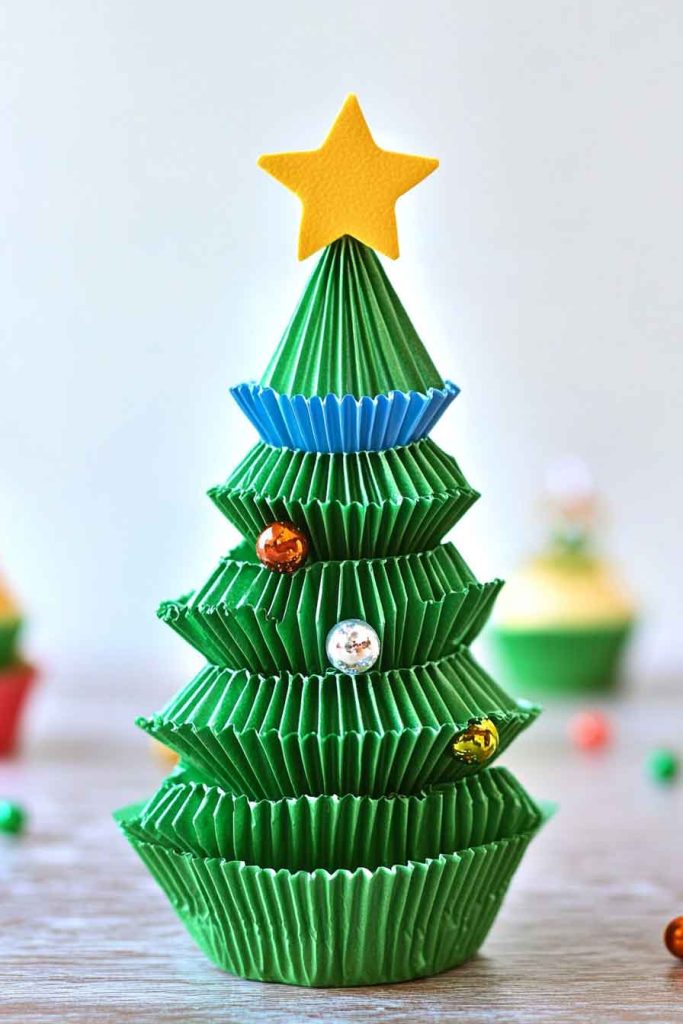
Cupcake liner Christmas trees are colorful, textured, and surprisingly impressive! Children fold green cupcake liners in half, then glue them onto a triangle-shaped piece of cardboard in overlapping rows.
Adding small beads, sequins, or stickers as ornaments and a yellow star on top creates a three-dimensional tree with beautiful depth.
The folded liners create natural texture and shadow that makes the tree look professional. This craft introduces children to the concept of layering and dimension.
The finished trees are sturdy enough to stand on their own when propped against a wall.
Tips for Success:
- Start with the largest liners at the bottom.
- Overlap each row slightly for a fuller appearance.
- Use different shades of green for added interest.
- Make trees in multiple sizes for a forest display.
18. Melted Crayon Ornaments
Melted crayon ornaments create stunning stained-glass effects that glow beautifully when hung in windows! Children place crayon shavings between two pieces of wax paper, adults carefully apply heat with an iron, and the melted crayons create colorful swirled patterns.
Cutting the cooled wax paper into Christmas shapes and adding ribbons creates unique ornaments.
This craft produces impressive results that look like professional art pieces. Watching the crayons melt and blend fascinates children and demonstrates the science of how heat changes materials.
Each ornament is completely unique with its own color patterns.
Tips for Success:
- Use a crayon sharpener to create fine shavings.
- Place towels above and below the wax paper when ironing.
- Adults should handle all ironing steps.
- Hang in windows to showcase the translucent colors.
19. Foam Sticker Christmas Cards
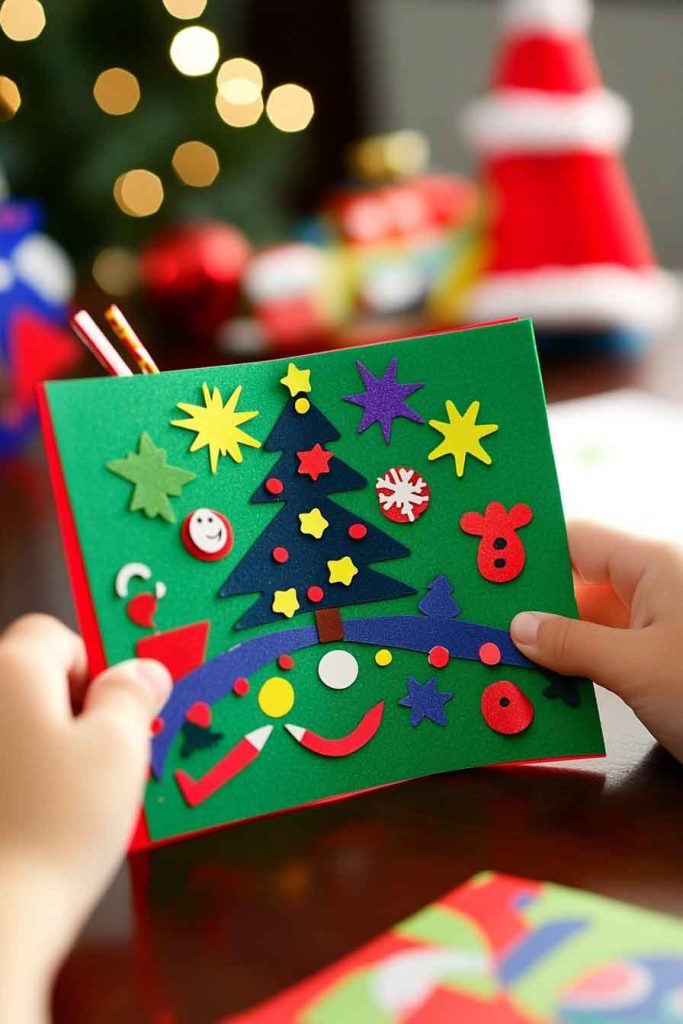
Creating foam sticker Christmas cards allows children to make dozens of cards quickly for friends and family! Kids fold cardstock in half, arrange foam stickers in festive designs, and add hand-drawn details with markers.
Writing personal messages inside makes these simple cards special and heartfelt.
Foam stickers are easy for small hands to peel and stick, providing instant satisfaction without the mess of glue. Children can create elaborate scenes or simple designs based on their age and interest.
Making cards for others teaches the joy of giving and spreads holiday cheer.
Tips for Success:
- Pre-fold cards to make assembly easier.
- Provide a variety of foam sticker shapes and colors.
- Encourage children to sign their names for a personal touch.
- Make extra cards to have on hand for unexpected gift-giving.
20. Ribbon Candy Cane

Transform ordinary ribbons into elegant candy cane decorations! Children glue red and white ribbon strips onto a candy cane shape cut from sturdy cardboard, creating a striped effect.
Adding a ribbon loop at the top creates a beautiful ornament with a sophisticated look.
This craft introduces children to creating patterns through color repetition. The ribbon’s smooth texture creates an elegant finished product that looks impressive displayed anywhere.
Varying the ribbon widths and patterns allows children to experiment with different designs.
Tips for Success:
- Cut ribbon strips the same width for uniform stripes.
- Apply glue to the cardboard rather than the ribbon.
- Press firmly to secure ribbons without wrinkles.
- Seal with mod podge for a glossy, durable finish.
21. Sock Snowman
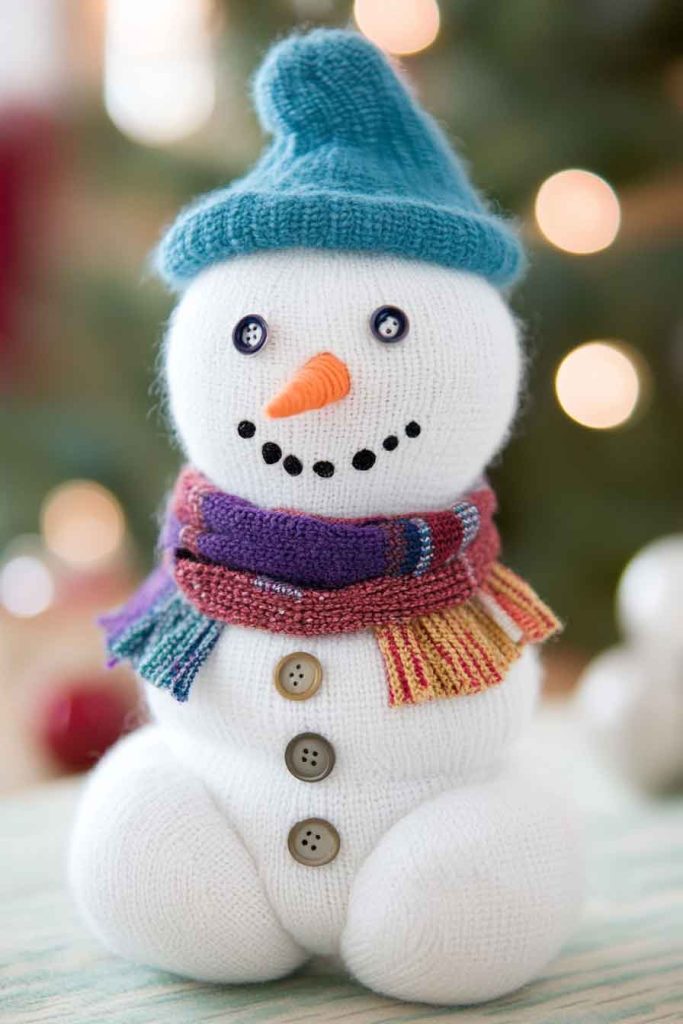
A sock snowman is the coziest craft around! Children fill a white sock with rice, tie it into sections with rubber bands to create the snowman’s body, and decorate with buttons, fabric scraps, and a tiny hat.
These adorable snowmen have weight and substance, making them perfect shelf or table decorations.
This craft teaches children about creating three-dimensional objects and working with fabric materials. The tactile experience of filling and shaping the sock is engaging for hands-on learners.
Sock snowmen make excellent gifts for grandparents or teachers.
Tips for Success:
- Use crew socks for taller snowmen.
- Fill with dry rice, beans, or poly-fil stuffing.
- Tie rubber bands tightly to define the sections clearly.
- Accessorize with small scarves and miniature hats.
22. Star Wands

Magical star wands bring fairy tale enchantment to Christmas! Children decorate large cardboard stars with glitter, sequins, and paint, then attach them to wooden dowels or sturdy straws.
Ribbons tied just below the star flutter beautifully with every movement, creating a toy that’s also a decoration.
These wands inspire imaginative play and become treasured toys during the holiday season. Creating their own magical prop empowers children and encourages creative storytelling.
Star wands are perfect for holiday photo props or as gifts for friends.
Tips for Success:
- Cut two identical stars and sandwich the stick between them.
- Apply glitter generously over glue for maximum sparkle.
- Use several colors of ribbons for a rainbow effect.
- Make wands in different sizes for variety.
23. Button Christmas Tree Card
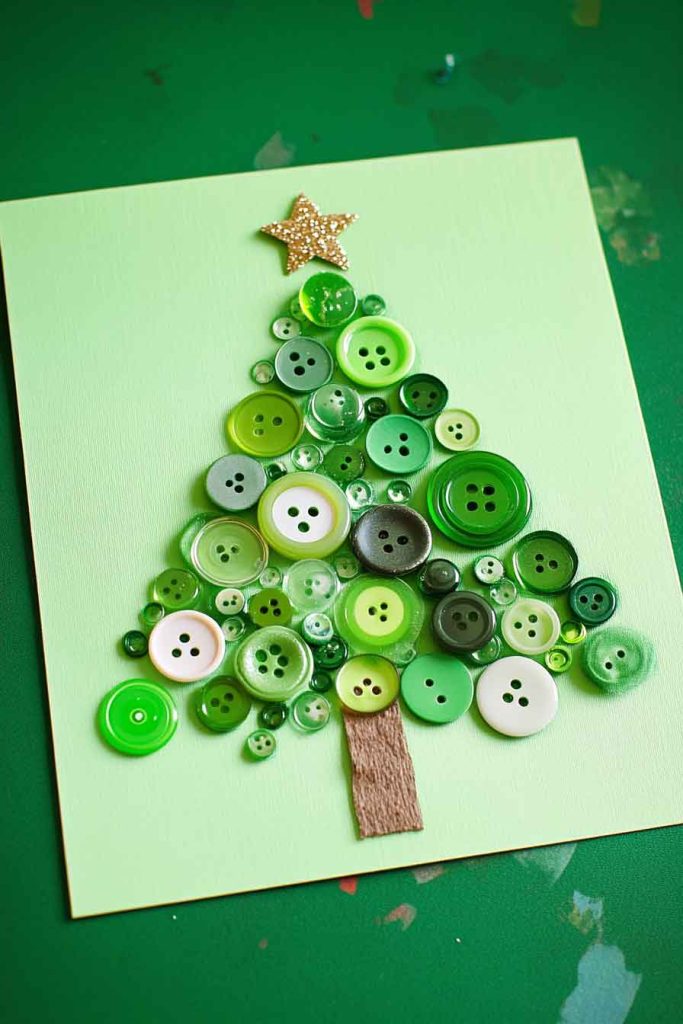
Button Christmas tree cards combine the charm of mixed media art with personal crafting! Children arrange green buttons in a triangle tree shape on a card, glue them in place, and add a small star button or sticker on top.
A simple brown marker line becomes the trunk, creating a textured card that’s tactile and beautiful.
Sorting and arranging buttons helps children develop color recognition and spatial planning skills. The different sizes and shades of green buttons create natural depth and interest.
These cards stand out from typical printed cards and show genuine handmade effort.
Tips for Success:
- Collect buttons in various sizes and shades of green.
- Use craft glue for secure button attachment.
- Add hand-drawn ornaments between buttons for color pops.
- Back the card with coordinating colored paper for contrast.
24. Paper Roll Christmas Village
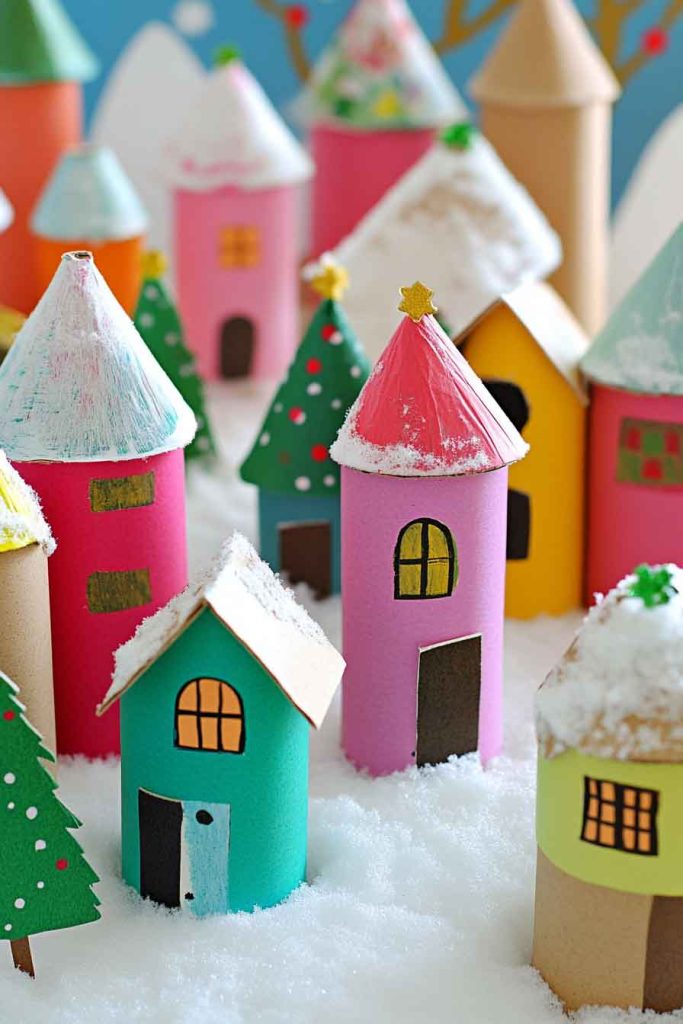
Create an entire Christmas village from toilet paper and paper towel rolls! Children paint rolls in various colors, cut out windows and doors, and add cone-shaped roofs made from construction paper.
Arranging the buildings together on a base creates a miniature town that sparks imaginative play.
Building a village teaches children about communities and how different buildings work together. This craft can extend over several days as children add details and new structures.
The village becomes a centerpiece that doubles as a toy for small figurines.
Tips for Success:
- Use different height rolls for variety.
- Add cotton ball snow on the roofs.
- Create a base with white paper for snow-covered ground.
- Add trees made from green paper cones for landscaping.
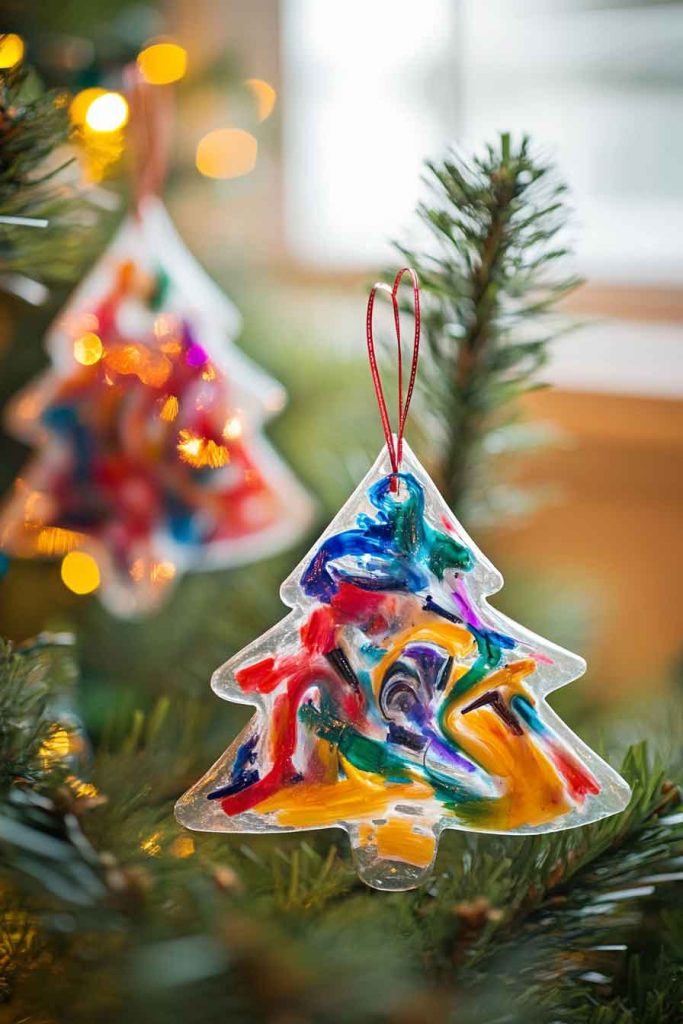
25. Glitter Ornament
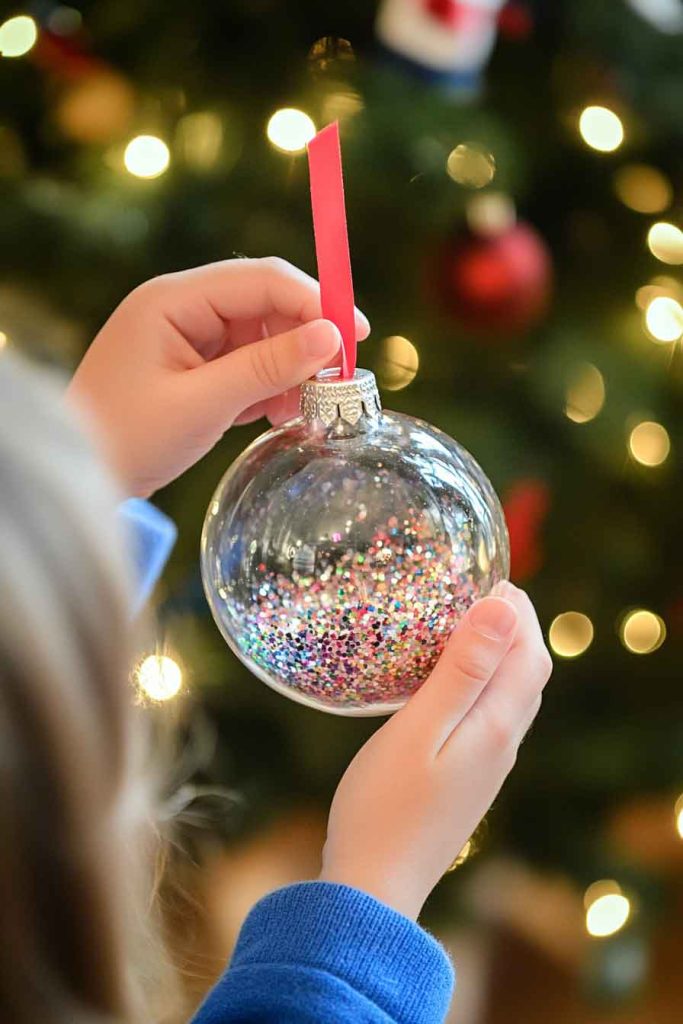
Making glitter ornaments is messy fun that creates dazzling results! Children brush glue onto clear plastic ornaments, pour glitter inside, shake to coat the interior, and dump out excess.
Adding ribbons and bows creates professional-looking ornaments that catch the light beautifully on the Christmas tree.
The sparkle and shine of glitter ornaments delights children and teaches cause and effect as they watch the glitter coat the inside surface. This craft allows for endless color combinations.
Personalize ornaments with children’s names written in glue before adding glitter.
Tips for Success:
- Work over a tray to contain glitter mess.
- Use a funnel to pour glitter into the ornament easily.
- Let glue dry completely before displaying.
- Store in egg cartons to prevent damage.
26. Felt Stocking Ornaments
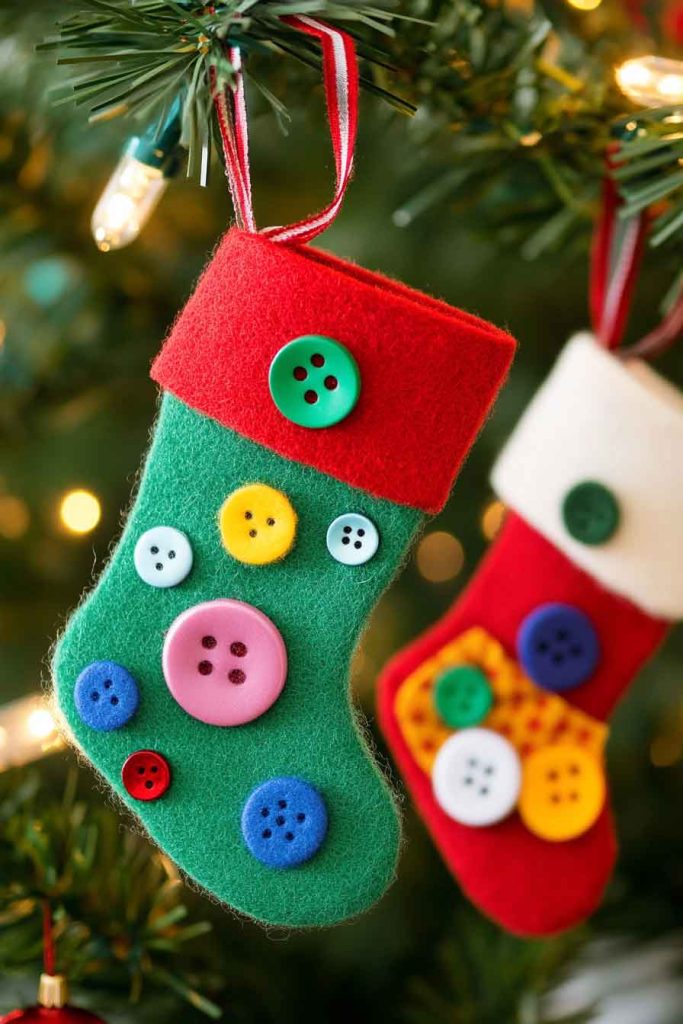
Mini felt stockings are sweet ornaments that children can personalize endlessly! Kids cut two stocking shapes from felt, glue or stitch the edges together leaving the top open, and decorate with foam shapes, buttons, sequins, and ribbon.
Adding the child’s name turns these into keepsake ornaments or gift tags.
Working with felt introduces children to fabric crafts in a beginner-friendly way. The material is easy to cut and doesn’t fray, making it perfect for young crafters.
These stockings can hold small treats or remain decorative ornaments.
Tips for Success:
- Use pinking shears for decorative edges.
- Provide craft glue suitable for fabric.
- Make stockings in family members’ favorite colors.
- Attach ribbon loops for hanging.
27. Pasta Christmas Tree
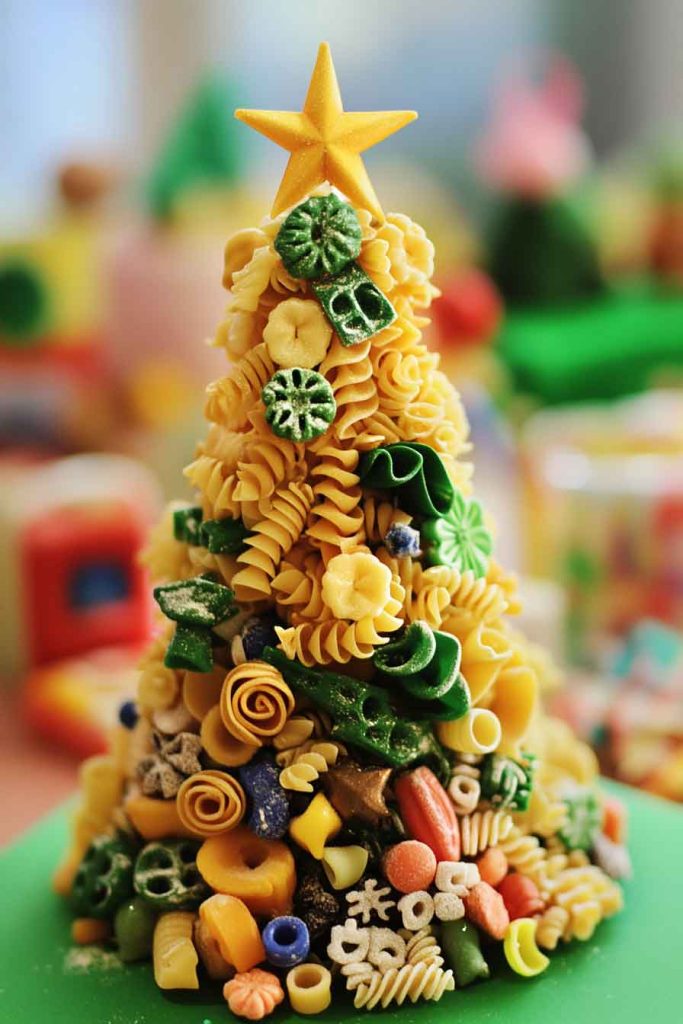
A pasta Christmas tree proves that craft supplies are everywhere in your home! Children glue various pasta shapes onto a cardboard cone or triangle in overlapping layers, spray paint the entire tree green or gold, and decorate with small beads or glitter.
The textured surface and unique shape of each pasta piece creates interesting visual effects.
This craft encourages children to see ordinary objects as art supplies and think creatively. The variety of pasta shapes available allows each child to create a completely unique tree.
Painted pasta trees look surprisingly sophisticated and professional.
Tips for Success:
- Use different pasta shapes for varied textures.
- Hot glue works best for securing pasta (adult supervision needed).
- Spray paint outside or in a well-ventilated area.
- Add a star on top for the classic finishing touch.
28. Fingerprint Ornament Keepsake
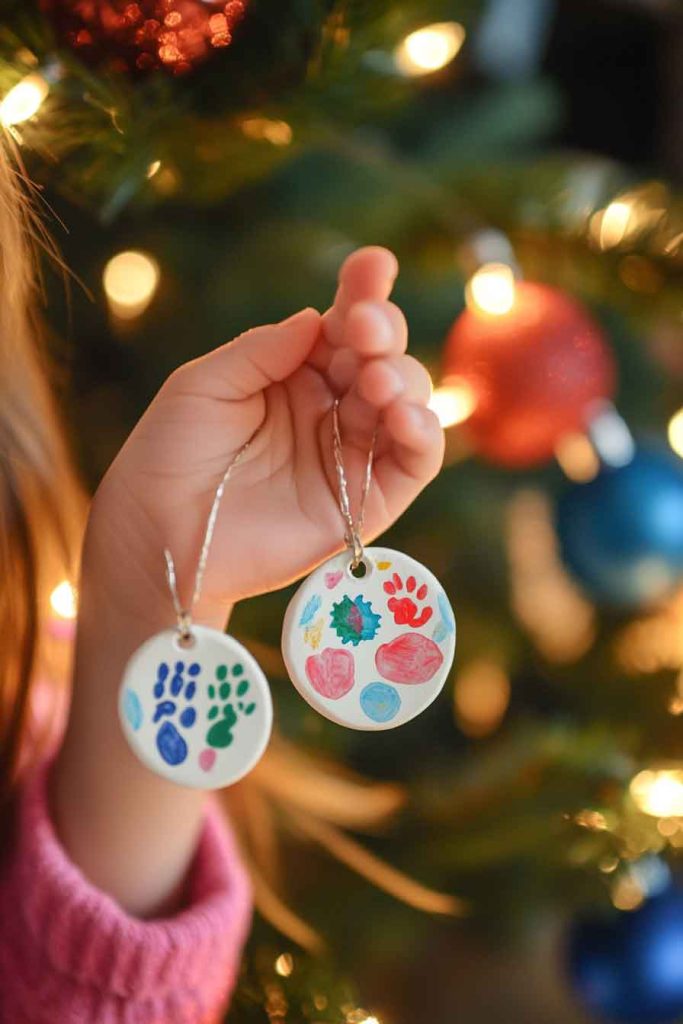
Fingerprint ornaments preserve precious memories in a beautiful, artistic way! Children press their painted fingertips onto ceramic or salt dough ornaments in colorful patterns, add the year, and seal with varnish.
These ornaments become treasured keepsakes that document how small their fingers were at each age.
Creating fingerprint art helps children understand that their unique prints make one-of-a-kind artwork. Parents and grandparents especially cherish these personalized ornaments.
Making one each year creates a collection that tells the story of childhood growth.
Tips for Success:
- Use washable paint for easy cleanup.
- Press gently for clear fingerprint impressions.
- Let paint dry completely before sealing.
- Include the child’s name and date on the back.
29. Clothespin Wreath
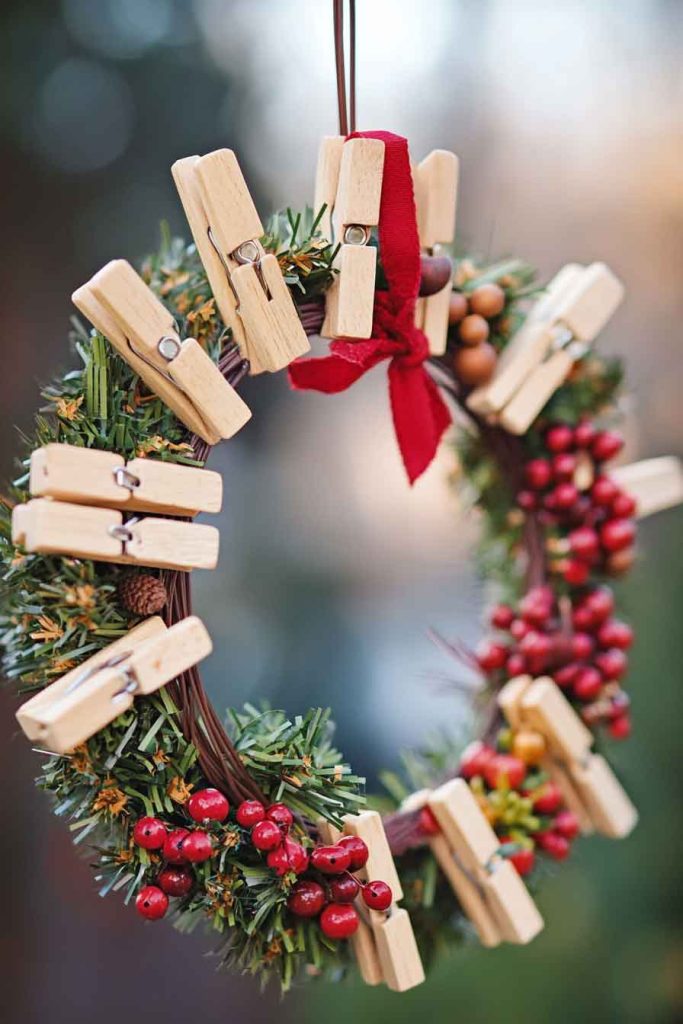
A clothespin wreath creates a surprisingly elegant decoration from humble materials! Children clip painted clothespins around a wire wreath frame, add small decorations between the pins, and finish with a beautiful ribbon bow.
The natural wood texture combined with festive colors creates a rustic yet refined wreath.
This craft teaches children about creating circular patterns and working with structural frameworks. Clipping the clothespins strengthens hand muscles and develops pincer grip.
The wreath can be modified each year by changing colors or decorations.
Tips for Success:
- Paint clothespins before attaching for easier handling.
- Use a wire frame designed for clothespin wreaths.
- Space pins evenly around the frame for balance.
- Add small jingle bells between pins for sound and movement.
30. Snow Globe Craft

Creating a magical snow globe captures winter wonder in a jar! Children glue a small Christmas figurine to the inside of a jar lid, fill the jar with water and glitter, and screw the lid tight.
Turning the jar upside down makes the glitter swirl like falling snow around the decoration.
This craft combines science with art as children learn about density and how glitter suspends in water. Watching their snow globe come to life with swirling “snow” provides immediate satisfaction.
Snow globes become special decorations that children request to display year after year.
Tips for Success:
- Use waterproof glue to attach the figurine securely.
- Add a drop of glycerin to slow the glitter fall.
- Fill jar completely to avoid air bubbles.
- Test seal for leaks before turning over.
Conclusion
Creating Christmas crafts with children is one of the most rewarding parts of the holiday season. Each project in this collection offers opportunities for learning, creativity, and making precious memories together.
Whether you choose simple projects for toddlers or more involved crafts for older children, the time spent creating these decorations becomes as special as the finished products themselves. These crafts develop important skills while celebrating the magic of Christmas.
Don’t hesitate to adapt these ideas to your child’s interests and abilities. The most important ingredient in any craft project is the joy of creating together. Start crafting today and watch as your home fills with handmade treasures that tell the story of your family’s Christmas celebrations!