30 Christmas Decor DIY Ideas: Creating Magical Holiday Moments at Home

Decorating for Christmas is more than just hanging ornaments and stringing lights; it’s about creating warm memories, expressing creativity, and bringing joy into your home. Handmade decorations add a personal touch that store-bought items simply cannot match, reflecting your unique style while creating a cozy, festive atmosphere.
The DIY Christmas decor approach embraces creativity, sustainability, and the joy of making something beautiful with your own hands. These projects not only save money but also provide wonderful opportunities to spend quality time with family and friends.
This article explores a variety of creative DIY Christmas decoration ideas, showcasing how different projects cater to various skill levels and design preferences. From rustic farmhouse charm to elegant winter wonderlands, each idea has its own distinct character while celebrating the magic of the holiday season.
Join us on this festive journey as we delve into 30 inspiring Christmas decor DIY projects, each offering step-by-step guidance and practical tips for transforming your home into a holiday haven.
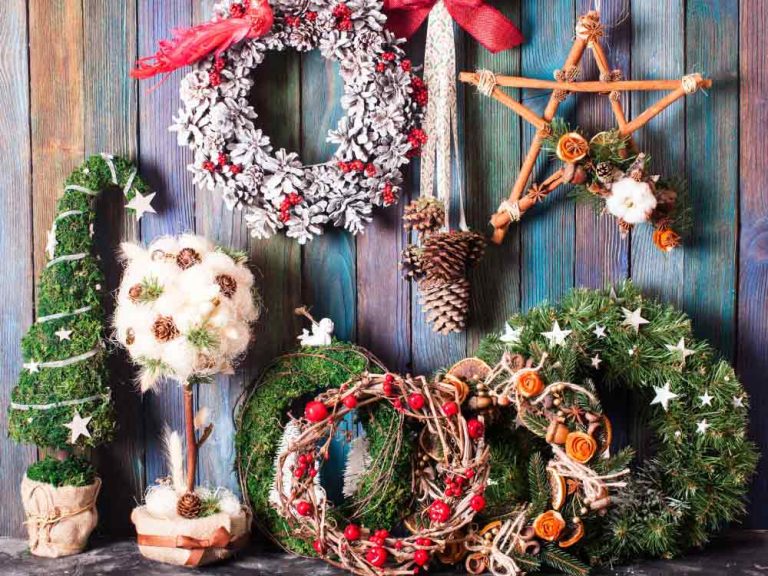
1. Rustic Pinecone Wreath with Red Ribbon
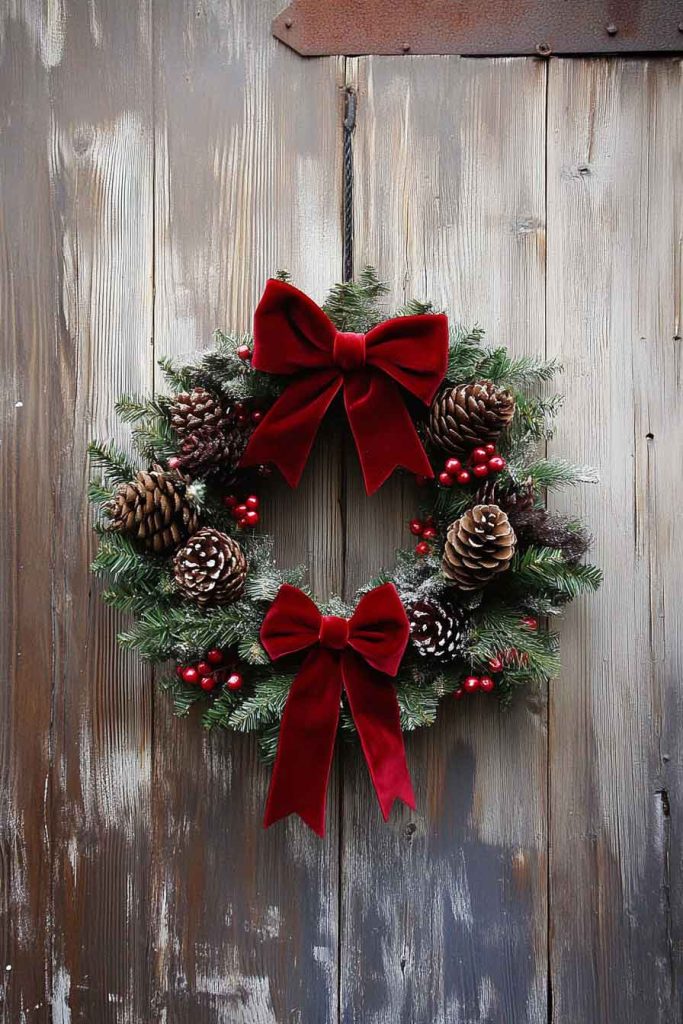
Imagine creating a beautiful wreath using natural pinecones gathered from your backyard or local park. This rustic decoration features pinecones arranged in a circular pattern on a wire frame, accented with a bold red velvet ribbon that adds a pop of traditional Christmas color.
Small sprigs of artificial or real evergreen branches peek through the pinecones, while tiny red berries add delicate touches of festive charm. The natural brown tones of the pinecones create a warm, earthy foundation that complements any front door or interior wall.
This wreath design celebrates the beauty of natural materials and brings the outdoors inside. The texture of the pinecones creates visual interest, while the red ribbon provides a classic Christmas touch that never goes out of style.
How to Create:
- Collect pinecones and clean them thoroughly, baking at low temperature to remove insects.
- Use a wire wreath frame as your foundation for easy assembly.
- Hot glue pinecones around the frame, layering them for fullness and depth.
- Add a large bow with red velvet ribbon and tuck in evergreen sprigs for color.
2. Mason Jar Snow Globes with Miniature Christmas Scenes
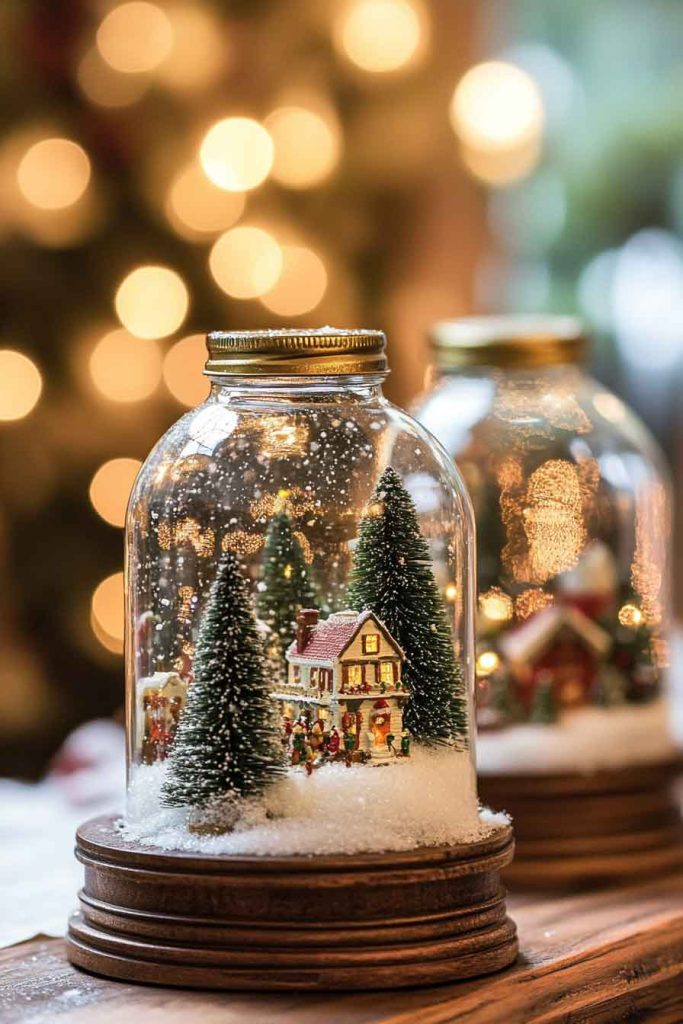
Transform ordinary mason jars into magical snow globes featuring tiny Christmas villages, miniature trees, or festive figurines. These charming decorations use glycerin-water mixture and artificial snow to create a swirling winter wonderland effect when shaken.
The glass jars sit on rustic wooden bases, with lids painted in metallic gold or silver for an elegant finish. Small LED tea lights placed nearby make the scenes glow warmly, creating cozy ambiance on mantels or side tables.
These personalized snow globes make wonderful gifts and allow for endless creativity. Each jar can tell a different story, from Santa’s workshop to a peaceful winter forest scene, making them perfect conversation starters during holiday gatherings.
How to Create:
- Choose mason jars in various sizes for visual variety.
- Glue miniature figurines securely to the inside of jar lids using waterproof adhesive.
- Fill jars with distilled water, glycerin, and artificial snow or glitter.
- Seal lids tightly and turn upside down for a magical snow globe effect.
3. Cinnamon Stick Candle Holders with Twine
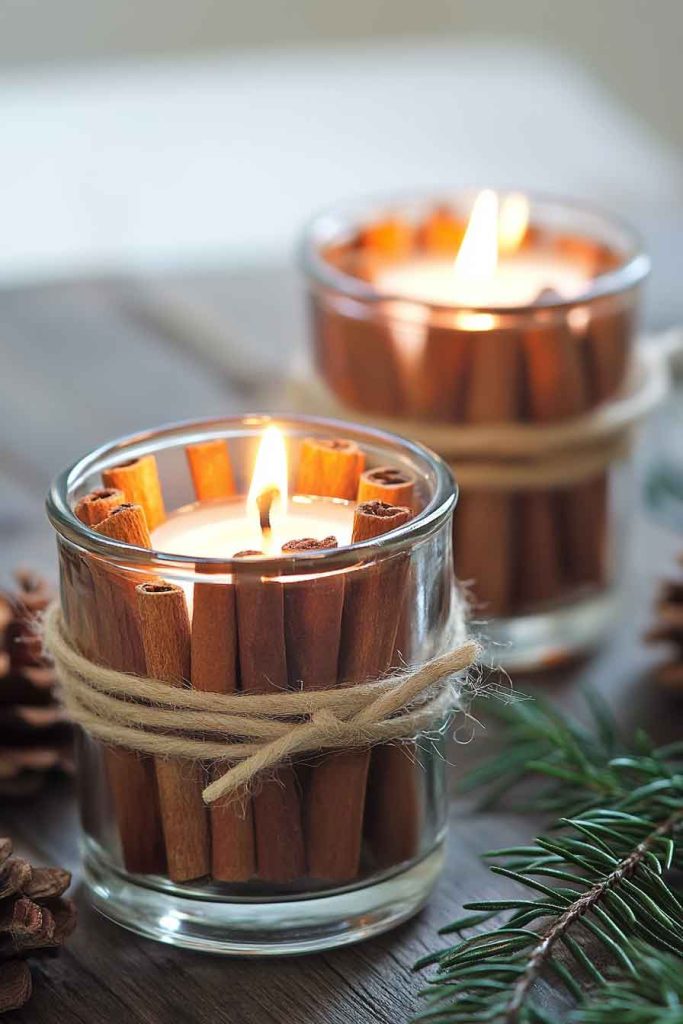
These aromatic candle holders combine cinnamon sticks bundled around plain glass vases or jars, secured with natural twine or jute rope. When candles are lit, the gentle heat releases the warm, spicy scent of cinnamon throughout your home.
Red or white pillar candles nestle inside the cinnamon-wrapped holders, creating a beautiful contrast between the natural brown sticks and festive candle colors. Small sprigs of fresh rosemary or dried orange slices can be tucked into the twine for additional visual and aromatic interest.
This design brings multiple senses into the holiday experience, combining visual beauty with the comforting scent of Christmas spices. The natural materials create a cozy, farmhouse-style aesthetic that works beautifully with various decor themes.
How to Create:
- Select glass vases or jars that match your candle sizes perfectly.
- Cut cinnamon sticks to match the height of your containers.
- Secure sticks around the glass using hot glue, then wrap with twine.
- Place pillar candles inside and add decorative elements like dried citrus or herbs.
4. Paper Snowflake Window Decorations
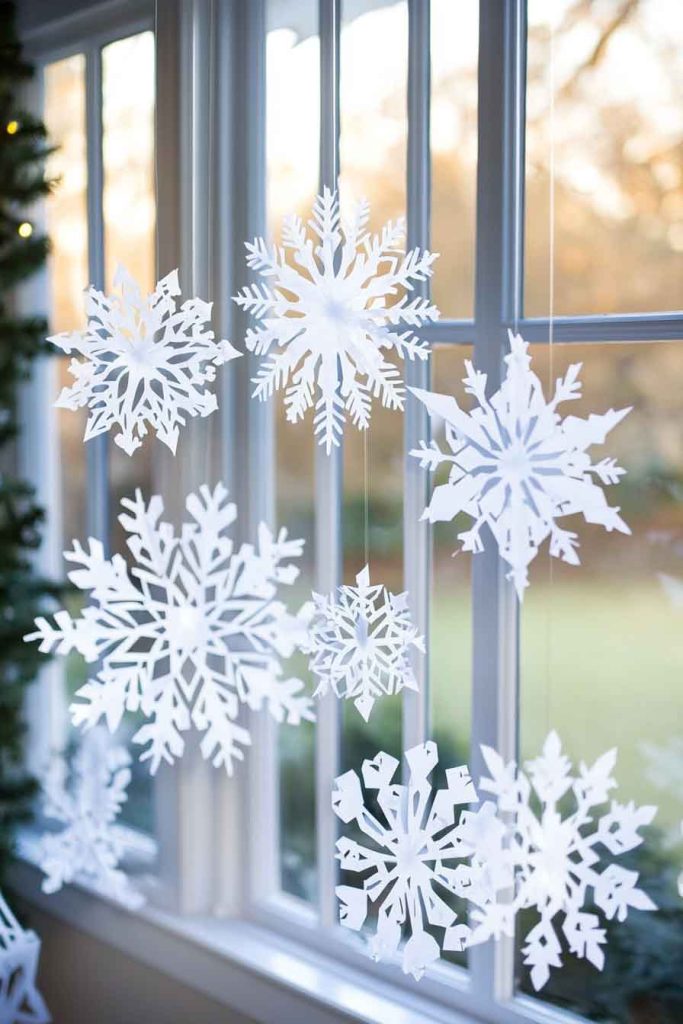
Create intricate paper snowflakes in various sizes and patterns to decorate windows and create beautiful silhouettes when backlit by winter sunlight. These delicate decorations use white or light blue paper, cut into unique designs that transform ordinary windows into works of art.
The snowflakes hang at different heights using invisible fishing line, creating depth and movement as they catch the breeze from heating vents. When illuminated by natural light or string lights, they cast beautiful shadows that dance across walls and floors.
This classic DIY project is perfect for families with children, offering opportunities for creativity and fine motor skill development. Each snowflake becomes a unique piece of art, and making them together creates lasting holiday memories.
How to Create:
- Use crisp white paper or cardstock for best results and durability.
- Fold paper into triangles and cut intricate patterns along the edges.
- Hang snowflakes at varying heights using clear fishing line for floating effect.
- Cluster them in windows or create cascading displays from ceilings.
5. Burlap and Lace Christmas Stockings
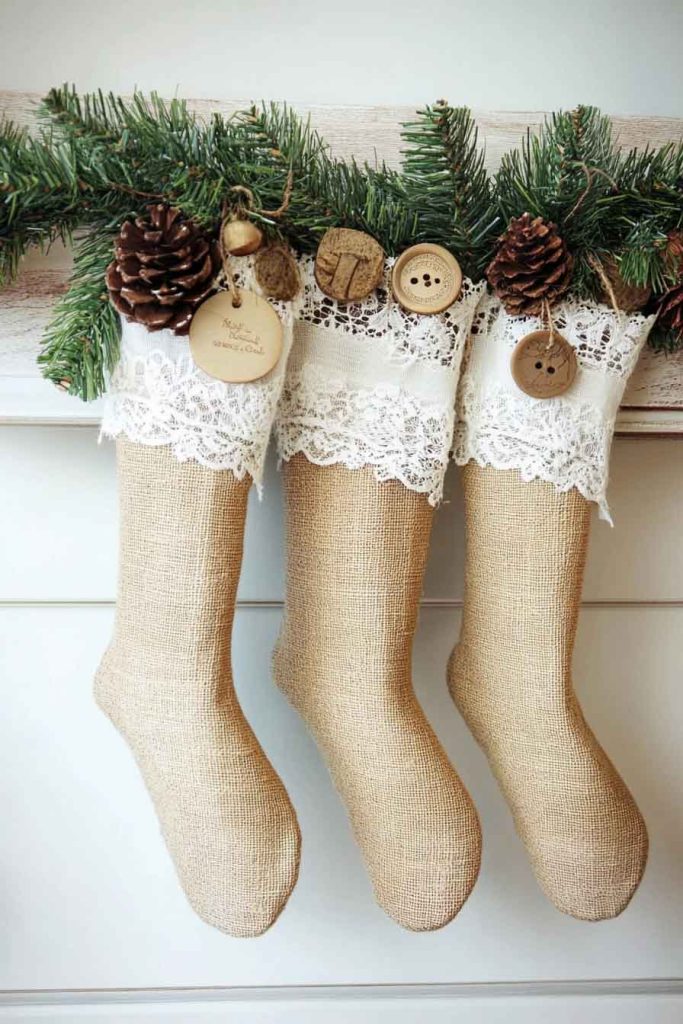
These handmade stockings combine rustic burlap fabric with delicate lace trim, creating a beautiful blend of textures that embodies farmhouse Christmas style. Each stocking features a burlap base with cream-colored lace sewn along the top edge and personalized name tags attached with twine.
Small wooden buttons, jingle bells, or miniature pinecones serve as additional embellishments, adding three-dimensional interest to the flat fabric surface. The natural color palette allows these stockings to complement various decorating schemes while maintaining a cohesive, handmade appearance.
Creating personalized stockings for each family member becomes a treasured tradition, and these handmade pieces can be passed down through generations as cherished holiday heirlooms.
How to Create:
- Cut stocking patterns from burlap fabric, allowing extra for seams.
- Sew pieces together inside-out, then flip right-side out for clean edges.
- Attach lace trim along the top using fabric glue or hand stitching.
- Add personalized name tags using wooden slices or fabric patches.
6. Eucalyptus and Berry Christmas Garland

This fresh and fragrant garland combines eucalyptus branches with red berries, pinecones, and subtle touches of gold-painted leaves. The silvery-green eucalyptus provides a modern alternative to traditional evergreen garlands while releasing a pleasant, refreshing scent.
Wired together in sections, the garland drapes beautifully across mantels, staircases, or doorways, with battery-operated fairy lights woven throughout for evening sparkle. Small clusters of artificial red berries add pops of festive color without overwhelming the sophisticated color palette.
This design appeals to those seeking a less traditional but equally festive look for their holiday decor. The eucalyptus stays fresh for weeks, making it a practical choice for early decorators.
How to Create:
- Purchase fresh eucalyptus from florists or grocery stores for best quality.
- Wire branches together in overlapping sections using floral wire.
- Add berry clusters and pinecones using hot glue or wire attachment.
- Weave battery-operated lights through the garland for magical evening glow.
7. Advent Calendar Using Small Fabric Pouches
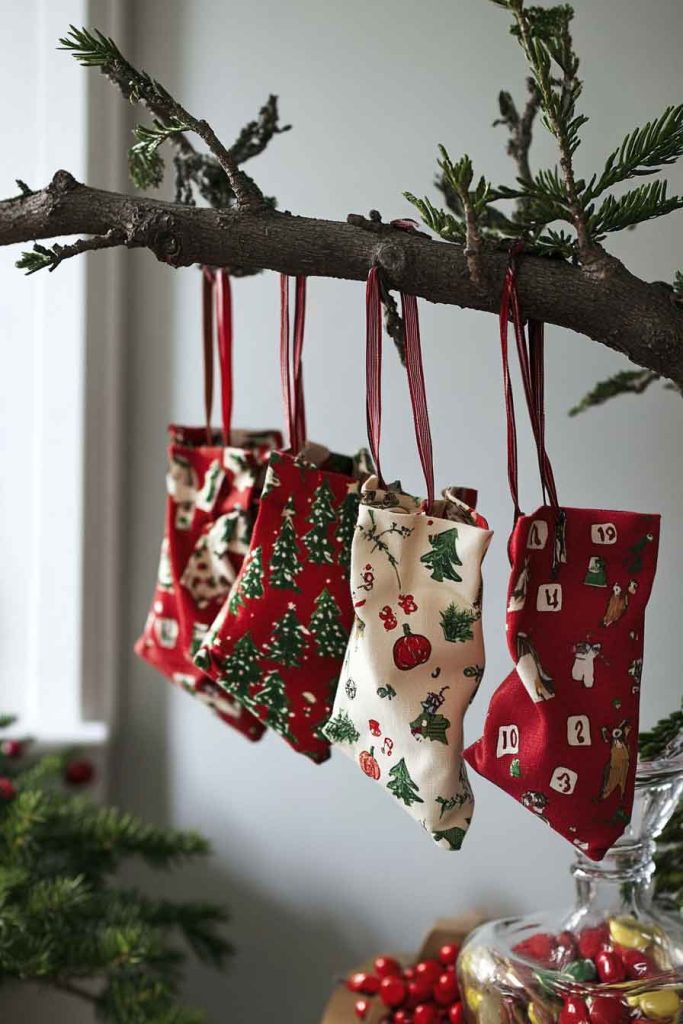
Create an interactive countdown to Christmas using numbered fabric pouches hung from a decorative branch or wooden dowel. Each small bag, made from festive fabrics in reds, greens, and creams, holds a tiny treat, note, or small toy for daily discovery.
The pouches hang from the branch using ribbon or twine, creating a beautiful display that serves both decorative and functional purposes. Hand-stitched or stamped numbers mark each pouch from 1 to 25, making it easy to track the countdown.
This project combines sewing skills with holiday anticipation, creating an heirloom piece that children will remember fondly for years to come. The daily ritual of opening each pouch builds excitement throughout December.
How to Create:
- Sew small drawstring pouches from festive cotton fabrics in coordinating colors.
- Number each pouch using fabric markers, stamps, or embroidered numbers.
- Hang pouches from a decorative branch secured in a weighted vase.
- Fill with candy, notes, or small toys before the first of December.
8. Wine Cork Christmas Tree Display
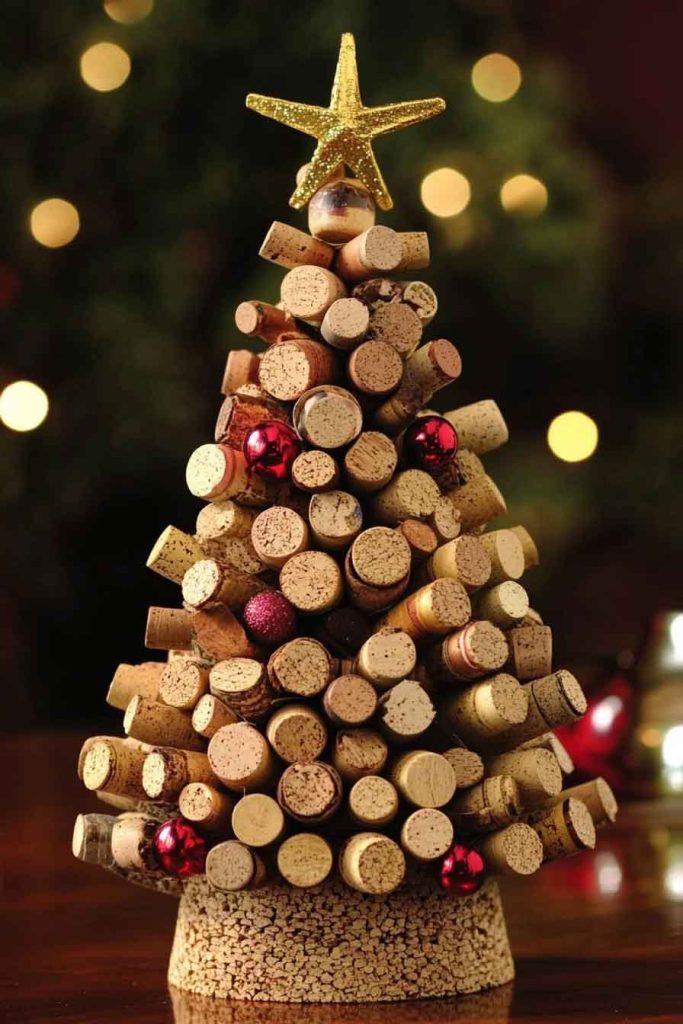
Transform collected wine corks into a miniature Christmas tree by gluing them in a conical shape around a foam cone base. This creative recycling project gives new life to materials that might otherwise be discarded, creating a conversation-starting centerpiece.
The natural variation in cork colors creates visual texture, while small embellishments like miniature ornaments, ribbon, or beads add festive touches. A small wooden star painted gold crowns the top, completing the tree’s traditional silhouette.
This eco-friendly project appeals to wine enthusiasts and environmental advocates alike, proving that beautiful decorations don’t require expensive materials or harm to the environment.
How to Create:
- Collect wine corks throughout the year or purchase in bulk online.
- Hot glue corks horizontally around a foam cone, working from bottom to top.
- Add miniature ornaments or beads between corks for pops of color.
- Top with a small wooden or paper star painted in metallic finish.
9. Felt Christmas Ornament Collection
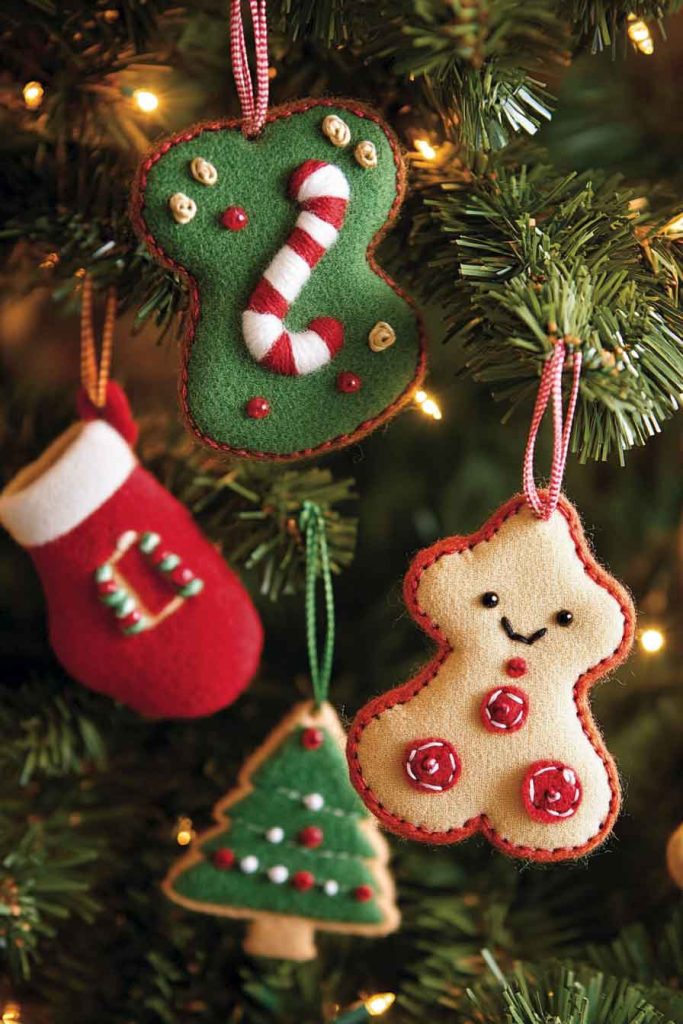
Hand-stitch a collection of felt ornaments in classic Christmas shapes: stars, trees, stockings, gingerbread people, and candy canes. These soft, child-safe decorations bring color and whimsy to trees while being durable enough to withstand years of handling.
Each ornament features simple embroidery stitches around the edges in contrasting thread colors, with details like buttons, sequins, or embroidered faces adding personality. The thick felt material holds its shape beautifully and won’t shatter if dropped, making these perfect for families with young children.
Creating these ornaments becomes a peaceful winter evening activity, with each stitch adding to the handmade charm. The finished collection represents hours of careful work and loving attention to detail.
How to Create:
- Cut felt shapes using templates or freehand for organic, imperfect charm.
- Use blanket stitch around edges with embroidery floss in contrasting colors.
- Add details like buttons, beads, or embroidered features before final stitching.
- Attach ribbon loops at the top for easy hanging on tree branches.
10. Wooden Slice Ornaments with Painted Designs
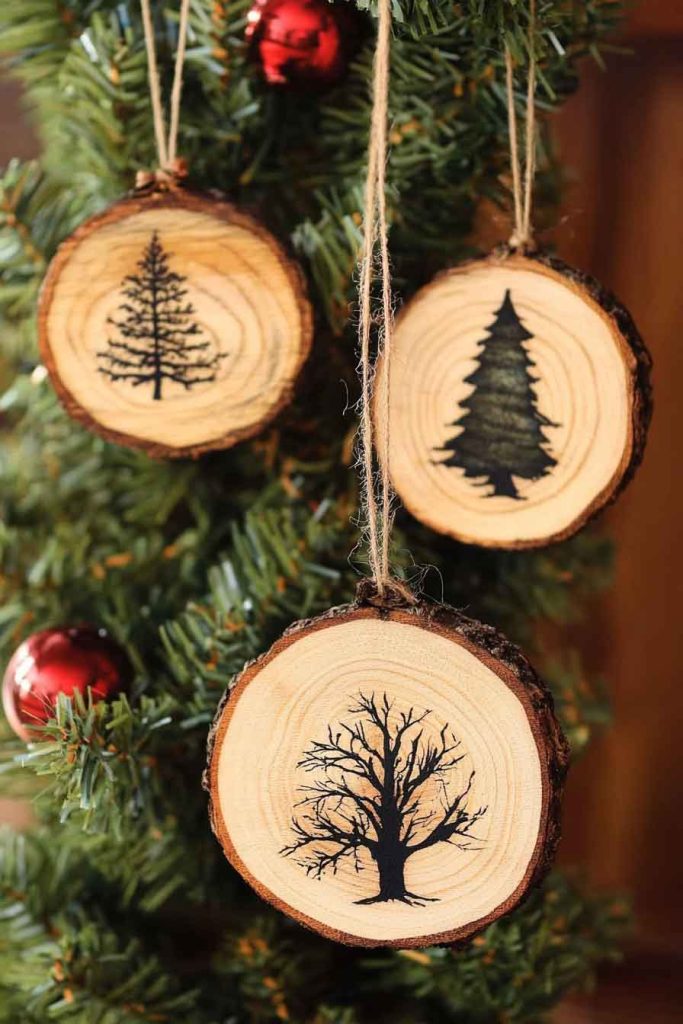
Use thin slices of tree branches to create rustic ornaments featuring hand-painted designs, stamped patterns, or wood-burned images. These natural wood rounds showcase the beautiful grain patterns and growth rings of the wood, celebrating nature’s artistry.
Simple designs work best on these small canvases: snowflakes, evergreen trees, reindeer silhouettes, or cheerful holiday messages. Each ornament receives a protective coat of clear sealant to preserve the artwork and add subtle shine.
The organic shape and texture of wooden slices bring an authentic, handcrafted quality to your tree that complements both rustic and modern decor styles. No two ornaments are exactly alike, making each one truly special.
How to Create:
- Cut branches into thin slices using a saw, then sand smooth.
- Drill small holes near the top edge for hanging ribbon or twine.
- Paint designs using acrylic paint or use wood-burning tools for permanent images.
- Seal with clear varnish or polyurethane for protection and shine.
11. Epsom Salt Snow-Covered Branches
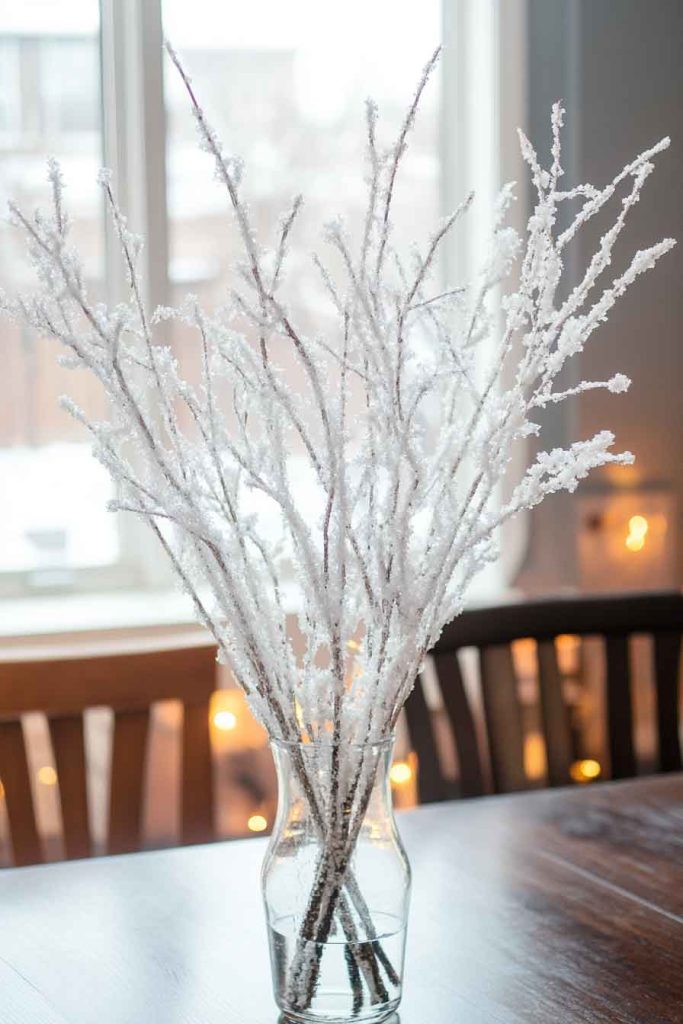
Transform ordinary branches into stunning winter decorations by coating them with a mixture of Epsom salt and water that dries to look like fresh snow. These magical branches create the appearance of a winter wonderland indoors, without the cold or mess.
Arranged in tall clear vases or vintage bottles, the snow-covered branches become striking focal points on side tables, mantels, or entryway consoles. Battery-operated fairy lights woven among the branches add sparkle and warmth to evening displays.
This simple technique produces dramatic results that look expensive and professional, yet requires only basic supplies and minimal time investment. The branches last throughout the entire holiday season with proper care.
How to Create:
- Collect interesting branches with good shape and multiple offshoots.
- Mix Epsom salt with boiling water until fully dissolved into thick solution.
- Paint or dip branches in the solution, then allow to dry completely overnight.
- Arrange in vases and add fairy lights for magical evening glow.
12. Cranberry and Orange Garland
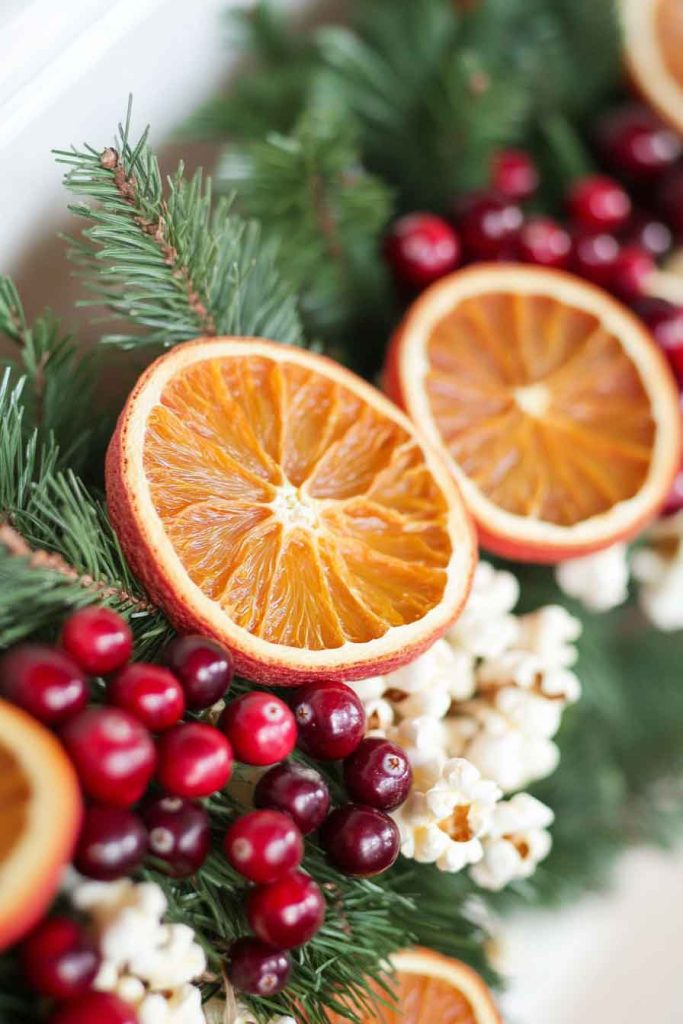
String fresh cranberries and dried orange slices together with popcorn to create an old-fashioned, edible garland that brings natural beauty and subtle fragrance to your tree or mantel. This traditional decoration connects us to simpler times while looking stunning in modern homes.
The deep red cranberries contrast beautifully with the golden-orange citrus rounds and white popcorn, creating a color combination that feels both classic and fresh. As the oranges dry further, their scent intensifies, filling rooms with the warm smell of citrus and spice.
Creating this garland can be a meditative activity or a fun family project, with everyone taking turns threading items onto sturdy thread or dental floss. The finished garland embodies the spirit of simple, natural Christmas decorating.
How to Create:
- Dry orange slices in a low oven until leathery but still flexible.
- Pop plain popcorn without butter, allowing it to cool completely before using.
- Thread items onto dental floss using a large needle in alternating pattern.
- Drape on tree, mantel, or staircase, replacing if it begins to deteriorate.
13. Fabric Scrap Christmas Tree Banner
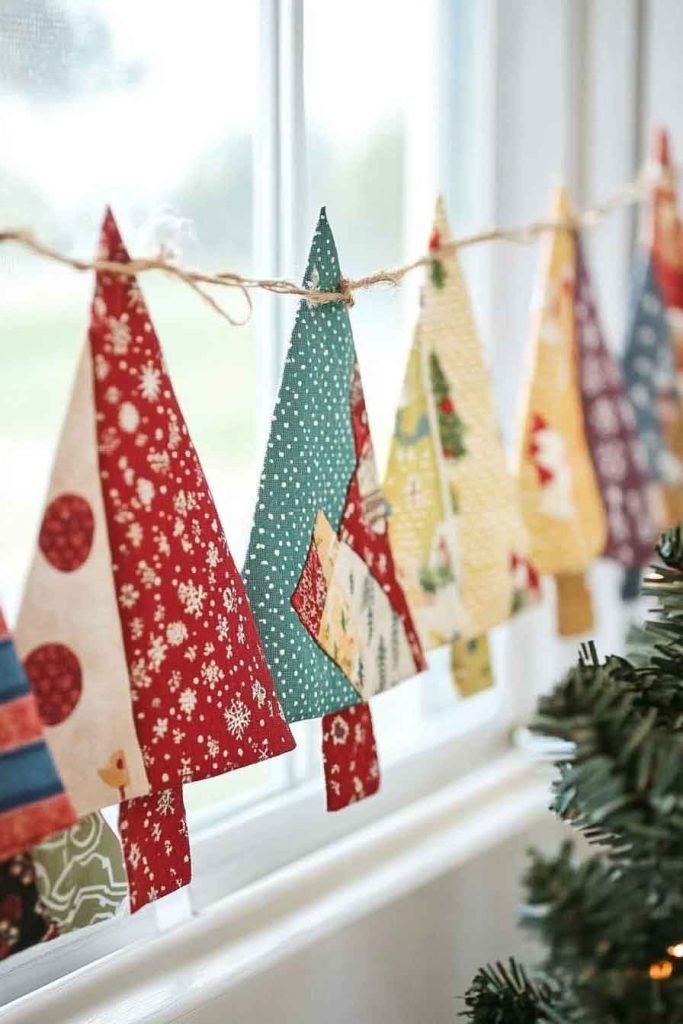
Create a festive banner using triangle flags cut from various Christmas-themed fabric scraps, arranged to form Christmas tree shapes. Each triangle features different patterns—plaids, polka dots, snowflakes, and stripes—creating visual interest through variety.
The triangles attach to natural twine or ribbon using fabric glue or simple stitches, with each “tree” consisting of graduated sizes that create the classic triangular tree silhouette. Small wooden beads or buttons between each tree section add decorative spacing.
This project makes excellent use of leftover fabric from other sewing projects, reducing waste while creating something beautiful. The mix-and-match aesthetic gives the banner a charming, collected-over-time appearance.
How to Create:
- Cut triangles in graduated sizes from various Christmas-themed fabrics.
- Arrange triangles in tree formations with largest at bottom, smallest at top.
- Glue or stitch triangle tops to twine or ribbon backing for secure attachment.
- Hang across mantels, windows, or walls using small hooks or tape.
14. Painted Pinecone Christmas Trees
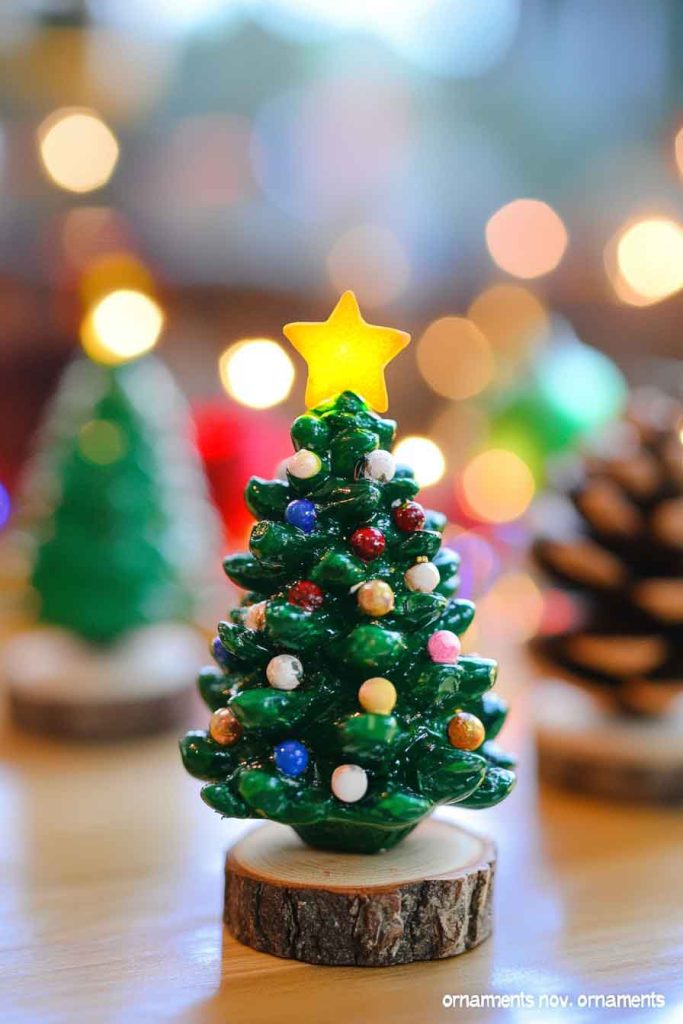
Transform pinecones into miniature Christmas trees by painting them green and adding colorful “ornaments” made from small beads, sequins, or painted dots. These tiny trees line windowsills, create table centerpieces, or accent larger displays with their playful charm.
Each pinecone sits in a small wooden base—either a painted wooden bead or a slice of cork—providing stability and a finished appearance. A small yellow bead or star painted at the tip completes the tree look, while a light dusting of white paint or glitter adds “snow.”
This project works wonderfully for children’s craft sessions, as the pinecones are easy to handle and the painting process is forgiving and fun. The finished trees bring smiles to everyone who sees them.
How to Create:
- Select open pinecones with good symmetrical shape for best tree appearance.
- Paint pinecones green using acrylic paint, allowing to dry between coats.
- Add colorful “ornaments” using beads glued in place or painted dots.
- Glue to wooden bases and add yellow star at top for finishing touch.
15. Vintage Book Page Ornaments
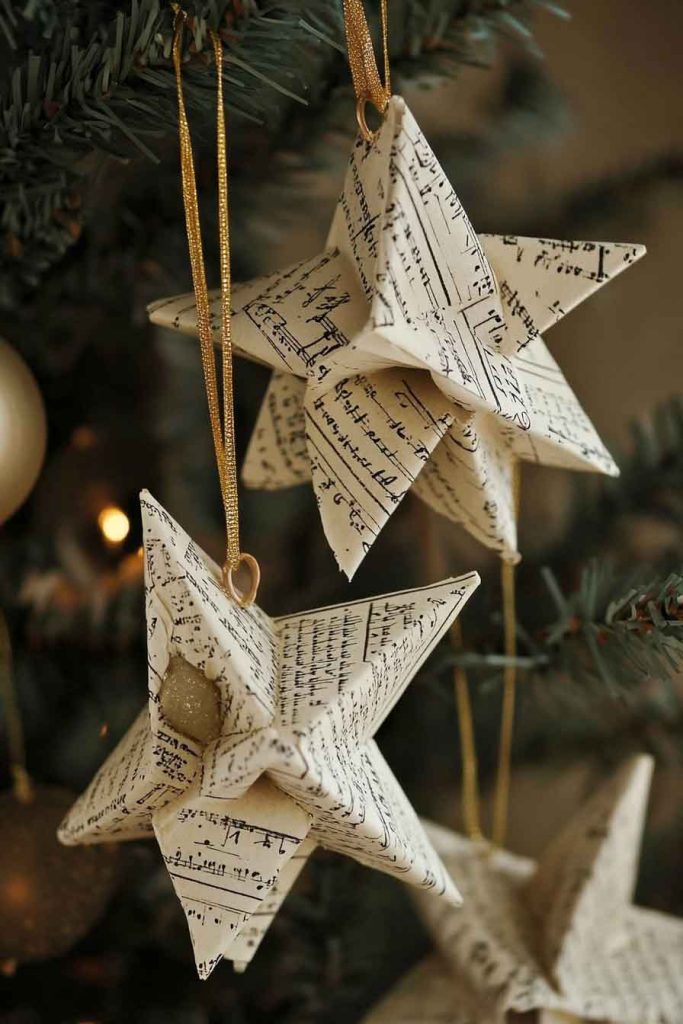
Cut Christmas shapes—stars, trees, angels, and bells—from pages of old books or sheet music, creating ornaments with literary or musical charm. These delicate decorations celebrate the written word while giving new life to damaged books that can no longer be read.
Multiple layers of shapes glued together create dimensional ornaments that catch light and cast interesting shadows. Edges can be inked with brown or gold metallic ink for an aged, vintage appearance that adds to their antique charm.
These ornaments appeal to book lovers and musicians, bringing personal interests into holiday decorating. They’re lightweight and delicate, perfect for hanging on smaller branches where heavier ornaments might weigh down the tree.
How to Create:
- Select pages from damaged books or print sheet music for authentic look.
- Cut shapes using templates or dies for clean, consistent edges.
- Layer multiple shapes, slightly offset, for dimensional appearance.
- Add ribbon loops and consider aging edges with ink for vintage effect.
16. Sweater Sleeve Stocking Ornaments
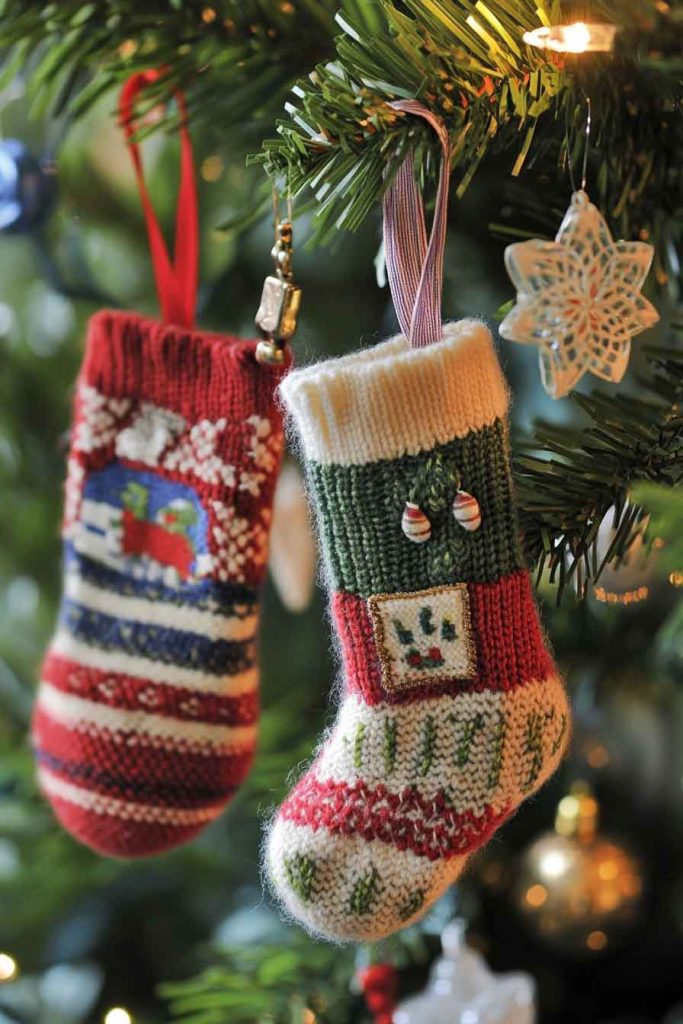
Repurpose old wool sweaters by cutting the sleeves into miniature stocking shapes that become adorable tree ornaments. The knit texture of the sweaters provides built-in visual interest, while the variety of patterns and colors creates a cohesive yet eclectic collection.
Each mini stocking features a folded cuff at the top, just like full-sized versions, with small embellishments like buttons, embroidered snowflakes, or tiny jingle bells adding personality. A loop of ribbon or twine at the top makes them ready for hanging.
This upcycling project prevents textile waste while creating sentimental ornaments from beloved sweaters that may have stains or damage. The cozy texture of wool perfectly captures the warmth of the holiday season.
How to Create:
- Cut stocking shapes from sweater sleeves, using ribbed cuffs as stocking tops.
- Sew sides together inside-out, then flip right-side out for clean finish.
- Add small embellishments like buttons or embroidered details for personality.
- Attach ribbon loops at the top for easy hanging on tree branches.
17. Candied Cranberry and Rosemary Centerpiece

Arrange sugared cranberries and fresh rosemary sprigs around pillar candles on a decorative tray or wooden cutting board for an elegant, fragrant centerpiece. The sugar coating on the cranberries creates a crystallized, frosted appearance that sparkles in candlelight.
Fresh rosemary releases its piney scent when warmed by nearby candle flames, filling the room with a natural, festive fragrance. Small pinecones, cinnamon sticks, or star anise pods can be scattered throughout for additional visual and aromatic interest.
This centerpiece combines natural elements with simple elegance, creating a sophisticated look that impresses guests while being surprisingly easy to assemble. The fresh elements last for several days before needing replacement.
How to Create:
- Roll damp cranberries in granulated sugar until fully coated, then dry.
- Arrange pillar candles on a tray or board as focal points.
- Scatter sugared cranberries and fresh rosemary sprigs around candles artfully.
- Add complementary elements like pinecones or cinnamon sticks for texture.
18. Painted Glass Jar Luminaries
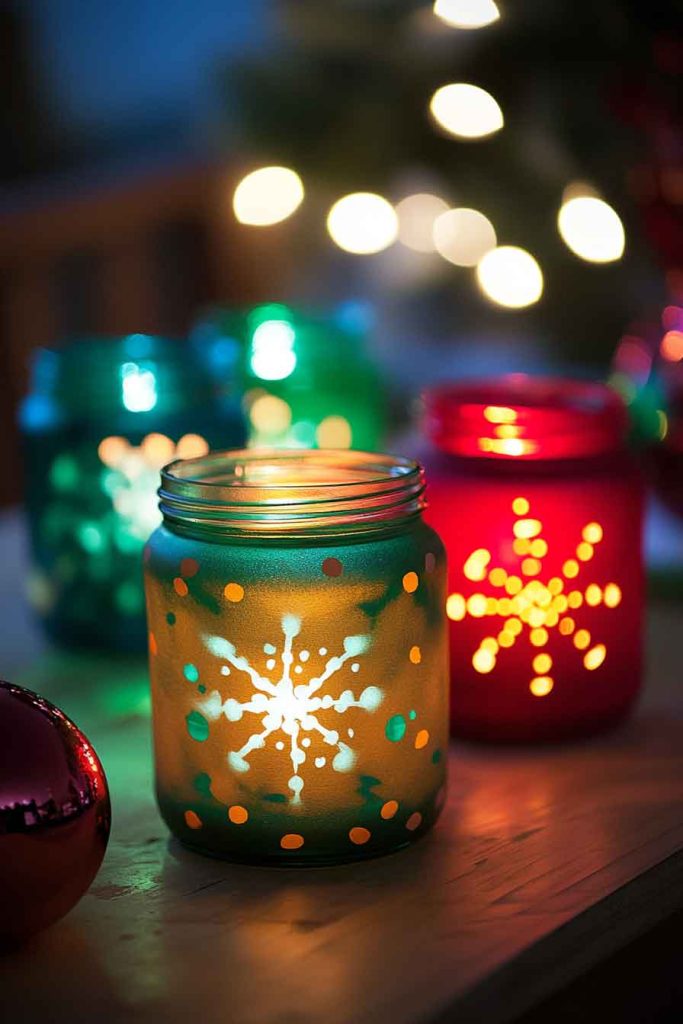
Paint mason jars or other glass containers with translucent glass paint in Christmas colors—red, green, gold, and white—creating colorful luminaries that glow warmly when tea lights are placed inside. Simple patterns like stripes, dots, or snowflakes allow light to shine through while adding decorative interest.
The painted jars line walkways, decorate mantels, or cluster on tables as centerpieces, creating pools of colored light that enhance the cozy holiday atmosphere. When grouped together, the various colors create a beautiful rainbow effect.
This project allows for endless creativity in color combinations and pattern choices, making each luminary unique. The jars can be reused year after year, becoming a treasured part of your holiday decoration collection.
How to Create:
- Clean glass jars thoroughly with rubbing alcohol for proper paint adhesion.
- Apply translucent glass paint in patterns using brushes or sponges.
- Allow paint to dry completely, following manufacturer’s instructions for best results.
- Place battery-operated tea lights inside for safe, worry-free glow.
19. Pom-Pom Garland in Christmas Colors
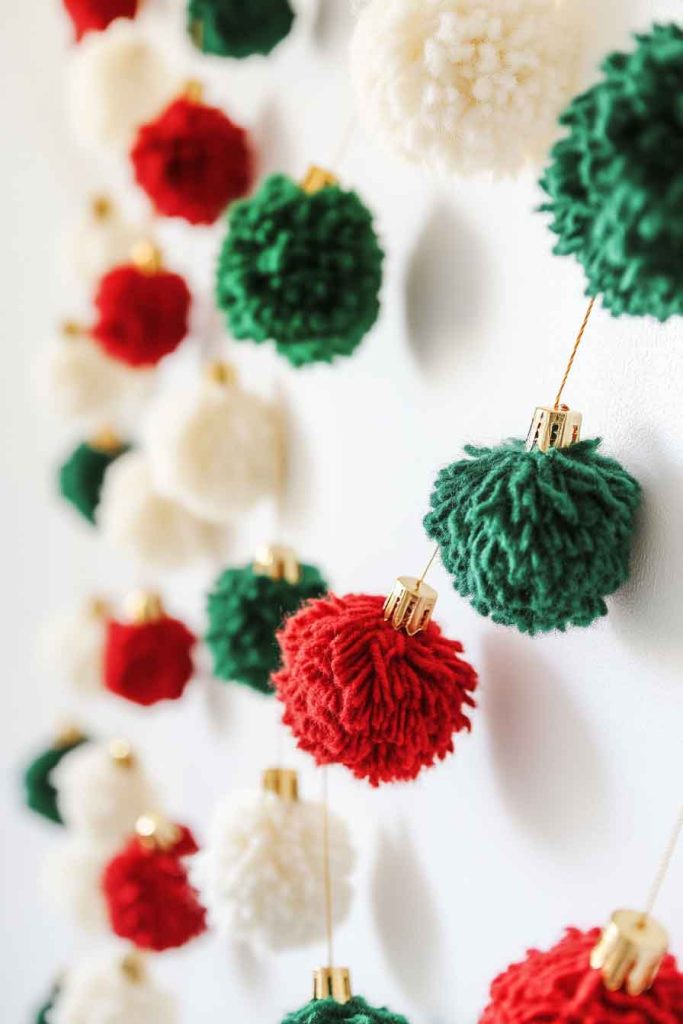
Create a cheerful garland using handmade yarn pom-poms in red, green, white, and gold, strung together on sturdy twine or embroidery floss. The soft, fluffy texture of the pom-poms adds a playful, whimsical element to your decor.
Making pom-poms is simple and meditative, requiring only yarn, scissors, and patience. Once completed, they’re strung in alternating colors or random patterns, depending on your preference. The resulting garland brings softness and color to mantels, staircases, or trees.
This project works wonderfully for using up leftover yarn from other craft projects, making it both economical and environmentally friendly. Children enjoy helping make pom-poms, making this an excellent family activity.
How to Create:
- Make pom-poms using a pom-pom maker or traditional cardboard circle method.
- Create pom-poms in various sizes for visual interest along the garland.
- String pom-poms onto embroidery floss or thin twine, knotting between each.
- Hang garland on trees, mantels, or doorways for cheerful decoration.
20. Pallet Wood Christmas Tree Wall Art
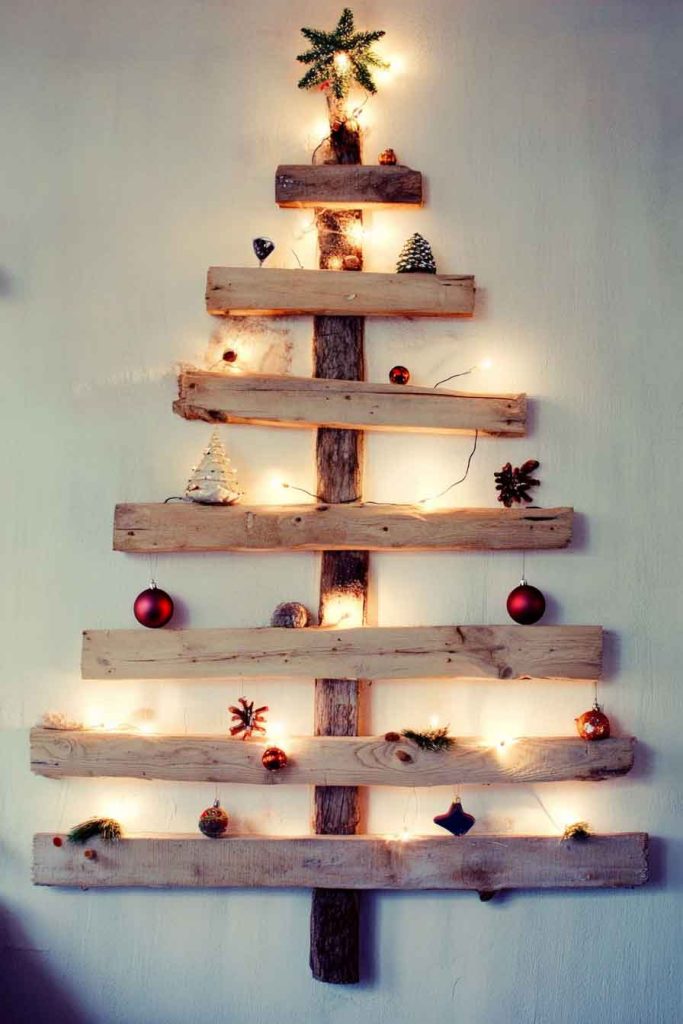
Construct a rustic Christmas tree using reclaimed pallet wood pieces arranged in graduated lengths to form a tree shape on the wall. This space-saving alternative to traditional trees works perfectly for small apartments or as additional holiday decor in various rooms.
The natural wood tones create a warm, organic backdrop for hanging lightweight ornaments, stringing lights, or displaying Christmas cards. Each board can be left natural, stained different shades, or painted for a more unified appearance.
This project appeals to those with woodworking skills and creates a substantial, impressive decoration that becomes a focal point in any room. The flat design allows it to fit in spaces where a traditional tree wouldn’t work.
How to Create:
- Cut pallet boards into graduated lengths, with longest at bottom, shortest at top.
- Arrange boards on wall in tree shape, securing with nails or command strips.
- String lights along the boards, weaving around each level for even coverage.
- Hang lightweight ornaments from small hooks or simply tack cards to the wood.
21. Cinnamon Ornament Dough Decorations

Mix cinnamon, applesauce, and glue to create aromatic ornament dough that can be rolled out and cut into shapes like hearts, stars, and gingerbread people. These ornaments dry hard and retain their wonderful cinnamon scent throughout the holiday season.
Simple decorations using paint, ribbon, or pressed herbs add visual interest without overwhelming the natural brown color of the cinnamon dough. A hole punched near the top before drying allows for easy hanging with ribbon or twine.
The warm spice scent creates an immediate feeling of coziness and holiday cheer, while the homemade quality of these ornaments adds authentic charm to your tree or garland displays.
How to Create:
- Mix equal parts ground cinnamon and applesauce with small amount of white glue.
- Roll dough to quarter-inch thickness and cut shapes with cookie cutters.
- Punch hanging holes before drying, then dry completely on cooling racks.
- Decorate minimally with paint or ribbon, allowing cinnamon color to show.
22. Layered Ribbon Christmas Tree Canvas
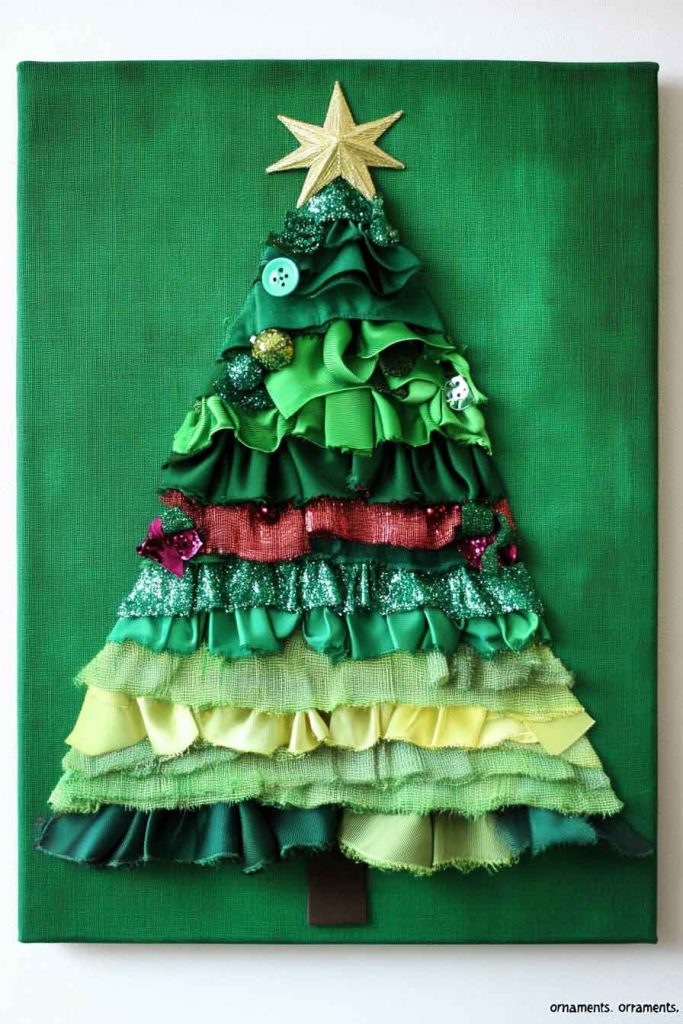
Create dimensional Christmas trees on canvas using ribbons in various widths, textures, and shades of green, layered to form the tree shape. This textile art combines different ribbon types—grosgrain, satin, burlap, and velvet—for rich textural variety.
The ribbons attach to the canvas in horizontal rows, starting wide at the bottom and narrowing toward the top, creating the classic tree silhouette. Small embellishments like buttons, beads, or miniature ornaments can be sewn or glued on as “ornaments.”
These canvas creations work beautifully as wall art, bringing a crafty, handmade quality to your holiday decor. Each one becomes a unique artwork that reflects your personal style and color preferences.
How to Create:
- Sketch a simple tree outline on canvas as a guide for ribbon placement.
- Cut ribbons in graduated lengths, longest at bottom, shortest at top.
- Glue ribbons horizontally to canvas, overlapping slightly for fullness.
- Add embellishments as “ornaments” and a star or bow at the top.
23. Frosted Epsom Salt Votive Holders
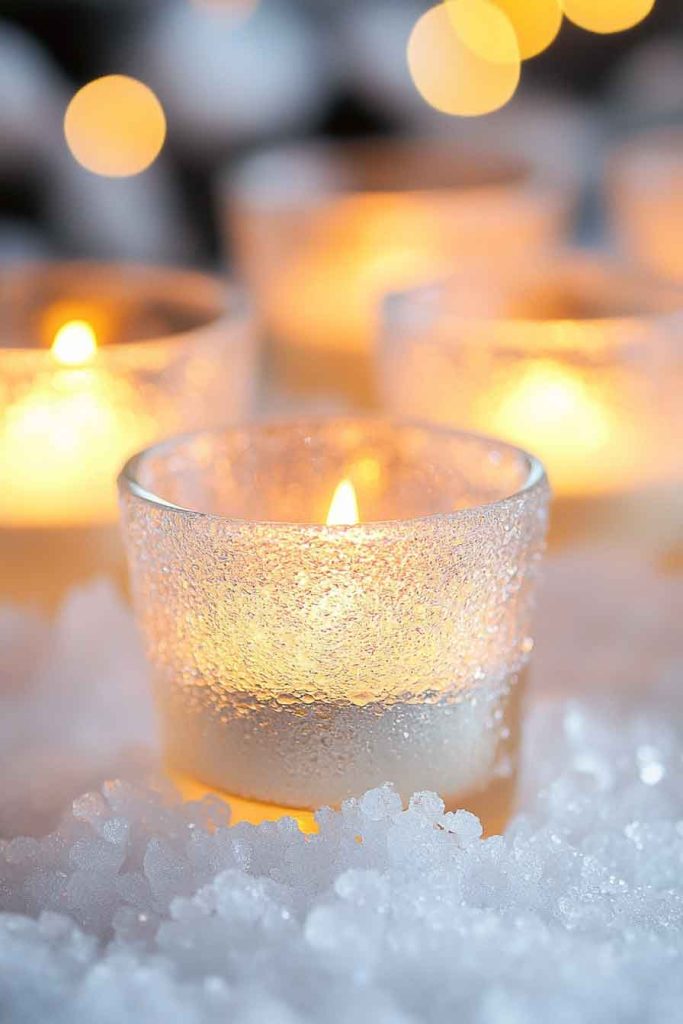
Transform plain glass votive holders into frosted, winter-themed decorations using Mod Podge and Epsom salt. The salt crystals create a sparkly, snow-like coating that catches and reflects candlelight beautifully.
These simple votives cluster together on trays, line mantels, or sit on tables as part of larger centerpiece arrangements. When tea lights flicker inside, the crystallized coating seems to sparkle like fresh snow under moonlight.
This quick project produces impressive results with minimal effort and expense, making it perfect for creating decorations in quantity for large spaces or for giving as gifts to neighbors and friends.
How to Create:
- Brush thin layer of Mod Podge onto clean glass votive holders.
- Roll damp holders in Epsom salt until completely coated with crystals.
- Allow to dry thoroughly before adding tea lights for safe use.
- Group multiple votives together for maximum visual impact and glow.
24. Fabric-Covered Ball Ornaments
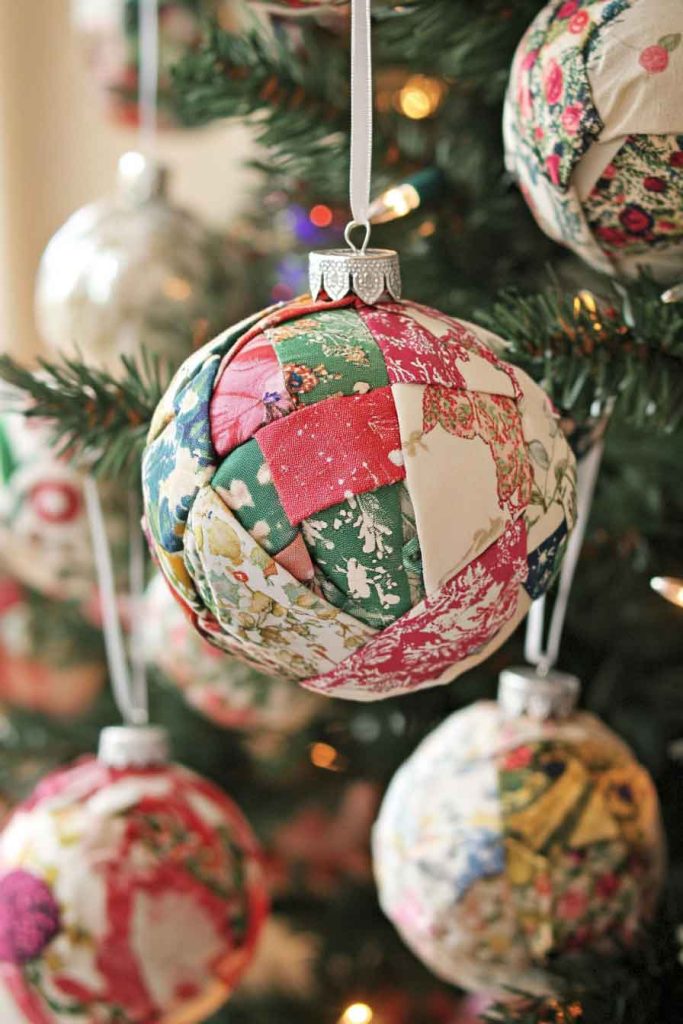
Cover plain foam or plastic ball ornaments with fabric scraps, creating patchwork patterns or covered entirely in one fabric for a cohesive look. The fabric adds texture and warmth to standard ornaments, transforming them into custom pieces that coordinate with your decor.
Small fabric squares attach using straight pins pushed into foam balls, creating a quilted appearance, or fabric can be wrapped and glued onto plastic ornaments. Ribbon trim around the middle or embellishments at the top add finishing touches.
This project gives new life to plain ornaments and uses up fabric scraps that might otherwise go to waste. The soft texture contrasts beautifully with traditional glass ornaments, adding variety to your tree.
How to Create:
- Cut fabric into small squares or strips for wrapping around ornaments.
- Attach fabric using straight pins for foam balls or hot glue for plastic.
- Cover the entire ornament or create patchwork patterns for visual interest.
- Add ribbon trim and hanging loops for finished professional appearance.
25. Birch Log Candle Holders with Greenery
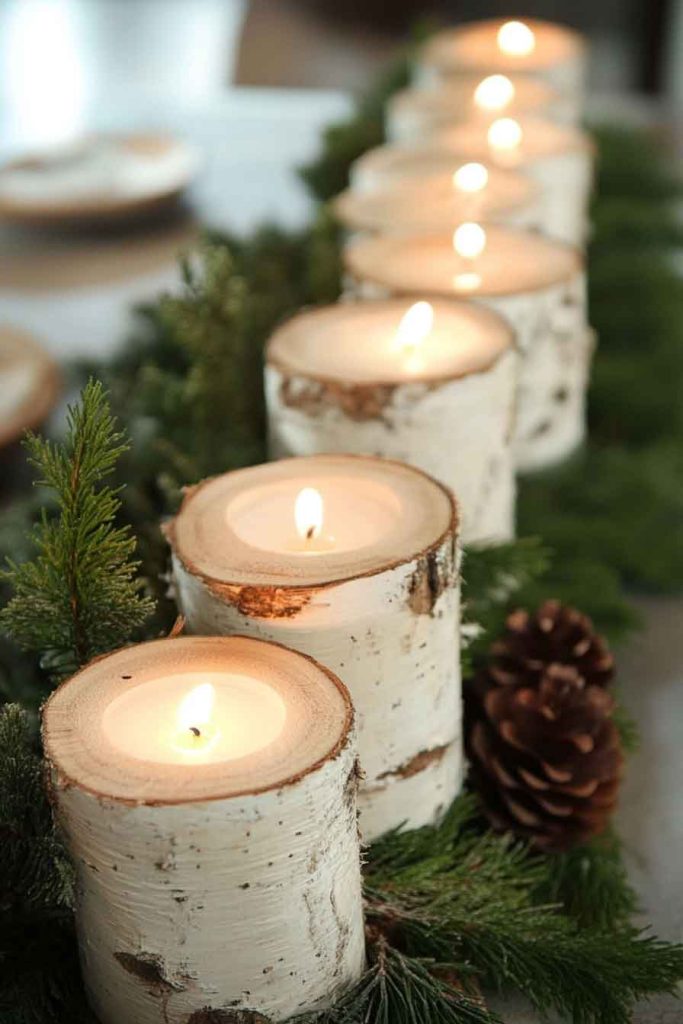
Drill holes into sections of birch logs to create rustic candle holders that celebrate the natural beauty of wood. The white bark of birch provides a clean, winter-appropriate backdrop for the warm glow of pillar candles.
Fresh evergreen sprigs, holly branches with berries, or pine needles tucked around the candles add color and scent while enhancing the woodland aesthetic. Multiple holders in varying heights create dramatic, layered displays on mantels or dining tables.
These simple yet elegant holders bring the outdoors inside, creating a connection to nature that feels appropriate for the winter season. The contrast between the white bark and dark wood interiors adds visual interest.
How to Create:
- Cut birch logs into sections ranging from four to eight inches tall.
- Drill candle-sized holes in the top, deep enough for stability but not through.
- Sand rough edges smooth and remove loose bark pieces for clean appearance.
- Arrange holders with candles and tuck fresh greenery around bases for decoration.
26. Cookie Cutter Wire Ornaments
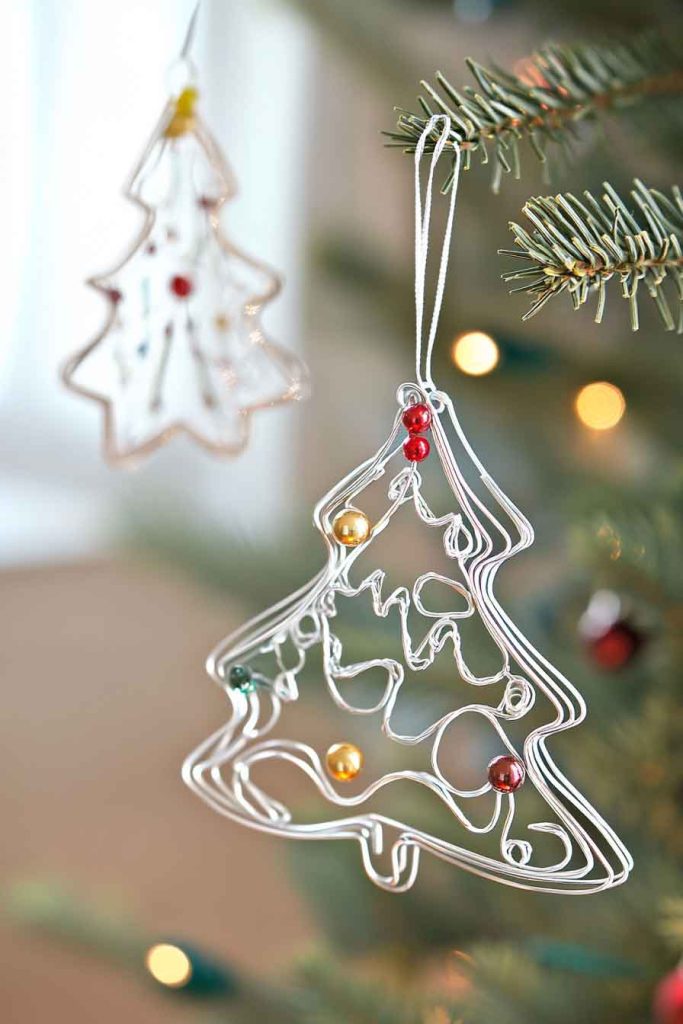
Bend craft wire around cookie cutters to create outline ornaments in classic Christmas shapes, then embellish with beads, buttons, or ribbon. These delicate wire ornaments have an airy, minimalist quality that adds elegance to trees without visual clutter.
The simplicity of the wire outlines allows them to complement rather than compete with other ornaments, while their handmade quality adds artisan charm. Different wire colors—silver, gold, copper, or red—create variety within the cohesive design theme.
This project requires minimal materials and produces ornaments that are virtually unbreakable, making them ideal for homes with pets or small children who might accidentally knock ornaments from trees.
How to Create:
- Bend craft wire around cookie cutters to form desired shapes easily.
- Twist wire ends together securely and trim excess for clean finish.
- Add beads along the wire for color, or wrap sections with embroidery floss.
- Create hanging loops at the top using the wire itself or added ribbon.
27. Stacked Book Christmas Tree
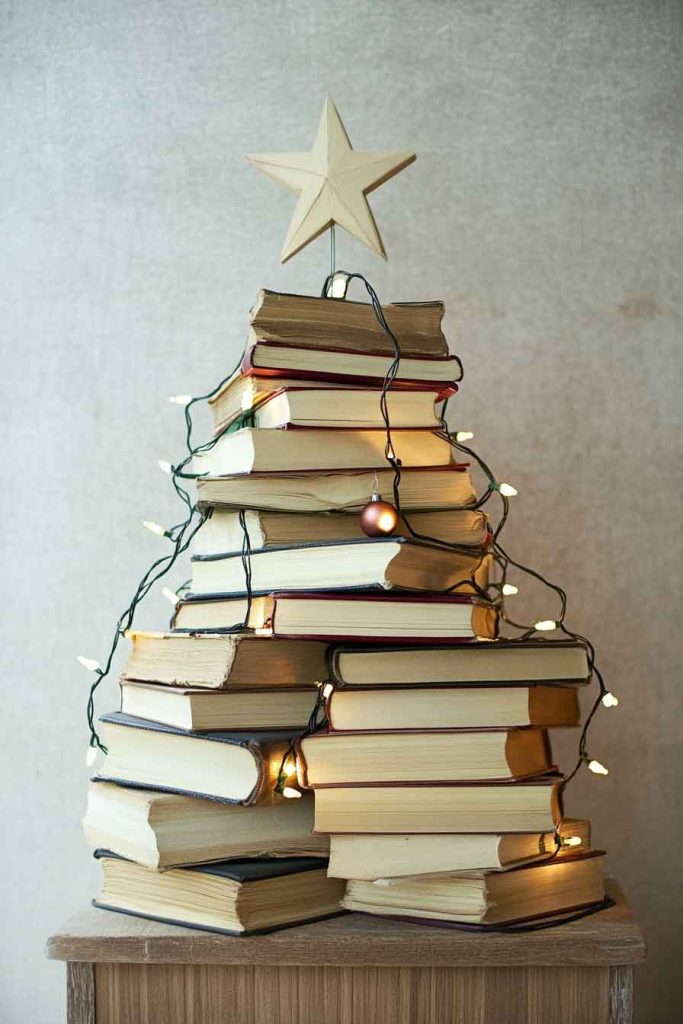
Create a unique tree by stacking old books in graduated sizes, largest at the bottom and smallest at the top, forming a tree shape. The book spines face outward, showing their titles and colors, creating an eclectic, literary-themed decoration.
Small ornaments, string lights, or garland wind through the layers, while a star or small tree topper sits at the peak. This alternative tree appeals to book lovers and works wonderfully in home libraries, reading nooks, or small spaces.
The temporary nature of this tree means it can be assembled and disassembled easily, requiring no storage space since the books simply return to shelves after the holidays. Each year, different books can be chosen for variety.
How to Create:
- Select hardcover books in graduated sizes for structural stability and visual appeal.
- Stack books in circular layers, rotating each layer slightly for tree shape.
- Tuck string lights or small ornaments between layers for festive decoration.
- Top with a small star ornament or decorative element as tree topper.
28. Dried Orange Slice Ornaments

Preserve orange slices through low-temperature oven drying, creating beautiful, translucent ornaments that glow when backlit. These natural decorations bring citrus fragrance and sunny color to winter decor, reminding us of warmer seasons.
The dried slices can hang individually from thin ribbon or string together to create garlands. Some crafters glue slices to cinnamon sticks or add star anise pods with hot glue for additional interest and scent.
This zero-waste project uses fruit that might otherwise be discarded, transforming it into beautiful, fragrant decorations that last throughout the season. The natural variation in how slices dry makes each ornament unique.
How to Create:
- Slice oranges thinly and evenly, about quarter-inch thick for best results.
- Dry in low-temperature oven for several hours, flipping occasionally until leathery.
- Allow to cool completely before adding hanging ribbon through holes.
- Display individually or string together as garland, combining with other natural elements.
29. Rustic Ladder Christmas Card Display

Lean a decorative wooden ladder against a wall and use clothespins or small clips to display Christmas cards as they arrive. This functional decoration solves the problem of what to do with cards while creating a charming, farmhouse-style display.
The ladder can be painted, stained, or left natural depending on your decor preferences. Small battery-operated string lights weave through the rungs, illuminating the cards and creating a warm glow.
This display allows you to enjoy the cards you receive throughout the season while keeping them organized and visible. After Christmas, the cards can be easily removed and the ladder used for other decorative purposes.
How to Create:
- Find or build a small decorative ladder, four to six feet tall for manageability.
- Paint or stain ladder to match your decor, or leave natural for rustic look.
- Attach small clothespins or clips to rungs for easy card hanging.
- Weave fairy lights through the ladder and add pine garland for extra festivity.
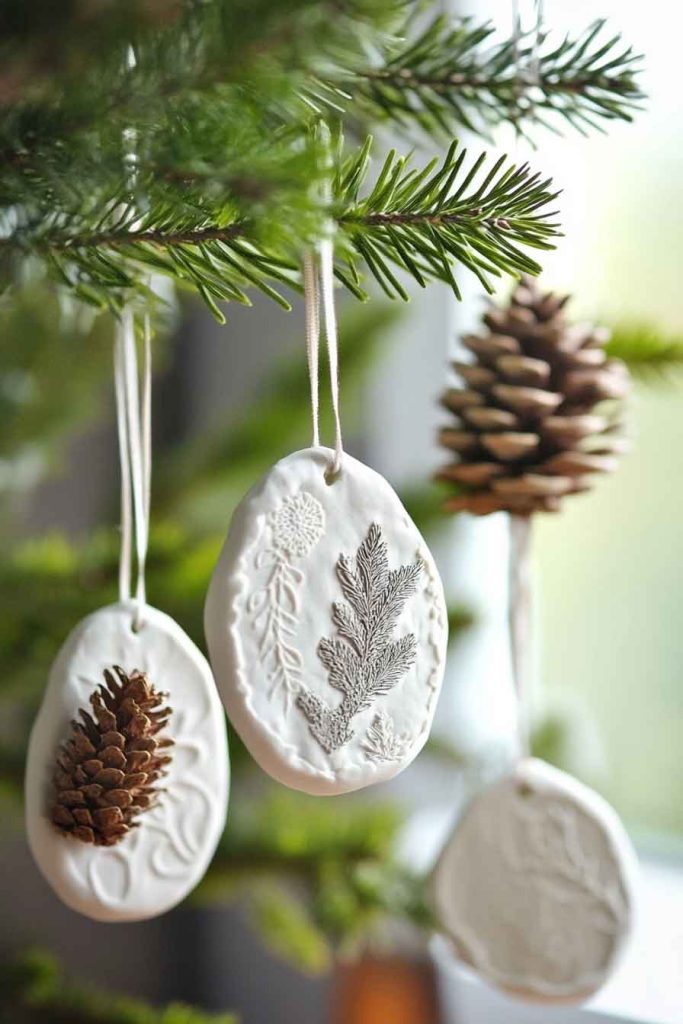
30. Clay Imprint Ornaments with Natural Textures
Press natural items—evergreen branches, pinecones, leaves, or lace—into air-dry clay to create textured ornaments with beautiful imprints. These elegant decorations celebrate the details found in nature, preserving them in lasting form.
The clay can be left natural, painted, or brushed with metallic finishes after drying for various aesthetic effects. Each ornament captures a moment in nature, making them meaningful decorations that prompt reflection on the natural world.
Creating these ornaments becomes a meditative practice, requiring patience and attention to detail. The finished pieces have an artisan quality that elevates your tree’s appearance while remaining deeply personal.
How to Create:
- Roll air-dry clay to quarter-inch thickness for durability without too much weight.
- Press natural items firmly into clay to create detailed impressions.
- Cut around impressions with cookie cutters or trim by hand for organic shapes.
- Punch hanging holes before drying, then paint or finish as desired after fully dry.
Conclusion
Creating DIY Christmas decorations is a rewarding way to personalize your holiday decor while making memories and saving money. Each project highlighted here offers unique opportunities to express creativity and bring handmade warmth into your home.
Whether you prefer the natural simplicity of dried oranges and pinecones or the creative challenge of sewing fabric ornaments, these ideas provide inspiration for crafters of all skill levels. Don’t hesitate to experiment with these projects, adapting them to your personal style and available materials.
The most meaningful holiday decorations are often those made with your own hands, infused with love and creativity. Start with one or two projects that appeal to you, and gradually build a collection of handmade treasures that will become cherished parts of your family’s Christmas traditions for years to come.