30 Christmas Decor Ideas DIY: Creating Magical Holiday Moments at Home
Creating a festive home for Christmas is more than just hanging ornaments; it’s about crafting memories, expressing creativity, and filling your space with warmth and joy. DIY Christmas decorations allow us to add personal touches that reflect our unique style while creating a cozy atmosphere that brings family and friends together.
The beauty of handmade Christmas decor lies in its authenticity, affordability, and the satisfaction of creating something special with your own hands. From rustic farmhouse charm to elegant modern designs, DIY projects offer endless possibilities for transforming your home into a winter wonderland.
This article explores 30 inspiring DIY Christmas decor ideas, each designed to help you create a festive atmosphere without breaking the bank. Whether you’re a crafting beginner or an experienced decorator, these projects offer step-by-step guidance and practical tips for bringing holiday magic into every corner of your home.
Join us as we discover creative ways to decorate for Christmas, turning simple materials into stunning decorations that will make your holiday season truly memorable.
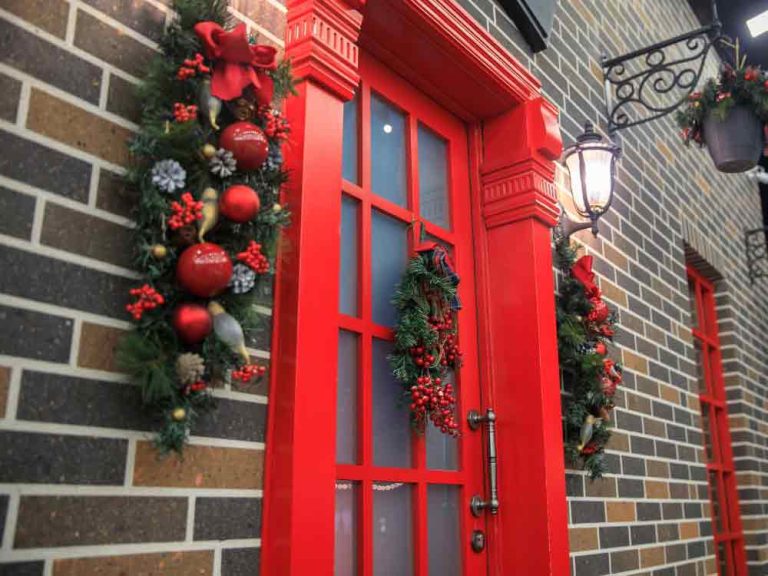
1. Rustic Pinecone Wreath for Front Door
Imagine greeting guests with a beautiful handmade wreath adorned with natural pinecones, red berries, and evergreen sprigs. This rustic pinecone wreath combines the beauty of nature with festive charm, creating a warm welcome for anyone who visits your home during the holidays.
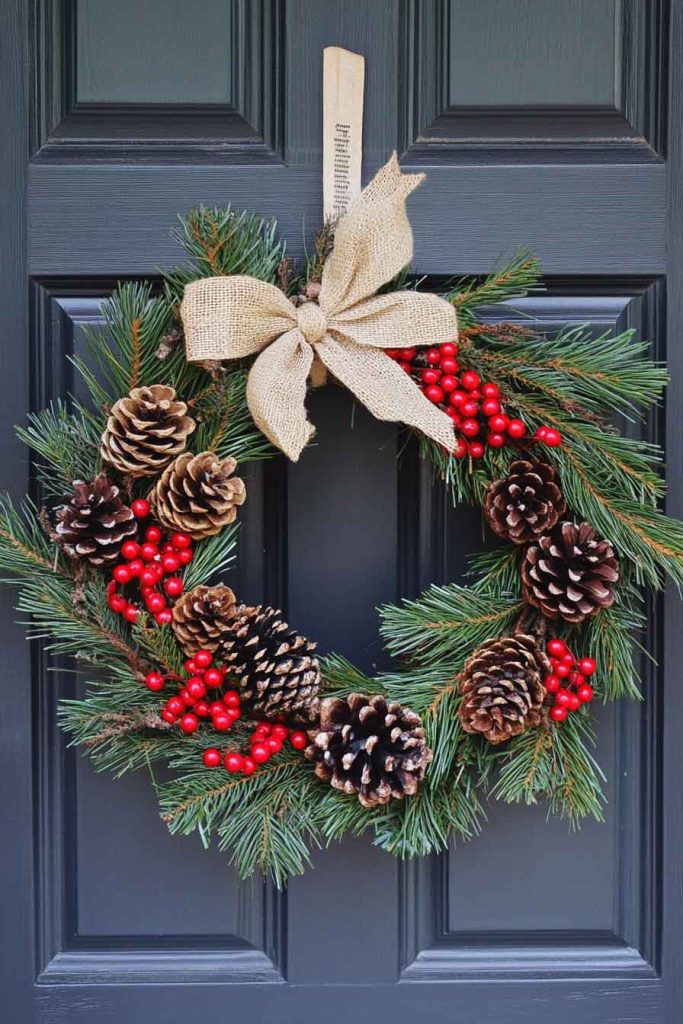
A simple grapevine wreath base provides the perfect foundation for attaching pinecones of various sizes using hot glue. Add sprigs of artificial or real evergreen branches, clusters of red berries, and a wide burlap ribbon for a finishing touch that exudes farmhouse elegance.
This DIY project captures the essence of a traditional Christmas while allowing you to personalize the design with your favorite natural elements. The earthy textures and warm tones create an inviting first impression that sets the tone for the festive atmosphere inside your home.
Tips for Creating Your Pinecone Wreath:
- Collect pinecones from your yard or local park for an authentic, budget-friendly approach.
- Use a hot glue gun to securely attach pinecones in layers for depth and texture.
- Spray pinecones with white paint for a snowy effect or leave them natural for rustic charm.
- Add a weatherproof ribbon to ensure your wreath lasts throughout the season.
2. Mason Jar Snow Globes with Winter Scenes
Transform ordinary mason jars into enchanting snow globes that capture the magic of winter. These charming DIY snow globes feature miniature Christmas trees, tiny figurines, and sparkling glitter that swirls when shaken, creating a mesmerizing display perfect for mantels or tabletops.
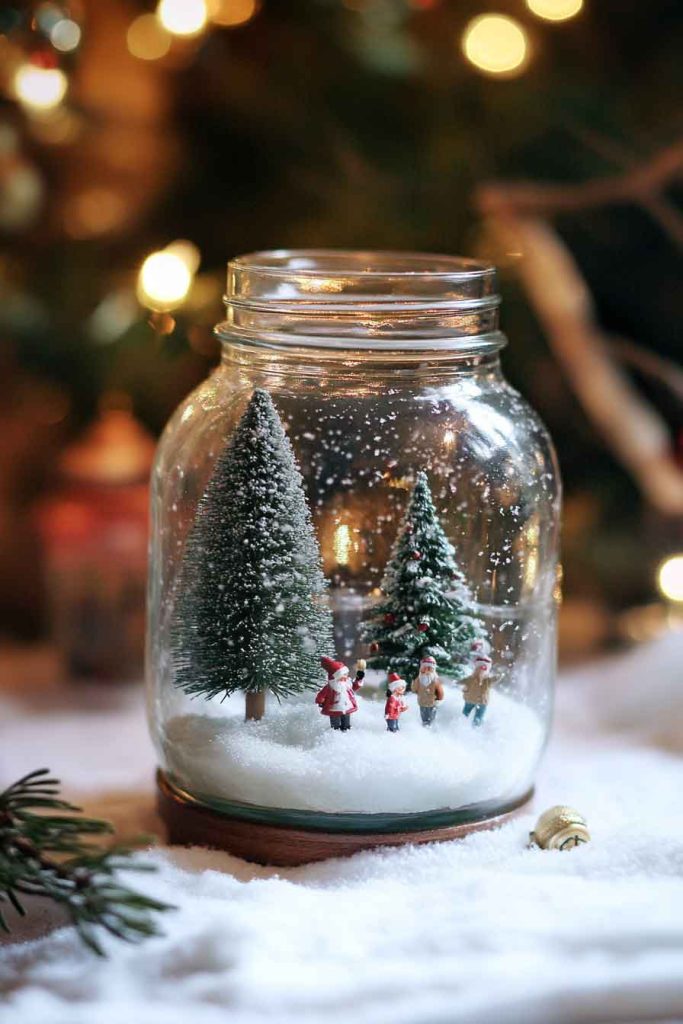
Start with clean mason jars and waterproof glue to attach small Christmas figurines or trees to the inside of the lid. Fill the jar with distilled water, add glycerin for slow-moving glitter, and sprinkle in white or silver glitter for the snow effect.
This project is perfect for involving children in holiday crafting, as they can choose their favorite miniature scenes and watch the magic unfold. The finished snow globes make wonderful gifts or personalized decorations that bring nostalgic charm to any room.
Tips for Making Mason Jar Snow Globes:
- Use distilled water to prevent cloudiness and ensure crystal-clear visibility.
- Add a tablespoon of glycerin to slow down the glitter for a gentle snowfall effect.
- Seal the lid with strong waterproof glue to prevent leaks.
- Decorate jar lids with ribbon or paint for added festive appeal.
3. Cinnamon Stick Candle Holders with Ribbon
Create aromatic and visually stunning candle holders by wrapping pillar candles with cinnamon sticks tied together with festive ribbon. These elegant DIY decorations not only look beautiful but also fill your home with the warm, spicy scent of cinnamon when the candles are lit.
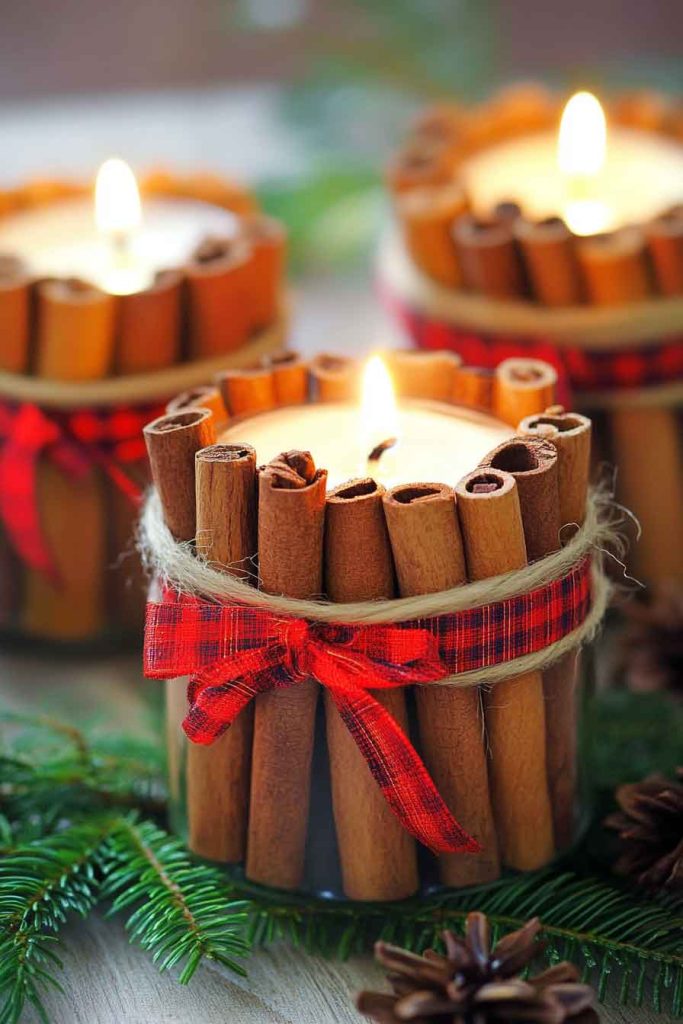
Gather cinnamon sticks of equal length and arrange them vertically around a pillar candle, securing them with twine or jute string. Finish with a wide ribbon in red, gold, or plaid pattern tied in a bow, adding sprigs of artificial evergreen or small pinecones for extra detail.
These candle holders are perfect for creating a cozy ambiance during holiday dinners or quiet winter evenings. The natural materials and warm glow of candlelight combine to create a sensory experience that embodies the spirit of Christmas.
Tips for Creating Cinnamon Stick Candle Holders:
- Use hot glue at the base to secure cinnamon sticks before tying with ribbon.
- Choose natural jute twine for a rustic look or satin ribbon for elegant occasions.
- Never leave burning candles unattended, especially with flammable decorations nearby.
- Create multiple holders in varying heights for a stunning centerpiece display.
4. Paper Snowflake Window Decorations
Bring the beauty of winter indoors with delicate paper snowflakes adorning your windows. This classic DIY Christmas decoration is simple, affordable, and creates a stunning visual effect when light filters through the intricate patterns, casting beautiful shadows throughout the room.
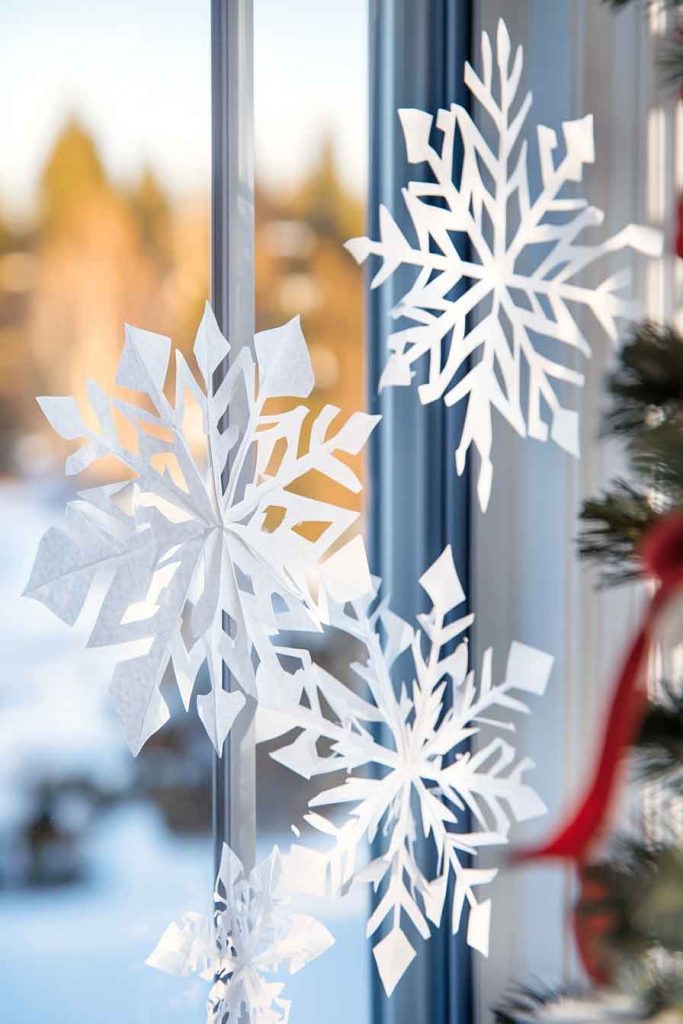
Use white printer paper or decorative scrapbook paper folded into triangles, then cut various patterns along the edges to create unique snowflake designs. Attach them to windows using removable adhesive putty or tape, arranging them in clusters or spreading them across the glass for a winter wonderland effect.
This project is perfect for spending quality time with family, as everyone can create their own snowflake designs. The result is a personalized winter display that costs almost nothing but delivers maximum visual impact.
Tips for Making Paper Snowflakes:
- Fold paper multiple times for more intricate and symmetrical designs.
- Use sharp scissors for clean cuts and detailed patterns.
- Vary snowflake sizes for visual interest and depth.
- Attach snowflakes at different heights to create a three-dimensional effect.
5. Burlap and Lace Christmas Stockings
Craft charming personalized stockings using burlap fabric and delicate lace trim for a rustic-chic holiday decoration. These handmade stockings combine the texture of burlap with the elegance of lace, creating a perfect blend of country charm and sophisticated style.
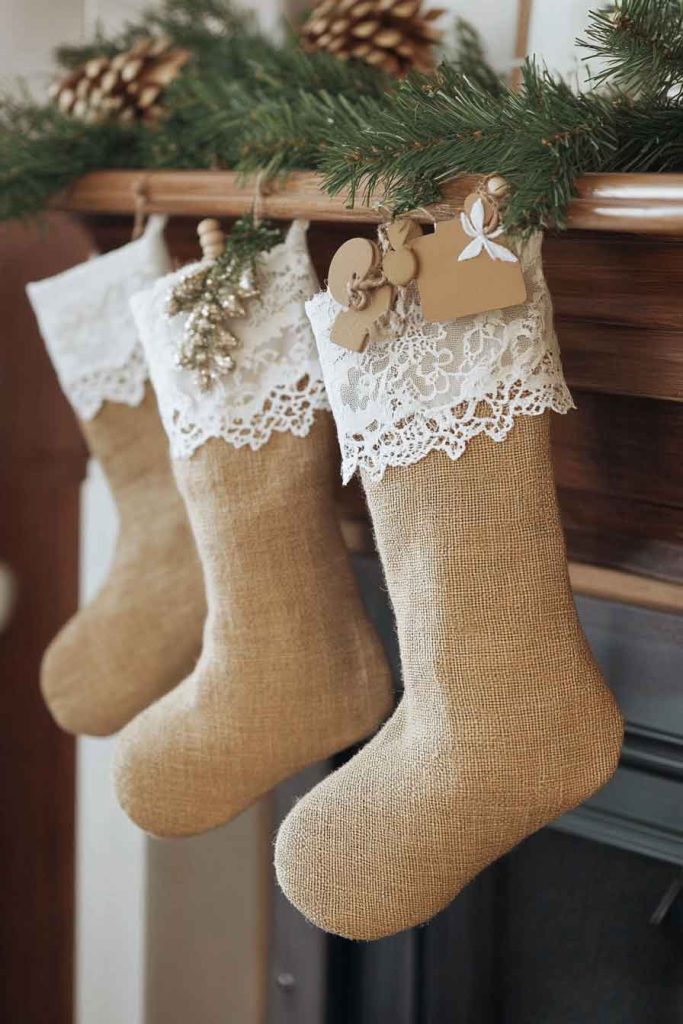
Cut stocking shapes from burlap fabric, sew or glue the edges together, and embellish with lace trim along the top edge. Add personalized touches like embroidered names, fabric letters, or decorative buttons to make each stocking unique for family members.
Hanging these handmade stockings by the fireplace or along a staircase creates a heartwarming focal point that celebrates both tradition and creativity. They’re not only beautiful decorations but also cherished keepsakes that can be used year after year.
Tips for Creating Burlap Stockings:
- Use a cardboard template to ensure consistent stocking shapes and sizes.
- Reinforce seams with double stitching for durability and longevity.
- Add a fabric liner inside burlap to prevent small gifts from falling through.
- Decorate with buttons, ribbons, or wooden tags for personalization.
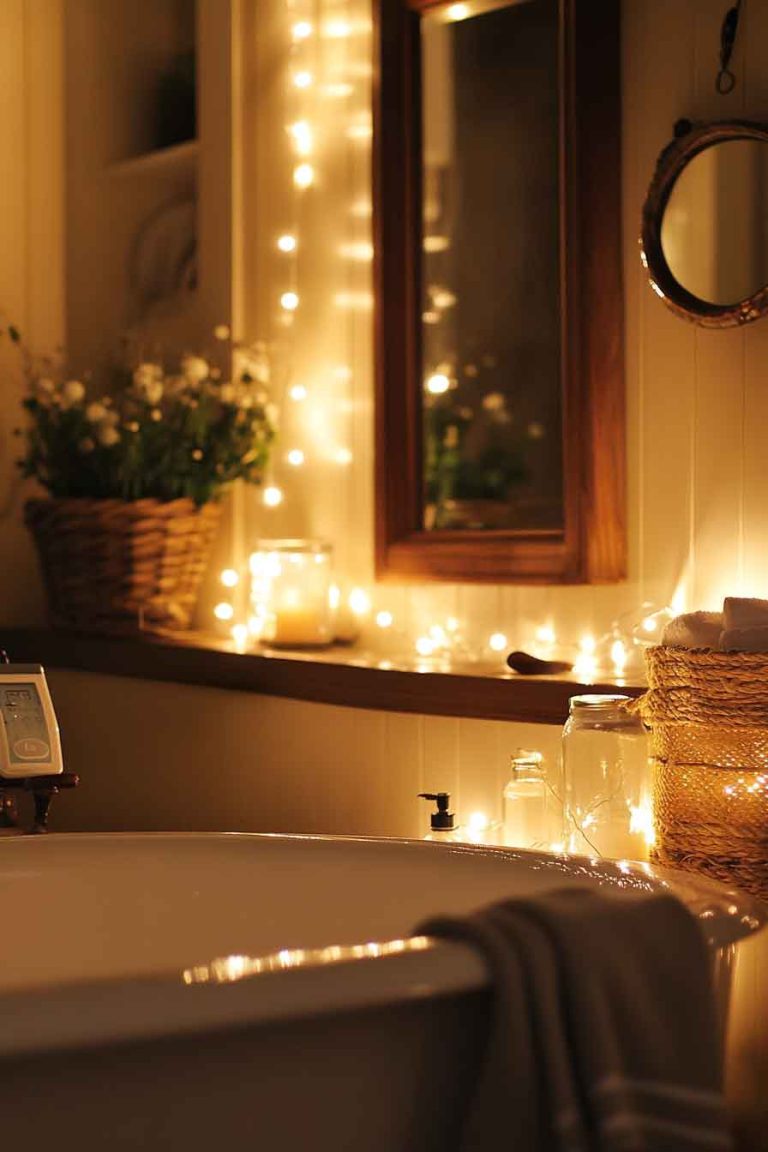
6. Twinkling Light Jar Luminaries
Transform simple glass jars into magical luminaries by filling them with battery-operated fairy lights. These enchanting DIY decorations create a warm, twinkling glow that adds ambiance to any room, perfect for mantels, windowsills, or outdoor displays.
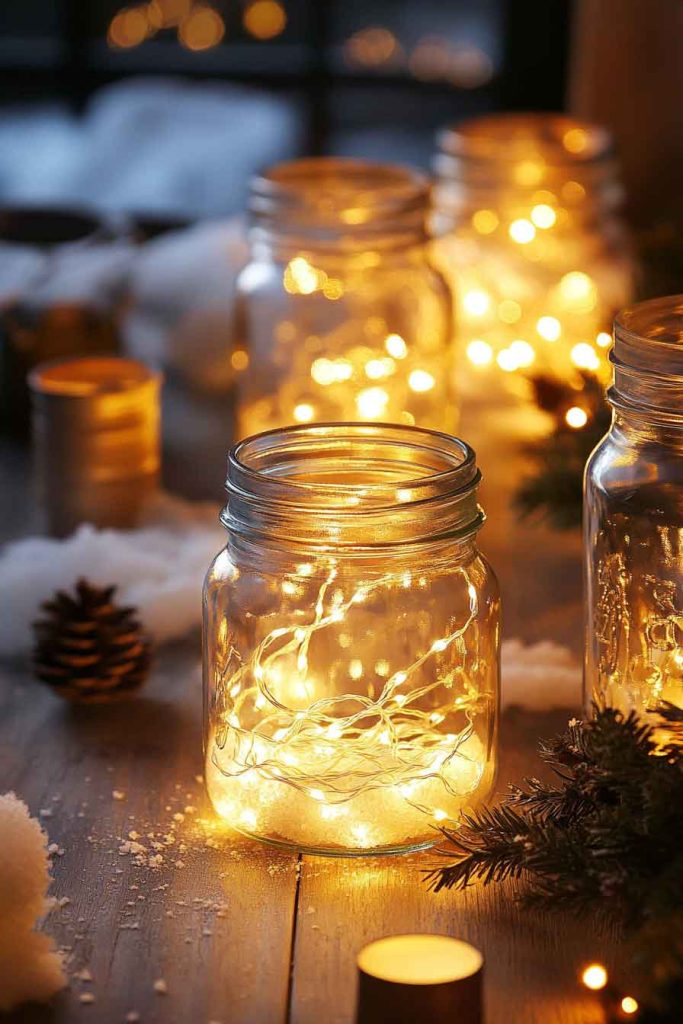
Choose clear glass jars in various sizes and shapes, from mason jars to apothecary containers. Wrap battery-operated LED string lights inside, letting them cascade naturally for a random, organic look that sparkles beautifully in the dark.
These versatile luminaries can be decorated further with ribbon around the jar rim, painted snowflakes on the glass, or filled with artificial snow, pinecones, or ornaments for added visual interest during the day.
Tips for Making Light Jar Luminaries:
- Use battery-operated LED lights to avoid heat and fire hazards.
- Choose warm white lights for cozy ambiance or colored lights for playful displays.
- Add Epsom salt to the bottom of jars for a snowy, crystalline effect.
- Group multiple jars together in varying heights for maximum impact.
7. Felt Christmas Tree Garland
Create a charming handmade garland featuring miniature felt Christmas trees strung together with twine. This whimsical decoration adds a pop of color and handcrafted charm to mantels, walls, or doorways, bringing festive cheer without overwhelming your space.
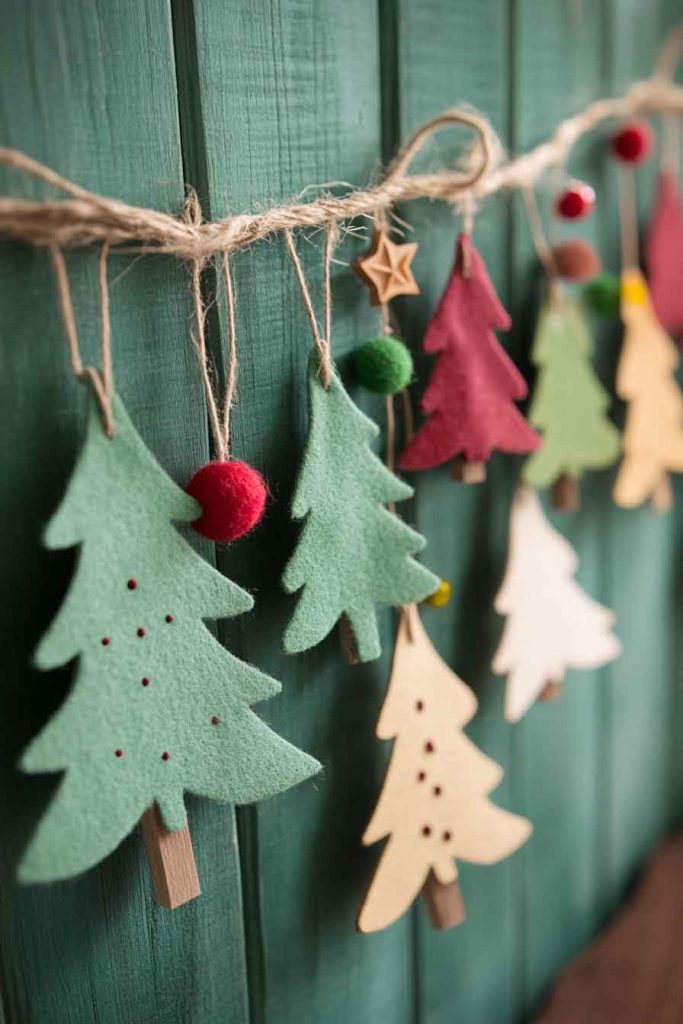
Cut small triangle shapes from green felt in various shades, stack them to create dimensional tree shapes, and secure with a stitch or glue. Attach small pom-poms or beads as ornaments, then string the trees along jute twine or ribbon with spacing between each tree.
This project is wonderfully adaptable, allowing you to customize colors, sizes, and embellishments to match your existing decor. The soft texture of felt adds warmth and coziness to your holiday display.
Tips for Creating Felt Tree Garland:
- Use pinking shears to cut felt edges for a decorative finish.
- Vary tree sizes and shades of green for visual interest.
- Add small wooden star toppers using hot glue for extra detail.
- Make the garland long enough to drape naturally with gentle curves.
8. Rustic Wooden Slice Ornaments
Turn natural wood slices into beautiful rustic ornaments with hand-painted designs or wood-burned patterns. These charming DIY decorations celebrate the beauty of natural materials while adding a personalized, handcrafted touch to your Christmas tree.
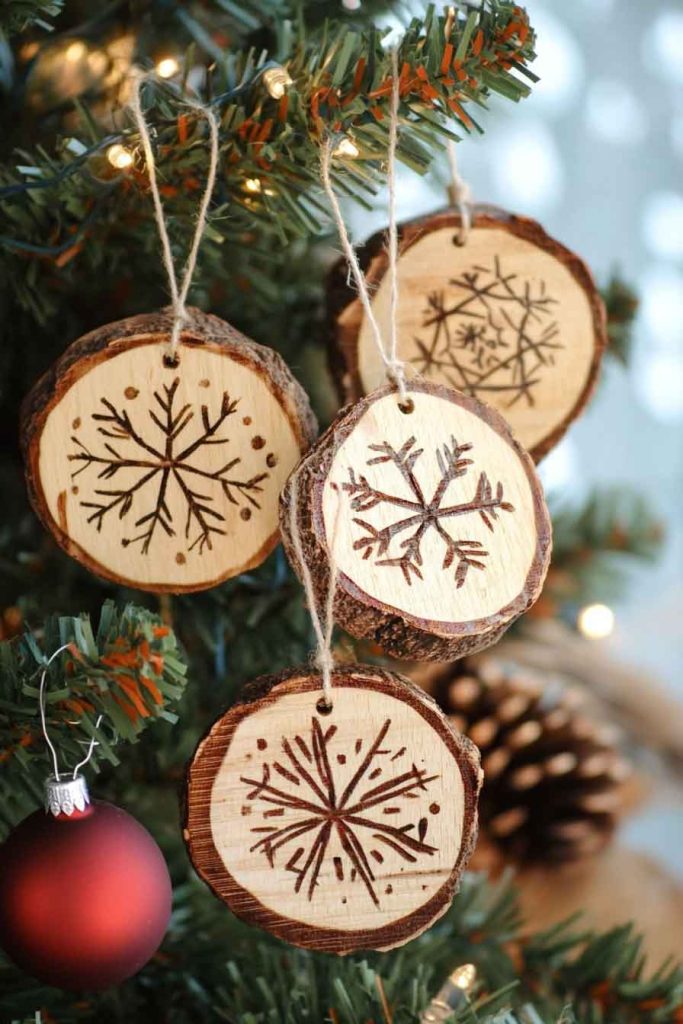
Purchase pre-cut wood slices or cut your own from fallen branches, ensuring they’re dried and sanded smooth. Paint festive designs like snowflakes, reindeer, or simple geometric patterns, or use a wood-burning tool for permanent designs. Drill a small hole at the top and add twine or ribbon for hanging.
Each ornament becomes a unique piece of art that reflects the natural variations in the wood grain. These ornaments also make thoughtful handmade gifts that friends and family will treasure for years.
Tips for Making Wood Slice Ornaments:
- Sand wood slices smooth before decorating to ensure even paint application.
- Apply a clear sealant to protect painted designs and preserve the wood.
- Use acrylic paint for vibrant colors that dry quickly and last long.
- Write the year on the back to create dated keepsakes.
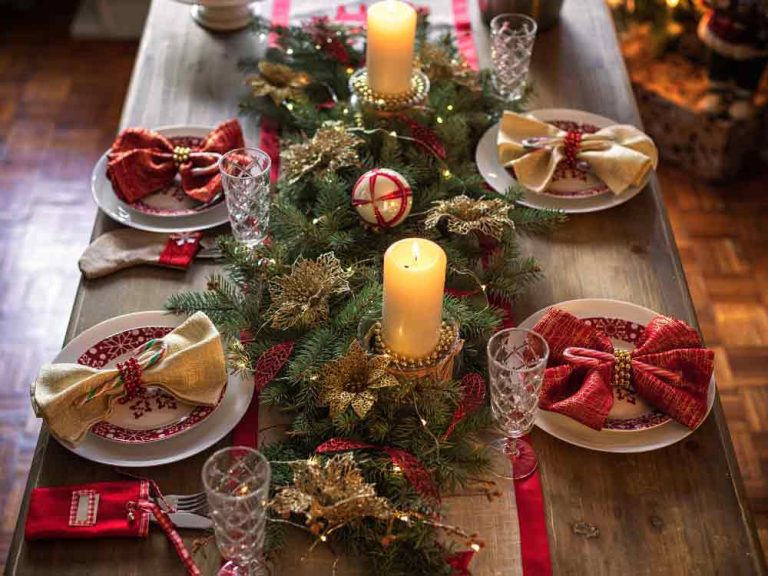
9. Evergreen and Cranberry Centerpiece
Craft a stunning natural centerpiece using fresh evergreen branches, vibrant cranberries, and pillar candles. This elegant DIY arrangement brings the colors and scents of Christmas to your dining table while creating a focal point that impresses guests at holiday gatherings.

Arrange evergreen branches in a low, wide container or directly on a decorative tray. Nestle pillar candles of varying heights among the greenery, scatter fresh cranberries around the base, and add pinecones or cinnamon sticks for texture and fragrance.
This living centerpiece evolves throughout the season as the evergreen releases its fresh scent and the cranberries add pops of rich red color. The natural elements create an organic, elegant display that feels both festive and sophisticated.
Tips for Creating Evergreen Centerpieces:
- Cut evergreen branches fresh for maximum fragrance and longevity.
- Place a protective mat under the arrangement to protect table surfaces.
- Mist evergreen branches lightly with water every few days to keep them fresh.
- Use unscented candles to avoid competing with the natural evergreen scent.
10. DIY Advent Calendar with Paper Bags
Create an interactive countdown to Christmas with a handmade advent calendar using small paper bags decorated with numbers and filled with treats or small gifts. This charming DIY project builds anticipation and excitement throughout December while doubling as festive wall decor.
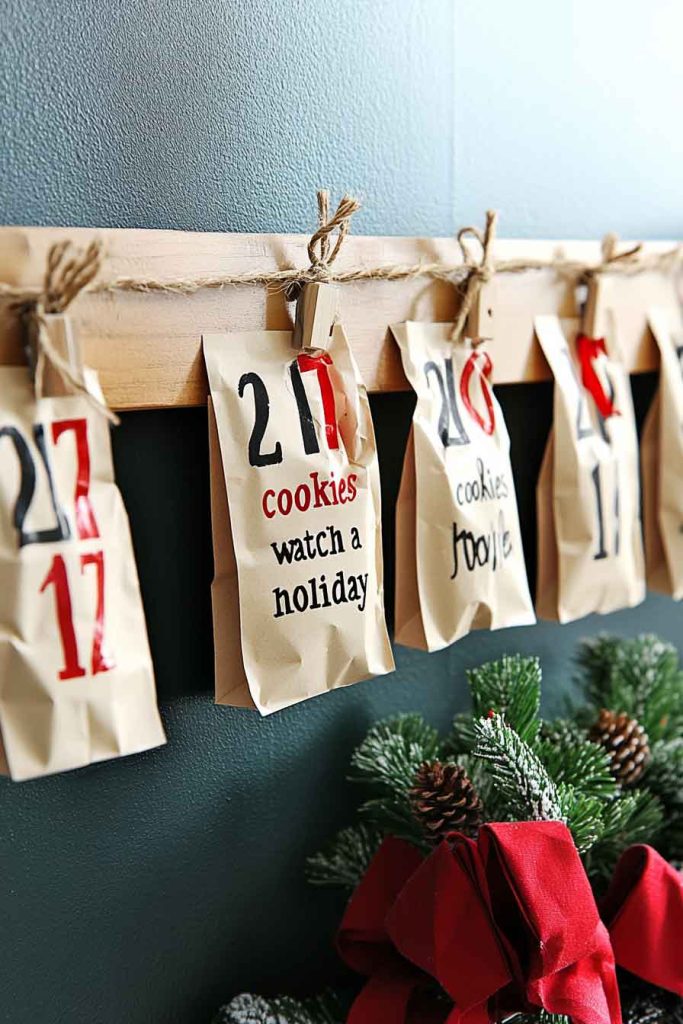
Decorate 24 small paper bags with hand-drawn or printed numbers, embellish with stamps, stickers, or hand-lettering, and fill each bag with chocolates, small toys, inspirational quotes, or activity ideas. Attach bags to a length of twine or ribbon using mini clothespins, creating a garland-style display.
This personalized advent calendar becomes a daily ritual that brings joy to children and adults alike. The bags can be reused year after year, making this a sustainable and meaningful holiday tradition.
Tips for Making Paper Bag Advent Calendars:
- Use kraft paper bags for a rustic look or colored bags for festive appeal.
- Number bags randomly rather than sequentially for added surprise.
- Include activity ideas like “bake cookies” or “watch a holiday movie” for family bonding.
- Hang the calendar at child-friendly height for easy daily access.
11. Pinecone Fire Starters with Wax
Create practical and decorative fire starters by dipping pinecones in melted wax and adding festive wicks. These functional DIY decorations look beautiful displayed in a basket near the fireplace while serving as helpful tools for starting cozy fires on cold winter nights.
Melt paraffin or soy wax in a double boiler, holding pinecones by their stems to dip them into the wax, allowing excess to drip off. Press a short piece of cotton wick into the top of each pinecone before the wax hardens, and optionally add a few drops of cinnamon or pine essential oil for fragrance.
These charming fire starters make excellent gifts for hosts or anyone with a fireplace. Arranged in a decorative bowl or basket, they add rustic charm to your decor while serving a useful purpose.
Tips for Making Pinecone Fire Starters:
- Work in a well-ventilated area when melting wax for safety.
- Use tongs or pliers to hold pinecones during dipping to avoid burns.
- Place dipped pinecones on parchment paper to cool and harden completely.
- Add red or green wax dye for festive colored fire starters.
12. Fabric Scrap Christmas Bunting
Transform leftover fabric scraps into colorful Christmas bunting that adds festive charm to any room. This eco-friendly DIY decoration uses materials you likely already have at home, creating a cheerful display while reducing waste.
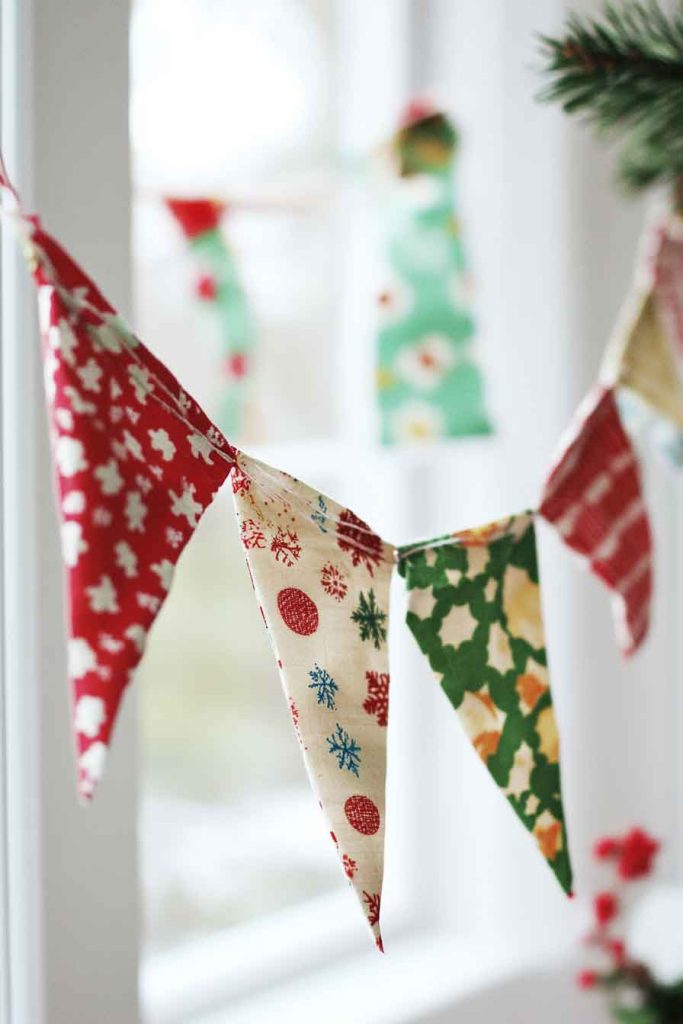
Cut fabric scraps into triangle shapes in Christmas colors and patterns like red, green, plaid, or snowflake prints. Fold the top edge of each triangle over a length of ribbon or twine and sew or glue in place, spacing triangles evenly along the length.
This versatile decoration works beautifully draped across mantels, hung along walls, or strung across doorways. The mix of patterns and textures creates a playful, cottage-style look that feels warm and inviting.
Tips for Creating Fabric Bunting:
- Use pinking shears to prevent fraying on fabric edges.
- Mix solid colors with patterns for visual balance and interest.
- Make bunting extra-long to create dramatic swags and draping.
- Iron fabric triangles before attaching for a crisp, polished appearance.
13. Orange and Clove Pomanders
Create fragrant natural decorations by studding fresh oranges with whole cloves in decorative patterns. These traditional pomanders fill your home with a delightful spicy-citrus scent while adding charming rustic appeal to bowls, centerpieces, or hanging displays.
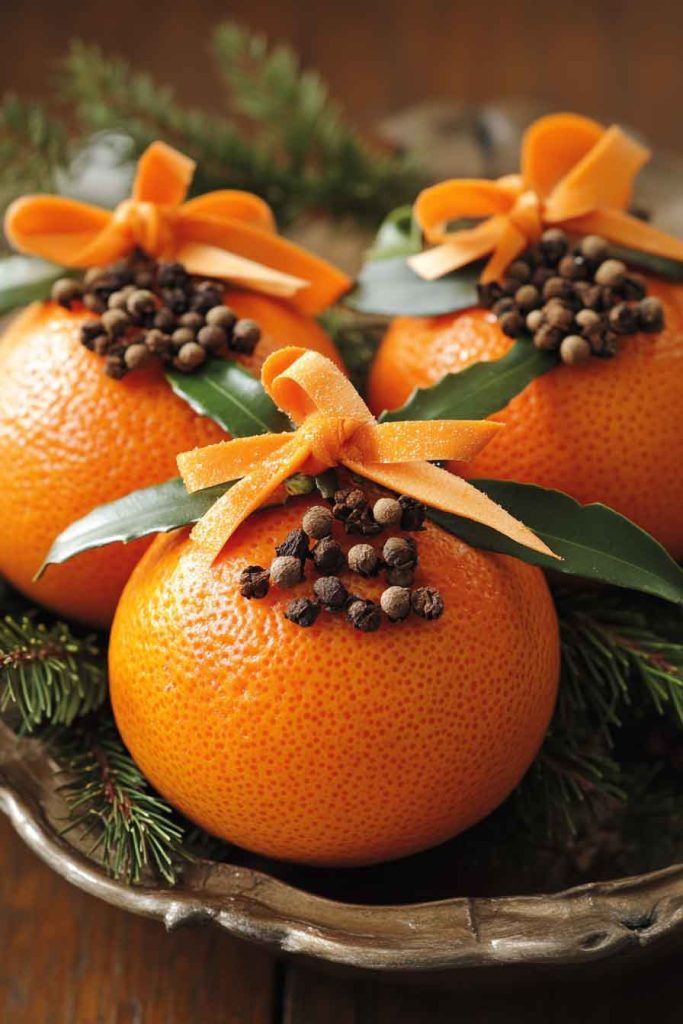
Use a skewer or toothpick to pre-poke holes in the orange skin, then insert whole cloves to create patterns like stripes, spirals, or random designs. Roll finished pomanders in a mixture of cinnamon and ground cloves, then let them dry for several days in a cool, dry location.
As the oranges dry, they shrink and harden, preserving the pomanders for weeks or even months. The natural fragrance is warm and inviting, creating a sensory experience that evokes nostalgic holiday memories.
Tips for Making Orange Pomanders:
- Choose firm oranges with thick skin for best results and longevity.
- Space cloves close together for maximum fragrance and visual impact.
- Tie ribbon around the orange before studding to create decorative sections.
- Display pomanders in open bowls to allow fragrance to circulate freely.
14. Repurposed Ladder Christmas Tree
Transform a vintage wooden ladder into a unique Christmas tree alternative by decorating the rungs with garland, ornaments, and lights. This creative DIY project is perfect for small spaces or for adding an unexpected decorative element to any room.
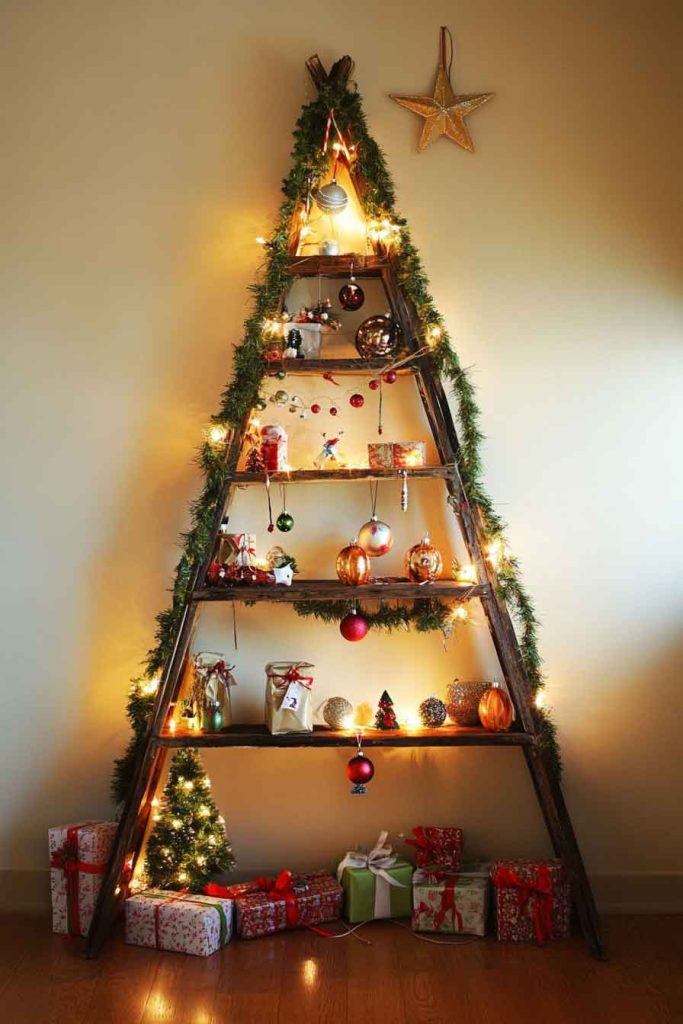
Lean a wooden ladder against a wall, wrap evergreen garland or tinsel around the rungs, and hang ornaments at varying lengths using ribbon or fishing line. Add battery-operated string lights woven throughout, and top with a star or bow for a complete tree effect.
This space-saving solution offers all the charm of a traditional Christmas tree with a unique twist that showcases your creativity. It’s also easy to disassemble and store after the holidays.
Tips for Creating a Ladder Christmas Tree:
- Secure the ladder to the wall for safety and stability.
- Use lighter ornaments to avoid weighing down the ladder structure.
- Vary ornament heights and sizes for a natural, layered appearance.
- Add a tree skirt or wrapped presents at the base for authentic tree appeal.
15. Hand-Poured Cinnamon Candles
Craft custom scented candles infused with cinnamon essential oil and topped with cinnamon stick decorations. These handmade candles fill your home with warm, spicy fragrance while creating beautiful decorative accents for your holiday decor.
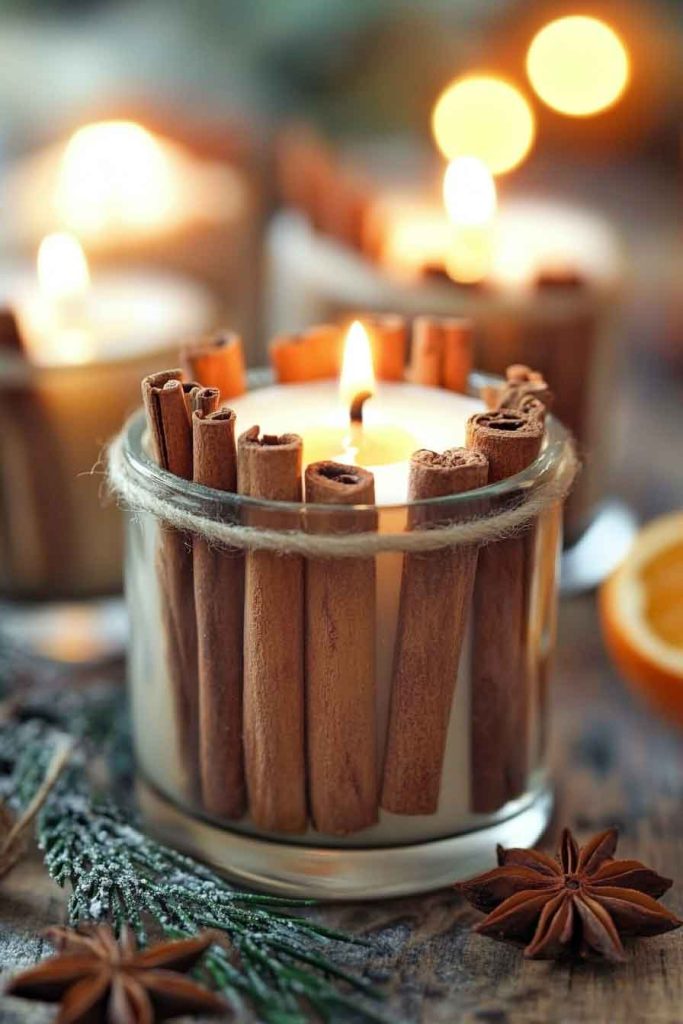
Melt soy or paraffin wax in a double boiler, add cinnamon essential oil, and pour into glass containers with pre-positioned wicks. Before the wax fully hardens, press cinnamon sticks vertically around the inside edges of the glass, creating a decorative border that releases additional fragrance when the candle burns.
These artisan candles make wonderful gifts or personal indulgences that add ambiance to holiday gatherings. The natural materials and warm scent create a cozy atmosphere perfect for winter evenings.
Tips for Making Cinnamon Candles:
- Use a thermometer to ensure wax is at proper temperature before adding fragrance.
- Secure wicks with glue dots at the container bottom before pouring wax.
- Add dried orange slices or star anise for additional visual and aromatic appeal.
- Let candles cure for 24-48 hours before burning for optimal scent throw.
16. Miniature Gingerbread House Village
Create an enchanting display of miniature gingerbread houses arranged on a white-dusted board to resemble a snowy village. This delightful DIY project combines baking with decorating, resulting in an edible centerpiece that delights both children and adults.
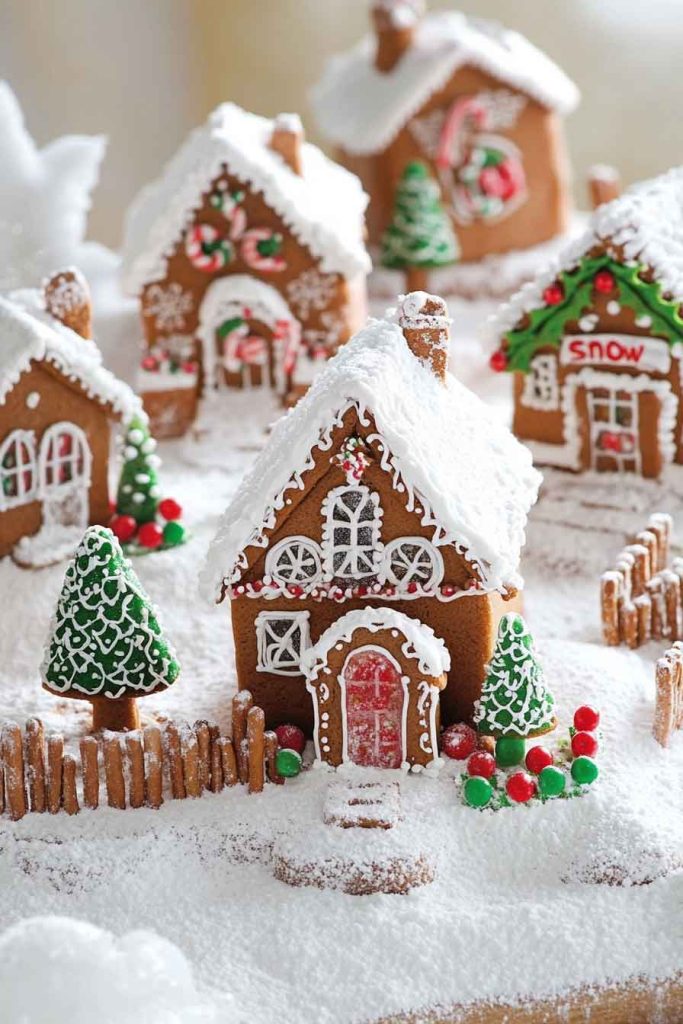
Bake gingerbread using your favorite recipe, cut out house shapes using templates, and assemble using royal icing as glue. Decorate each house with colorful candies, icing details, and pretzel stick fences. Arrange on a board covered with powdered sugar “snow” and add bottle brush trees for a complete village scene.
This project becomes a cherished holiday tradition that brings families together in the kitchen. The finished village serves as both decoration and dessert, adding sweetness to your Christmas celebrations.
Tips for Creating Gingerbread Villages:
- Make gingerbread dough a day ahead to allow proper chilling and easier cutting.
- Use thick royal icing for strong construction that holds houses together.
- Let assembled houses dry completely before adding decorative details.
- Display on a raised platform to create a focal point and protect surfaces.
17. Wine Cork Reindeer Ornaments
Repurpose wine corks into adorable reindeer ornaments with googly eyes, red pom-pom noses, and twig antlers. These whimsical DIY decorations are perfect for tree ornaments or package embellishments, adding personality and charm to your Christmas decor.

Glue small googly eyes and a miniature red pom-pom nose onto a wine cork, insert small twigs or bent pipe cleaners into the top for antlers, and add a ribbon loop for hanging. Paint the cork brown if desired, or leave it natural for rustic appeal.
These quick and easy ornaments are perfect for crafting with children or making in bulk for gifts. Each reindeer develops its own personality based on antler positioning and facial features.
Tips for Making Cork Reindeer:
- Use a drill or sharp tool to create pilot holes for antlers.
- Add small felt scarves or bells around the neck for extra festive detail.
- Seal with clear varnish to preserve and protect the decorations.
- Write the year and maker’s name on the bottom for keepsake value.
18. Plaid Flannel Throw Pillow Covers
Sew festive throw pillow covers from red and green plaid flannel fabric to instantly add Christmas cheer to your living room or bedroom. These cozy DIY pillow covers are simple to make and can be easily removed and stored after the holidays.
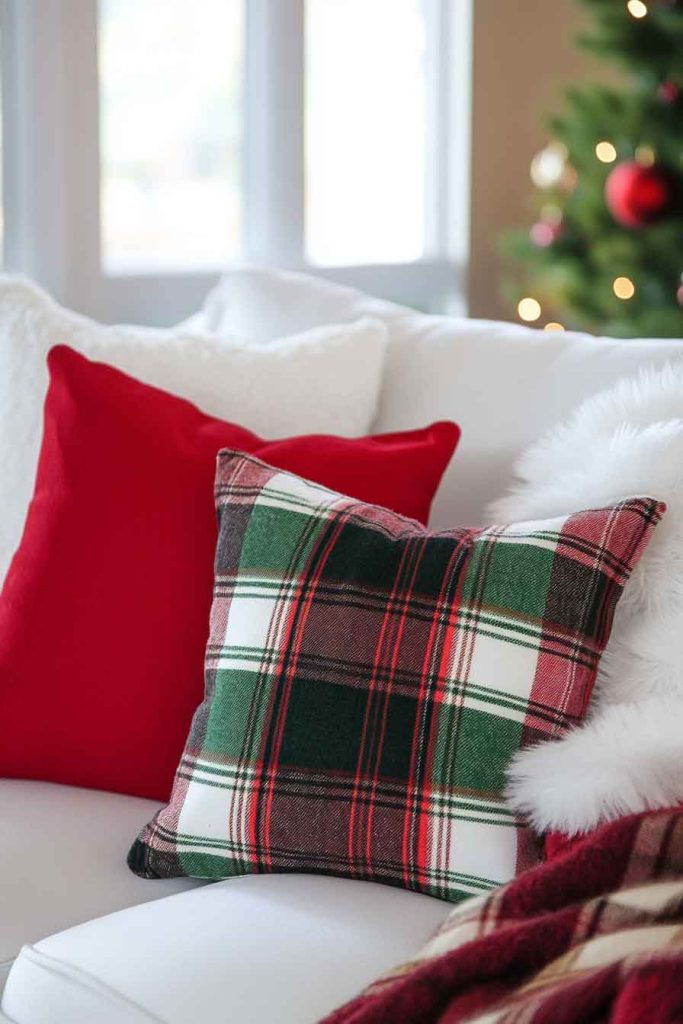
Cut flannel fabric to fit your existing throw pillows, leaving extra for seam allowances. Sew three sides together with right sides facing, turn right side out, insert pillow form, and close the fourth side with an envelope closure or zipper for easy removal.
The soft texture of flannel adds warmth and comfort to your space while the classic plaid pattern evokes traditional Christmas charm. These pillow covers can be mixed with existing decor for subtle holiday touches.
Tips for Making Flannel Pillow Covers:
- Pre-wash flannel fabric to prevent shrinkage after sewing.
- Use contrasting thread colors for decorative topstitching detail.
- Add pom-pom trim or ribbon along edges for extra festive appeal.
- Make covers slightly smaller than pillow forms for plump, full appearance.
19. Birch Log Candle Holders
Create natural candle holders by drilling holes into birch log sections and inserting tea light or votive candles. These rustic DIY decorations bring woodland charm to your holiday decor while providing soft, ambient lighting for cozy winter evenings.
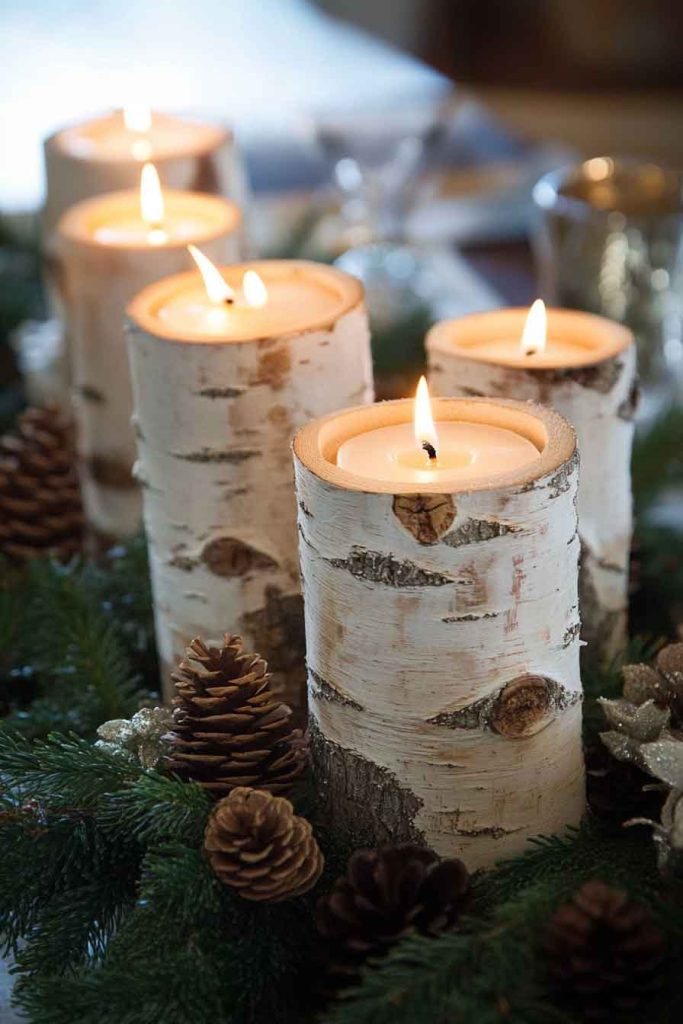
Cut birch logs into sections of varying heights, drill holes in the top to fit candle size, and sand the top surface smooth. Arrange multiple log holders in groups on mantels or tables, adding sprigs of evergreen, holly, or cranberries around the base.
The natural white bark of birch creates a beautiful contrast with warm candlelight, while the organic shapes add texture and interest to your decor. These holders work beautifully for both rustic and modern aesthetic styles.
Tips for Making Birch Log Candle Holders:
- Use a spade bit sized to your candle diameter for clean holes.
- Drill holes deep enough to hold candles securely but not all the way through.
- Treat wood with furniture polish to enhance the natural bark appearance.
- Place on decorative trays or chargers to catch wax drips and protect surfaces.
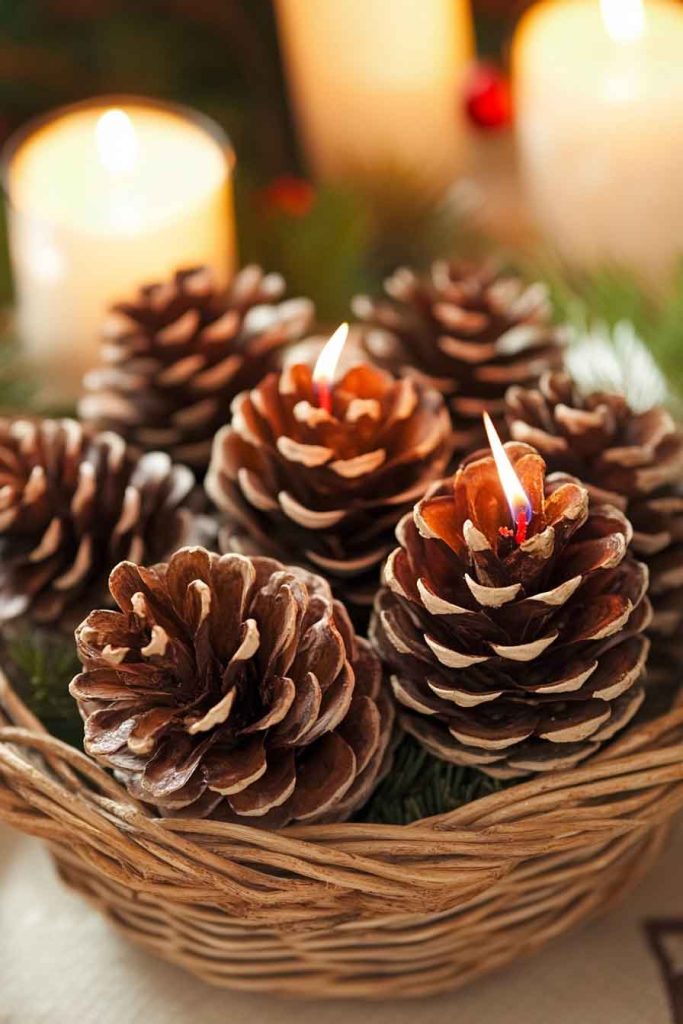
20. Frosted Pinecone Centerpiece Bowl
Fill a decorative bowl with pinecones dusted with artificial snow or white paint for an elegant winter centerpiece. This simple DIY decoration captures the beauty of a winter forest while adding sophisticated texture to your holiday table.

Collect pinecones of various sizes, lightly spray with white paint or dust with artificial snow, and allow to dry completely. Arrange in a wide, shallow bowl or on a decorative tray, adding white battery-operated lights nestled among the pinecones for evening sparkle.
This versatile centerpiece works beautifully on dining tables, coffee tables, or console tables, bringing the beauty of nature indoors with minimal effort. The neutral color palette complements any existing decor style.
Tips for Creating Frosted Pinecone Displays:
- Apply paint in light coats for a natural, dusted appearance rather than solid coverage.
- Mix frosted pinecones with natural ones for dimensional interest.
- Add silver or gold spray paint accents for extra glamour and shine.
- Tuck in sprigs of artificial berries or greenery for pops of color.
21. Wooden Bead Garland with Greenery
String natural wooden beads on jute twine and weave in artificial eucalyptus or evergreen sprigs to create a modern farmhouse-style garland. This trendy DIY decoration adds texture and understated elegance to mantels, shelves, or Christmas trees.
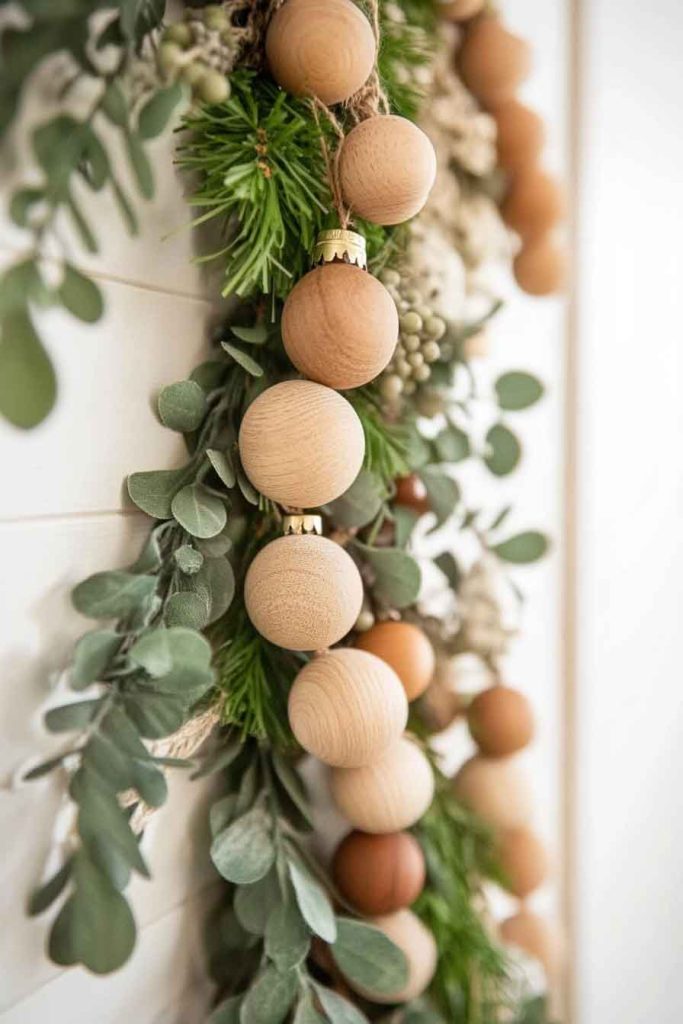
Thread large wooden beads onto strong jute twine or leather cord, spacing them evenly or in clusters. Weave artificial greenery through the beads, securing with small dabs of hot glue if needed, and add small jingle bells or miniature ornaments for festive accents.
This minimalist garland appeals to those who prefer subtle, natural decorations over bright, traditional Christmas colors. The neutral tones and organic materials create a calm, sophisticated holiday atmosphere.
Tips for Making Wooden Bead Garland:
- Use beads in varying sizes for visual interest and movement.
- Choose natural or whitewashed wooden beads for different aesthetic effects.
- Make garland long enough to drape naturally with gentle swoops.
- Add fabric tassels at ends for a finished, designer look.
22. Sweater-Wrapped Vase Collection
Upcycle old Christmas sweaters by cutting sleeves and wrapping them around glass vases to create cozy, textured holiday decor. This creative DIY project breathes new life into worn sweaters while adding warmth and personality to your home.
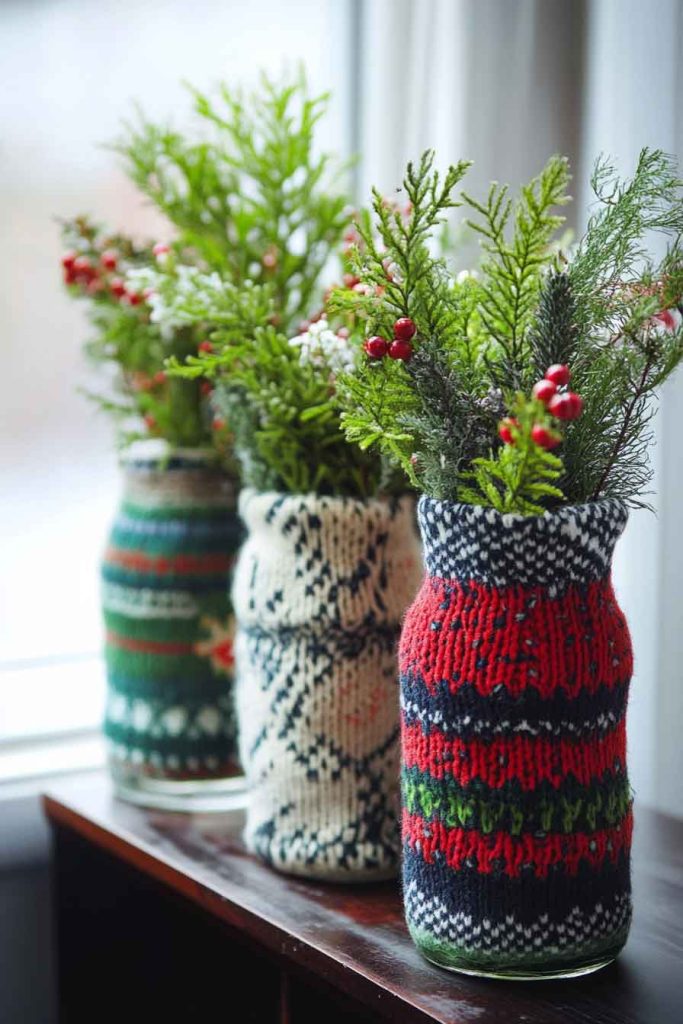
Cut sleeves from old sweaters in festive patterns like Fair Isle, cable knit, or Nordic designs. Slip them over glass vases of various heights, folding the top edge down for a clean finish, and secure with ribbon, twine, or decorative pins. Fill vases with evergreen branches, holly, or holiday flowers.
These charming wrapped vases add instant coziness to any surface while providing a unique way to display fresh or artificial winter greenery. They’re also wonderful conversation starters that showcase your creativity.
Tips for Creating Sweater-Wrapped Vases:
- Use sweaters with interesting textures or patterns for maximum visual impact.
- Cut sleeves slightly longer than vases to allow for folding and adjustment.
- Add decorative buttons, brooches, or small ornaments to embellish the wrapping.
- Group multiple wrapped vases in varying heights for a cohesive display.
23. Peppermint Stick Wreath
Create a refreshing and whimsical wreath by gluing wrapped peppermint sticks to a foam wreath form in a circular pattern. This playful DIY decoration adds a pop of red and white color while celebrating the sweet side of Christmas.
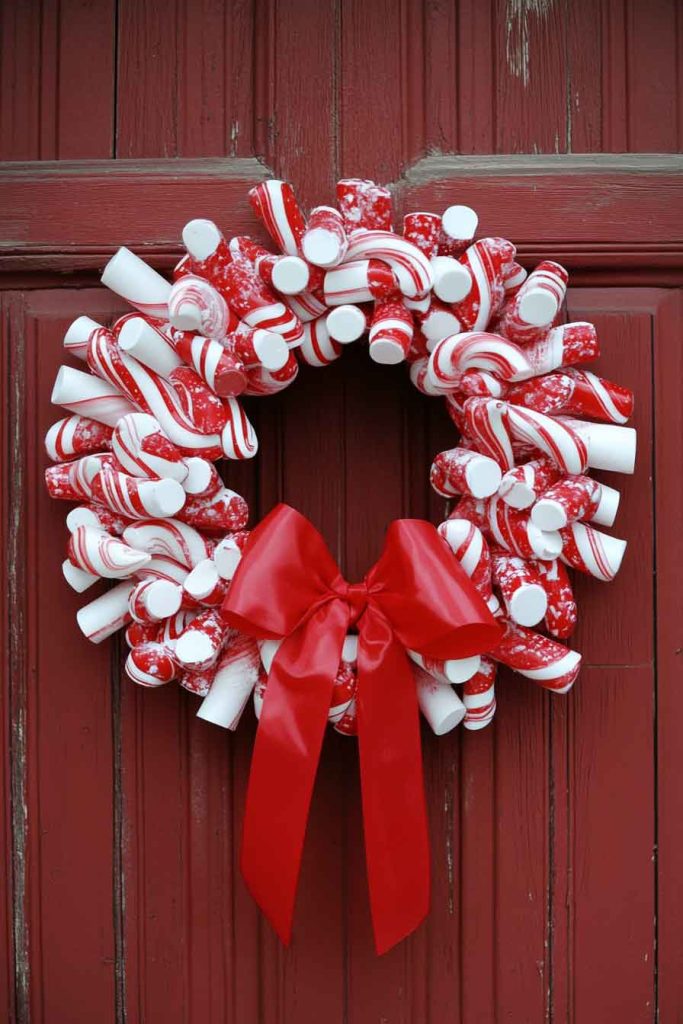
Purchase individually wrapped peppermint sticks or candy canes, attach them side-by-side around a foam wreath form using hot glue, and fill any gaps with smaller peppermints or red ribbon. Add a large bow at the bottom and hang on your door or wall for a sweet welcome.
This edible-themed wreath delights children and adds a lighthearted, candy-shop charm to your holiday decor. It’s a fun alternative to traditional greenery wreaths that showcases your playful spirit.
Tips for Making Peppermint Stick Wreaths:
- Keep peppermints in wrappers to protect them and add shine.
- Work in a cool environment to prevent candies from becoming sticky.
- Use a wire wreath form for lighter weight if using many candies.
- Display indoors to protect candies from moisture and temperature changes.
24. Rustic Wooden Star Decorations
Cut star shapes from reclaimed wood or plywood and finish with stain or paint for charming rustic ornaments or wall decorations. These versatile DIY stars add farmhouse appeal to your Christmas decor and can be displayed in numerous creative ways.

Trace or print star templates in various sizes, transfer to wood, and cut out using a jigsaw or scroll saw. Sand edges smooth, apply stain for a natural look or paint in festive colors, and add hanging twine or display freestanding on mantels and shelves.
These handcrafted stars become cherished decorations that work beautifully grouped together or mixed with other rustic elements. Their simple shapes and natural materials create timeless appeal that transcends temporary trends.
Tips for Creating Wooden Star Decorations:
- Use different wood types for varied grain patterns and natural color variations.
- Add white-washed or distressed finishes for vintage farmhouse appeal.
- Drill small holes for hanging or attach ribbon loops to the back.
- Create a gallery wall of stars in graduating sizes for dramatic effect.
25. Yarn-Wrapped Letter Monograms
Wrap large cardboard or wooden letters in festive yarn to create personalized Christmas decorations spelling out names, “JOY,” “NOEL,” or other holiday words. This simple DIY project adds a personal touch to your decor while being budget-friendly and fun to create.

Purchase or cut large letters from thick cardboard, wrap tightly with yarn in Christmas colors, securing ends with hot glue. Embellish with small ornaments, bells, or artificial flowers for added dimension, and display on mantels, shelves, or tables.
These customized letter decorations make wonderful gifts when spelling out recipients’ names or can create festive word displays that become focal points in your holiday decor.
Tips for Making Yarn-Wrapped Letters:
- Choose thick, chunky yarn for faster coverage and better texture.
- Wrap yarn tightly and evenly to avoid gaps showing cardboard underneath.
- Use contrasting yarn colors for a bold, eye-catching appearance.
- Apply a coat of mod podge over wrapped yarn to secure and protect.
26. Eucalyptus and White Berry Garland
Create an elegant garland using artificial eucalyptus stems, white berries, and silver accents for a sophisticated, wintry decoration. This DIY project brings a fresh, modern take on traditional garland while maintaining a festive atmosphere.
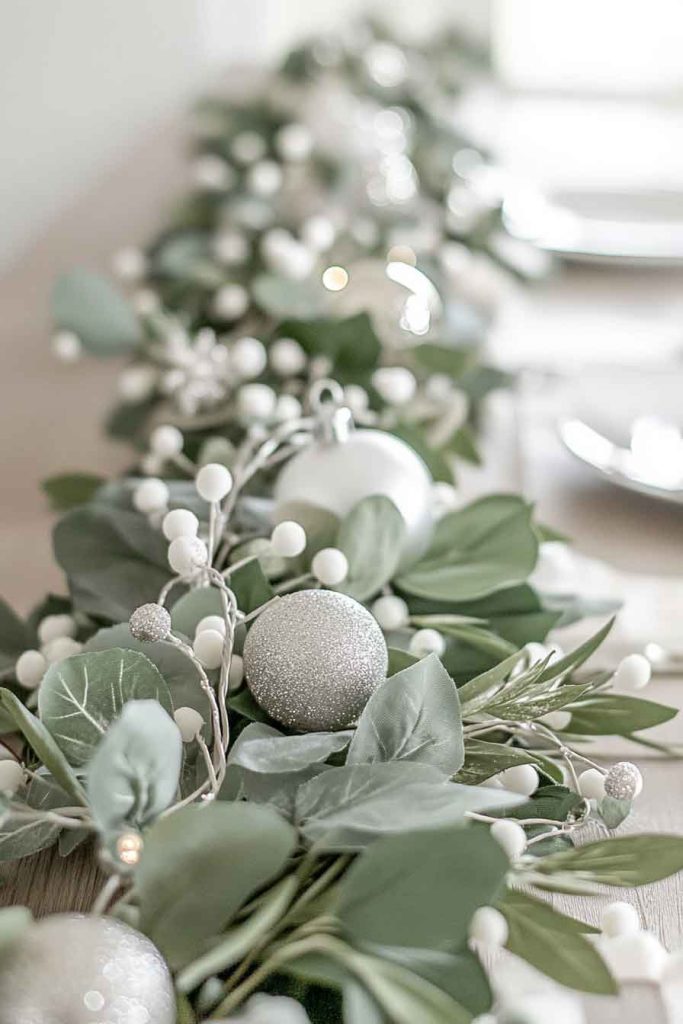
Wire together eucalyptus stems to create a base, weave in white berry branches and silver ornaments, and add white or silver ribbon woven throughout. Drape across mantels, wind around stair railings, or lay as a table runner for elegant holiday displays.
The muted color palette of this garland creates a refined, upscale look that complements modern and traditional decor styles alike. It’s perfect for those who prefer subtle elegance over bold, traditional Christmas colors.
Tips for Creating Eucalyptus Garland:
- Use floral wire to secure stems together for flexibility and strength.
- Add battery-operated white lights woven through for evening ambiance.
- Spray with artificial snow for added wintry texture and shimmer.
- Make garland modular in sections for easier storage and reuse.
27. Tin Can Lanterns with Punched Patterns
Repurpose tin cans into charming lanterns by punching decorative patterns and painting in festive colors. These DIY luminaries create beautiful light patterns when candles or LED lights are placed inside, adding ambiance to holiday evenings.
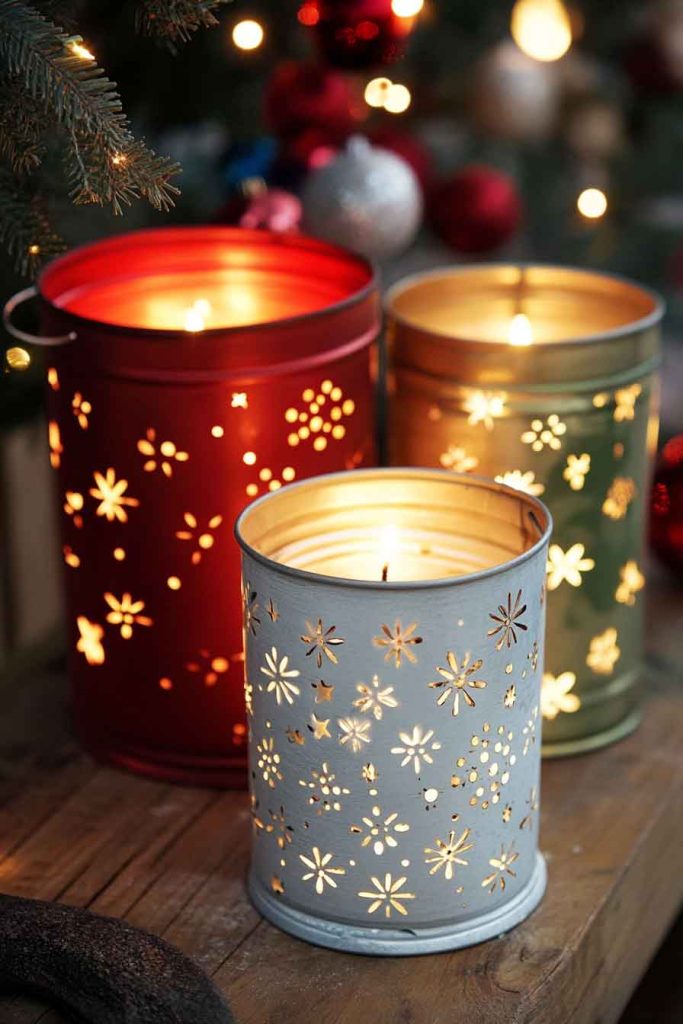
Clean and remove labels from tin cans, fill with water and freeze solid, then use a hammer and nail to punch patterns like snowflakes, stars, or Christmas trees into the sides. Paint exteriors in colors like white, red, or metallic gold, and add wire handles for hanging.
These rustic lanterns work beautifully lining walkways, hanging from tree branches, or grouped on tables for soft, patterned lighting. They’re an eco-friendly way to upcycle materials while creating charming decorations.
Tips for Making Tin Can Lanterns:
- Freeze water inside cans to prevent crushing while punching holes.
- Plan patterns on paper first and tape to cans as guides for punching.
- Sand sharp edges around the top rim for safety.
- Use battery-operated tea lights for safe, flameless illumination.
28. Ribbon Candy Christmas Tree
Stack and glue ribbons in loops to create a dimensional ribbon candy effect on a cone-shaped base, forming a unique tabletop Christmas tree. This colorful DIY decoration adds whimsy and texture to your holiday displays while showcasing your creativity.
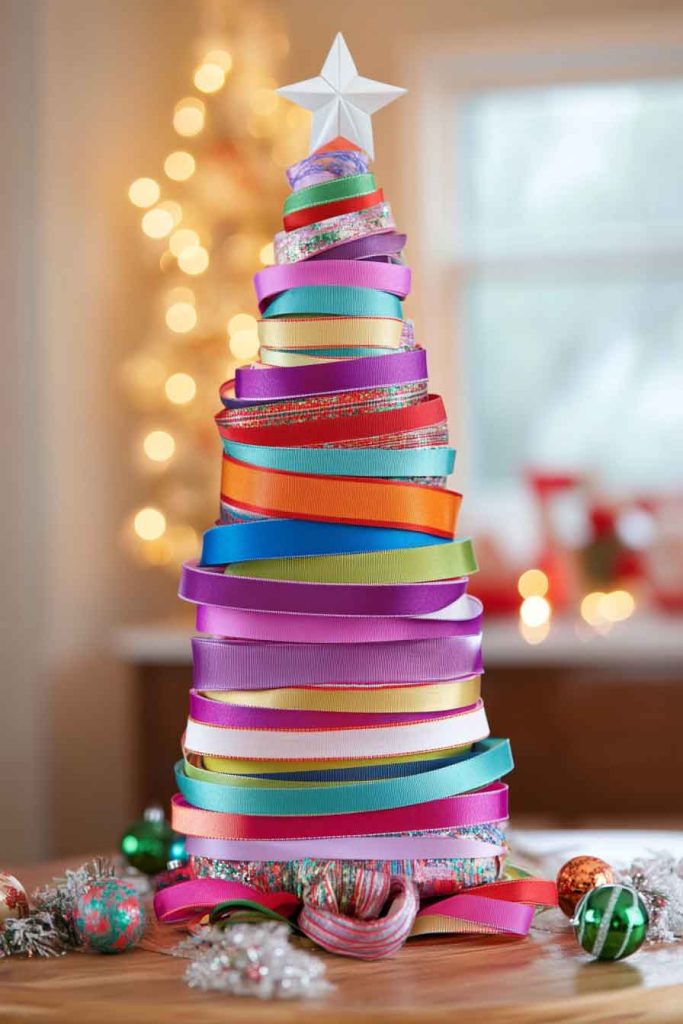
Purchase a foam cone form, cut lengths of wired ribbon in Christmas colors and patterns, form into loops, and attach with pins or hot glue starting at the bottom and working upward. Add a decorative topper like a bow, star, or ornament for a finished look.
This ribbon tree makes a stunning centerpiece or mantel decoration that catches the light beautifully and adds movement to your decor. It’s also a great way to showcase beautiful ribbons you’ve collected.
Tips for Creating Ribbon Candy Trees:
- Use wired ribbon to maintain shape and create full, dimensional loops.
- Vary ribbon patterns and textures throughout the tree for visual interest.
- Secure loops with pins first, then add hot glue for permanent placement.
- Create multiple trees in different sizes for a festive forest display.
29. Chalkboard Ornament Gift Tags
Paint wooden slice ornaments with chalkboard paint and use chalk markers to write personalized messages, names, or holiday greetings. These versatile DIY creations serve as both ornaments and reusable gift tags that add a rustic, personalized touch to presents.
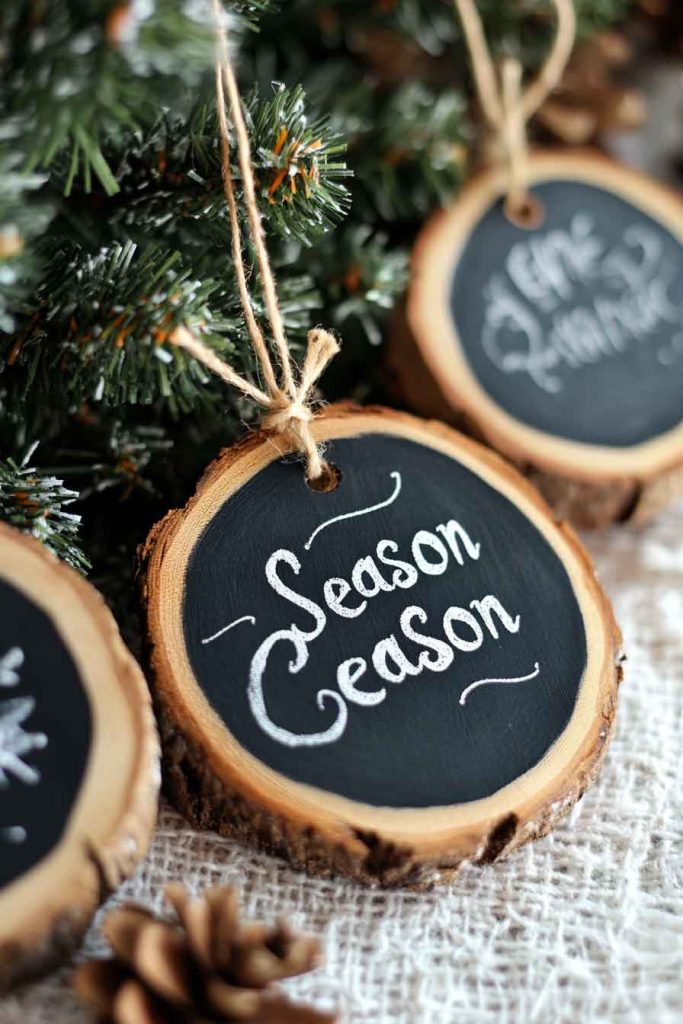
Sand wooden slices smooth, apply several coats of chalkboard paint, and let dry completely. Write messages or names with chalk markers, add decorative borders or designs, and attach to gifts with twine or hang on the tree. The chalkboard surface can be wiped clean and reused year after year.
These multifunctional ornaments become keepsakes that recipients can treasure and reuse, making them more meaningful than disposable gift tags. They add artisan charm to your gift presentation.
Tips for Making Chalkboard Ornament Tags:
- Apply multiple thin coats of chalkboard paint for best coverage and finish.
- “Season” the chalkboard by rubbing chalk over the entire surface before first use.
- Use chalk markers instead of traditional chalk for brighter, cleaner writing.
- Seal with clear varnish if you want messages to be permanent.
30. Felt Poinsettia Flower Arrangement
Craft realistic poinsettia flowers from red and green felt, arranging them in a decorative pot or vase for a long-lasting holiday centerpiece. This DIY flower arrangement brings the iconic Christmas flower into your home without the worry of maintaining live plants.
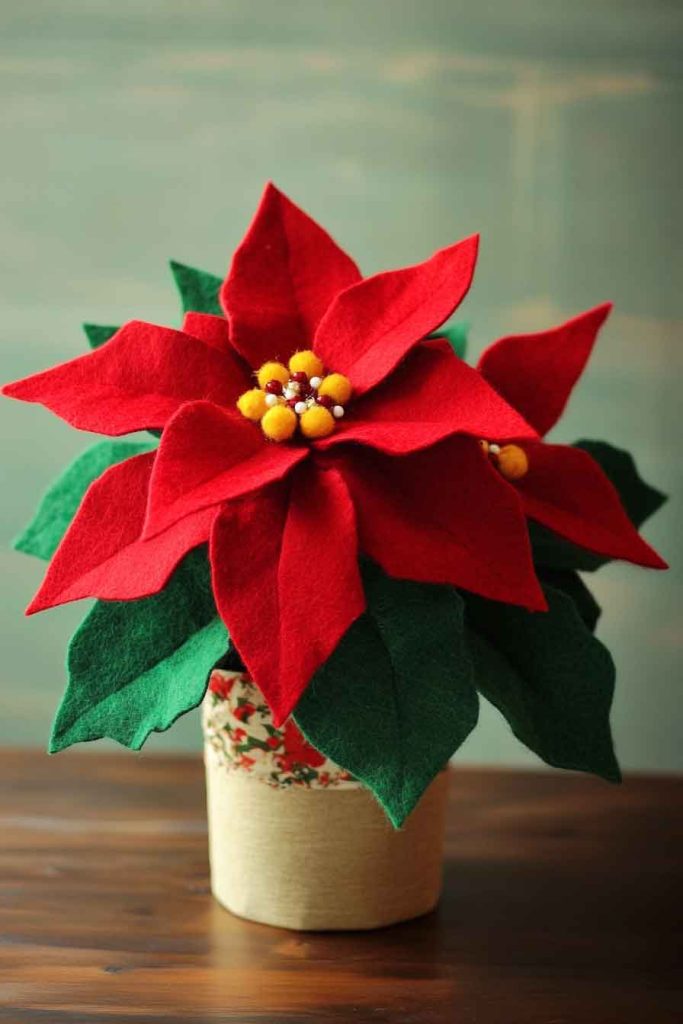
Cut petal shapes from red felt in graduating sizes, layer them to form flower shapes, and add yellow pom-poms or beads in the center for stamens. Create leaves from green felt, attach flowers and leaves to floral wire stems, and arrange in a pot filled with foam or decorative stones.
These handmade poinsettias look beautiful on dining tables, side tables, or as part of larger holiday displays. They capture the traditional Christmas aesthetic while lasting throughout the entire season without wilting or requiring care.
Tips for Making Felt Poinsettias:
- Use stiffened felt or add fabric stiffener for petals that hold their shape.
- Layer petals in alternating patterns for realistic, dimensional flowers.
- Vary red shades from bright to burgundy for natural-looking variations.
- Add glitter to petal edges for sparkle and festive shimmer.
Conclusion
Creating DIY Christmas decorations is more than just a way to save money; it’s an opportunity to infuse your home with personality, creativity, and love. Each handmade ornament, wreath, or centerpiece tells a story and becomes part of your family’s holiday traditions.
The 30 DIY Christmas decor ideas presented here offer something for every skill level and style preference. Whether you’re drawn to rustic farmhouse charm, elegant modern sophistication, or whimsical playful designs, these projects provide the inspiration and guidance you need to transform your home into a festive wonderland.
Remember that the beauty of DIY decorations lies not in perfection but in the personal touches and memories created during the crafting process. Involve family members of all ages, experiment with different materials and techniques, and don’t be afraid to adapt these ideas to suit your unique style and preferences.
As you embark on your Christmas decorating journey, embrace the joy of creating with your hands and the satisfaction of seeing your home come alive with handmade beauty. These DIY projects are investments in tradition, creativity, and the spirit of Christmas that will bring warmth and joy to your home for years to come.
Start with one or two projects that excite you most, gather your materials, and let your creativity shine. Your handmade Christmas decorations will not only beautify your space but also create lasting memories and perhaps inspire new family traditions that will be cherished for generations.
Happy crafting, and may your Christmas season be filled with creativity, joy, and the magic of handmade decorations!