30 DIY Christmas Ornaments Ideas: Creating Handmade Magic for Your Holiday Tree

Making your own Christmas ornaments is more than just a craft project; it’s a heartfelt tradition that brings families together and creates lasting memories. Handmade decorations add a personal touch to your holiday celebrations, allowing you to express creativity while building cherished keepsakes that can be treasured for years to come.
The art of DIY Christmas ornaments embraces natural materials, recycled items, and simple crafting techniques that not only enhance your tree’s beauty but also promote sustainability and mindful living.
This article explores a wonderful collection of unique DIY Christmas ornament ideas, showcasing how different crafting styles cater to various skill levels and personal preferences. From rustic woodland designs to elegant glittering creations, each ornament has its own special character while celebrating the joy of handmade holiday decor.
Join us on this festive journey as we explore 30 delightful DIY Christmas ornament concepts, each offering step-by-step guidance and creative inspiration for decorating your tree with handmade treasures.
1. Cinnamon Stick Star Ornaments with Rustic Twine
Imagine creating a beautiful star ornament using five cinnamon sticks arranged in a classic star shape. Tied together with natural jute twine at each point, this aromatic decoration fills your home with the warm scent of cinnamon while adding rustic charm to your tree.
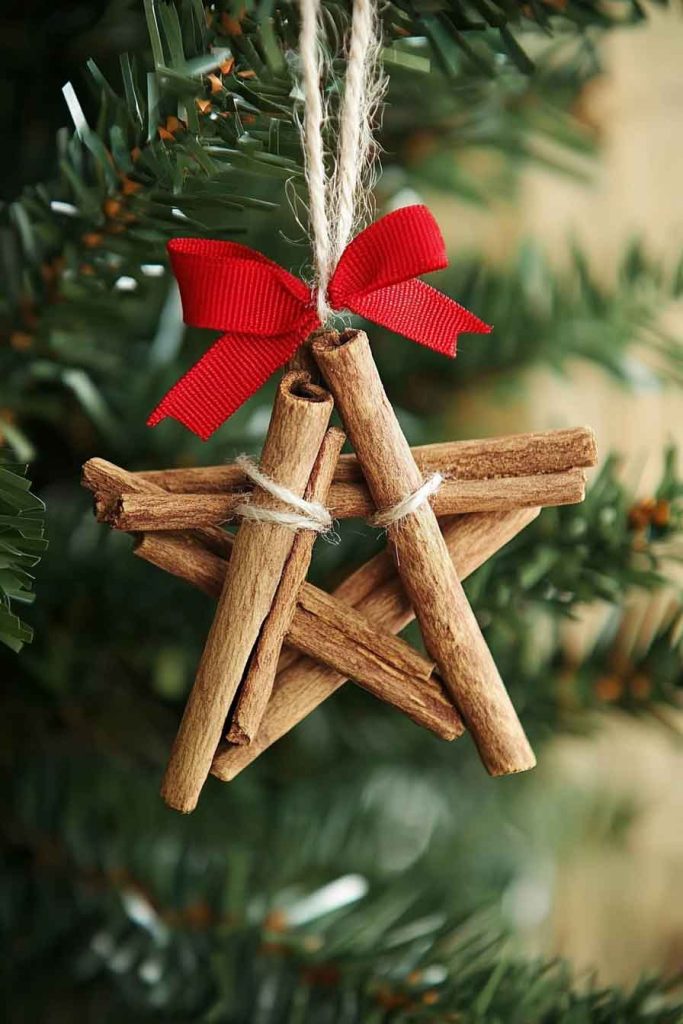
A small red bow at the top provides a festive pop of color against the natural brown tones. The cinnamon sticks can be easily glued together using a hot glue gun, making this a quick and satisfying project.
The overall appeal of this ornament lies in its simplicity and natural beauty. The warm cinnamon scent creates a cozy holiday atmosphere, while the rustic texture adds an organic, farmhouse feel to your Christmas decor.
This design is perfect for those who love natural materials and traditional holiday scents.
Tips:
- Use fresh cinnamon sticks for the strongest scent.
- Apply hot glue carefully at each intersection point for stability.
- Tie twine tightly to ensure the star shape holds together.
- Add a loop of twine at the top for easy hanging.
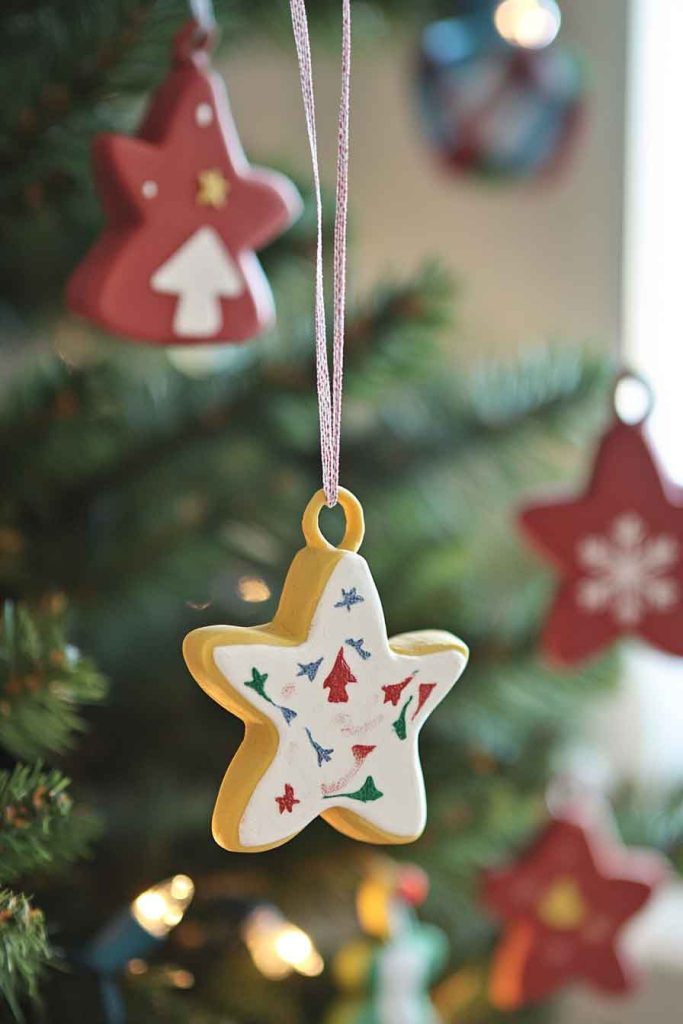
2. Salt Dough Handprint Ornaments
Create a precious keepsake by pressing your child’s handprint into homemade salt dough. These simple ornaments can be personalized with the child’s name and year, painted in festive colors like red, green, or gold.

The salt dough recipe requires only flour, salt, and water, making this an affordable and accessible craft. After baking and cooling, the ornaments can be decorated with acrylic paints and sealed with clear varnish for long-lasting memories.
These handprint ornaments become priceless family treasures that capture a moment in time. Parents and grandparents cherish these personalized decorations, making them perfect gifts or cherished additions to your own tree.
Tips:
- Mix two cups flour, one cup salt, and one cup water for basic dough.
- Press handprints firmly but gently into rolled dough.
- Use a straw to create a hanging hole before baking.
- Bake at 200°F for two to three hours until completely dry.
3. Pine Cone Snow-Dusted Ornaments
Transform ordinary pine cones into winter wonderland decorations by adding a dusting of artificial snow. Collected from nature walks, pine cones become magical when their tips are painted with white acrylic paint or dipped in white glue and sprinkled with glitter.
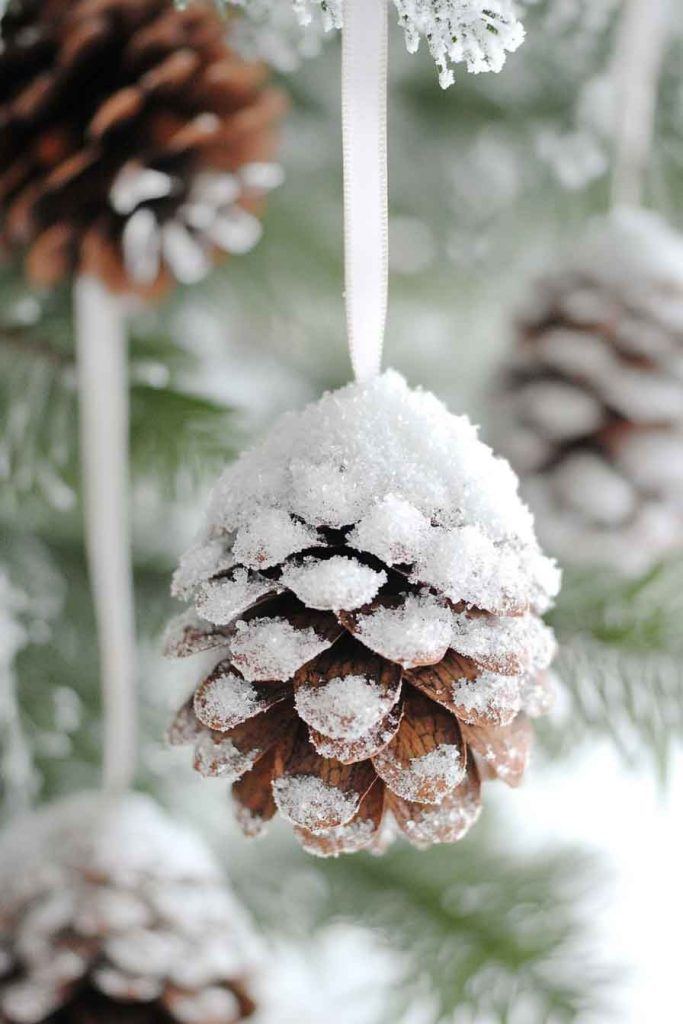
A small ribbon loop attached to the top allows for easy hanging. These ornaments can be left natural in the center while the edges receive the snowy treatment, creating a beautiful contrast.
The charm of these ornaments comes from their connection to nature and the outdoors. They bring the beauty of winter forests into your home while requiring minimal materials and effort to create.
Tips:
- Clean pine cones thoroughly and let them dry completely.
- Use white acrylic paint for a matte snow effect.
- Apply clear glitter for a sparkling, icy appearance.
- Attach ribbon loops with hot glue for secure hanging.
4. Felt Gingerbread Man Ornaments
Craft adorable gingerbread man ornaments from brown felt, decorated with white embroidery thread or fabric paint to create icing details. These soft ornaments are safe for young children and add a whimsical, handmade touch to your tree.
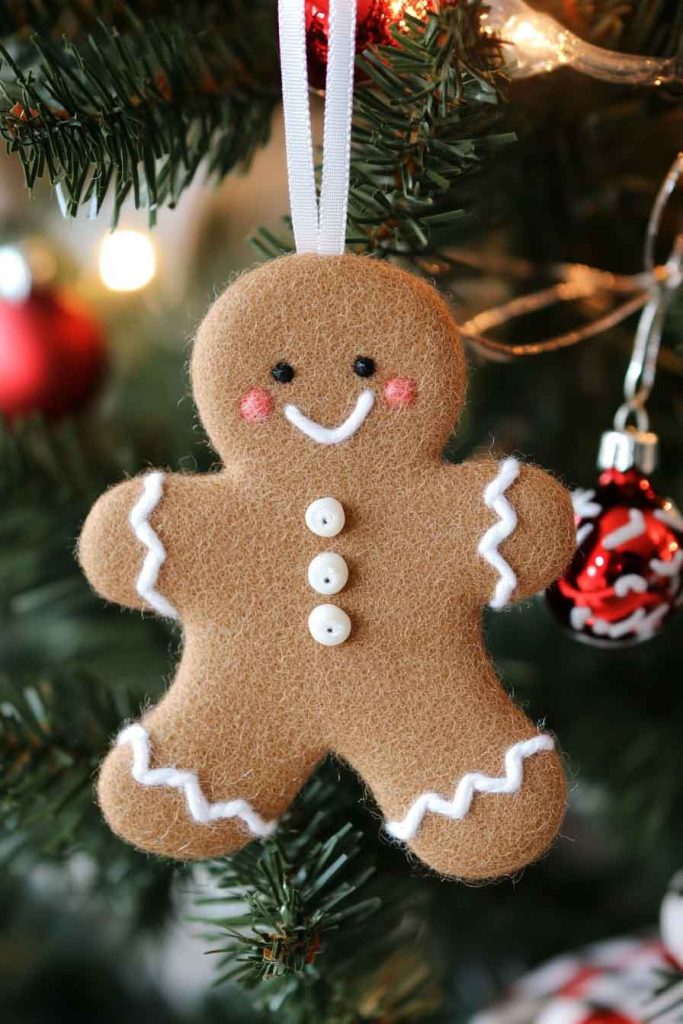
Cut two felt pieces in a gingerbread man shape, stitch around the edges, and add simple facial features and buttons. A ribbon loop sewn at the top completes this charming decoration.
The appeal of felt ornaments lies in their soft texture and child-friendly nature. They’re perfect for families with young children who want to participate in decorating without worrying about breakable glass ornaments.
Tips:
- Use a template to cut matching felt pieces for consistency.
- Sew edges together using a simple blanket stitch.
- Add buttons, beads, or embroidered details for personality.
- Stuff lightly with cotton for a slightly puffy appearance.
5. Mason Jar Lid Snow Globe Ornaments
Create miniature snow globe ornaments using mason jar lids, small holiday figurines, and artificial snow. These tiny worlds capture the magic of winter scenes in a rustic, farmhouse-style package.
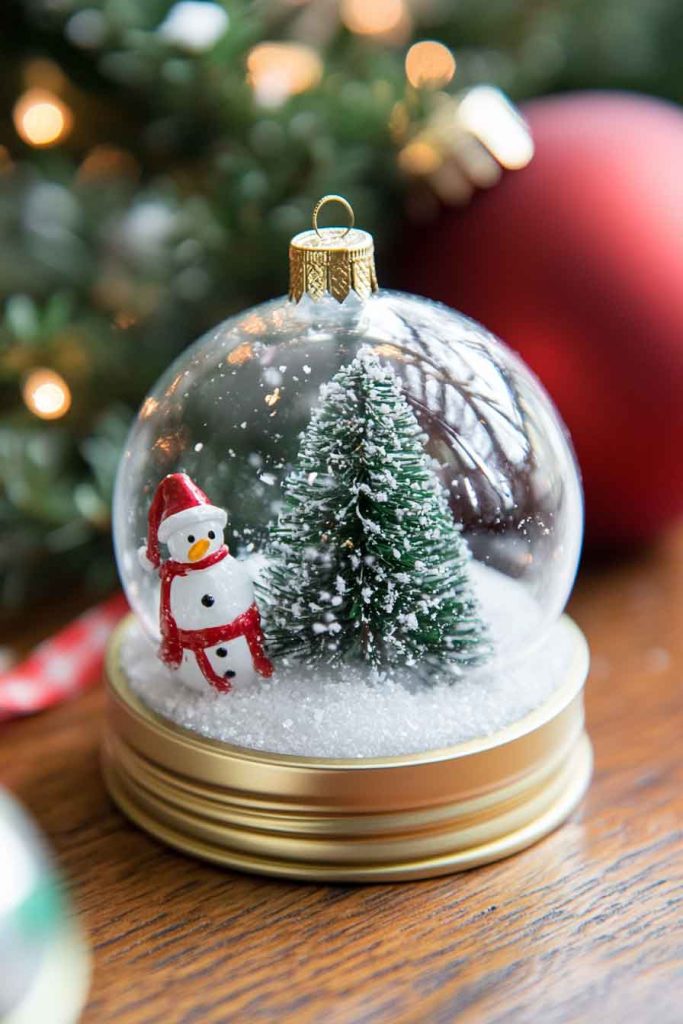
Glue a small Christmas tree, snowman, or other festive figure to the inside of the lid. Add artificial snow or white glitter, then seal with a clear plastic disc or the jar ring to create a viewing window.
These ornaments combine nostalgia with creativity, offering a three-dimensional decoration that tells a tiny holiday story. The rustic metal lid adds farmhouse charm while the miniature scene inside sparks imagination.
Tips:
- Use strong adhesive to secure figurines to the lid.
- Add a small amount of fake snow for the best effect.
- Seal edges carefully to keep snow contained.
- Attach hanging ribbon through pre-punched holes in the lid.
6. Burlap and Lace Rustic Ornaments
Combine rough burlap fabric with delicate lace to create elegant rustic ornaments. Cut burlap into circles or other shapes, add a lace overlay, and embellish with buttons, twine, or small wooden accents.
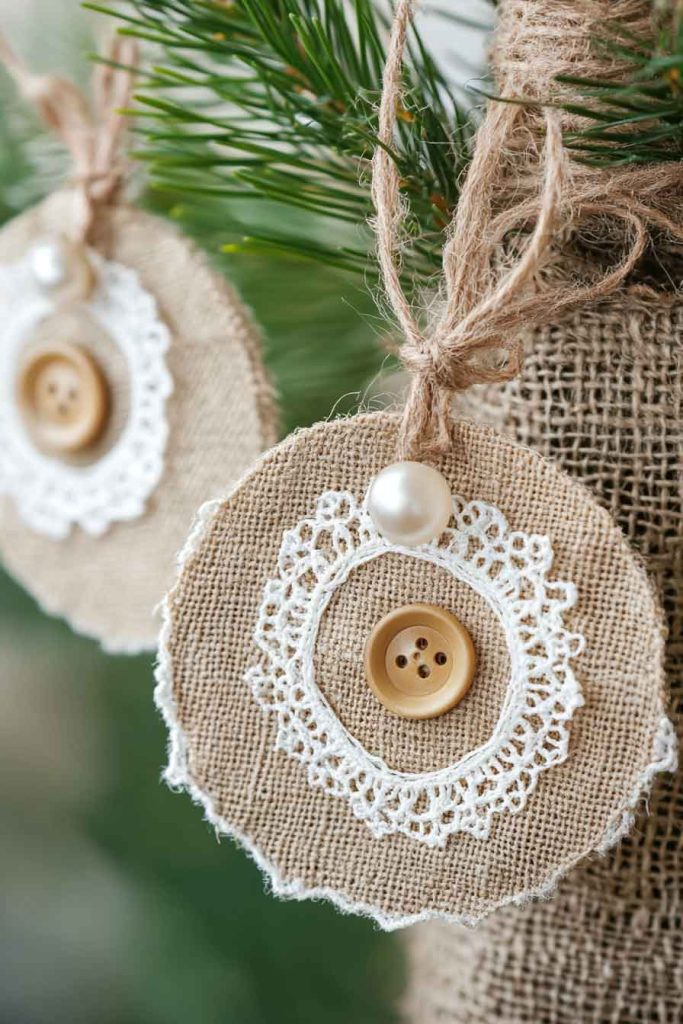
These ornaments blend textures beautifully, creating a shabby-chic aesthetic that works well with farmhouse or cottage-style decor. The contrast between rough and delicate materials adds visual interest.
The beauty of these ornaments comes from their textural variety and vintage appeal. They bring warmth and homespun charm to holiday decorating while remaining simple enough for beginners to create successfully.
Tips:
- Cut burlap edges with pinking shears to prevent excessive fraying.
- Layer lace over burlap and secure with fabric glue.
- Add pearl buttons or wooden embellishments for detail.
- Use natural jute twine for hanging loops.
7. Popsicle Stick Snowflake Ornaments
Arrange white-painted popsicle sticks in snowflake patterns to create simple yet beautiful winter decorations. Glue sticks together at the center, creating six or eight points, then add small decorations like sequins, gems, or glitter.
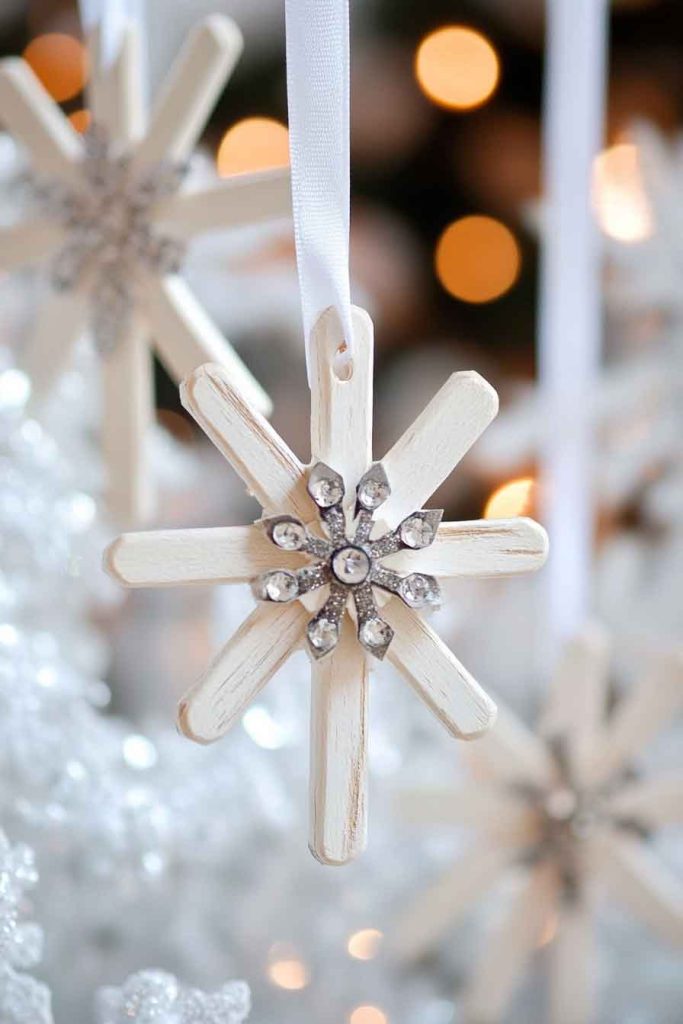
Paint the sticks white or light blue before assembly, or leave them natural for a rustic look. A ribbon or string loop at one point allows for easy hanging.
These ornaments are perfect for children’s craft sessions and school projects. They’re inexpensive, easy to make, and offer endless possibilities for creative decoration and personalization.
Tips:
- Paint popsicle sticks before gluing for easier coverage.
- Arrange sticks evenly to create balanced snowflake shapes.
- Add glitter while paint is still wet for better adhesion.
- Use strong craft glue at the center intersection point.
8. Wine Cork Reindeer Ornaments
Upcycle used wine corks into adorable reindeer ornaments by adding small twig antlers, googly eyes, and a red pom-pom nose. These charming creatures bring personality and humor to your tree.
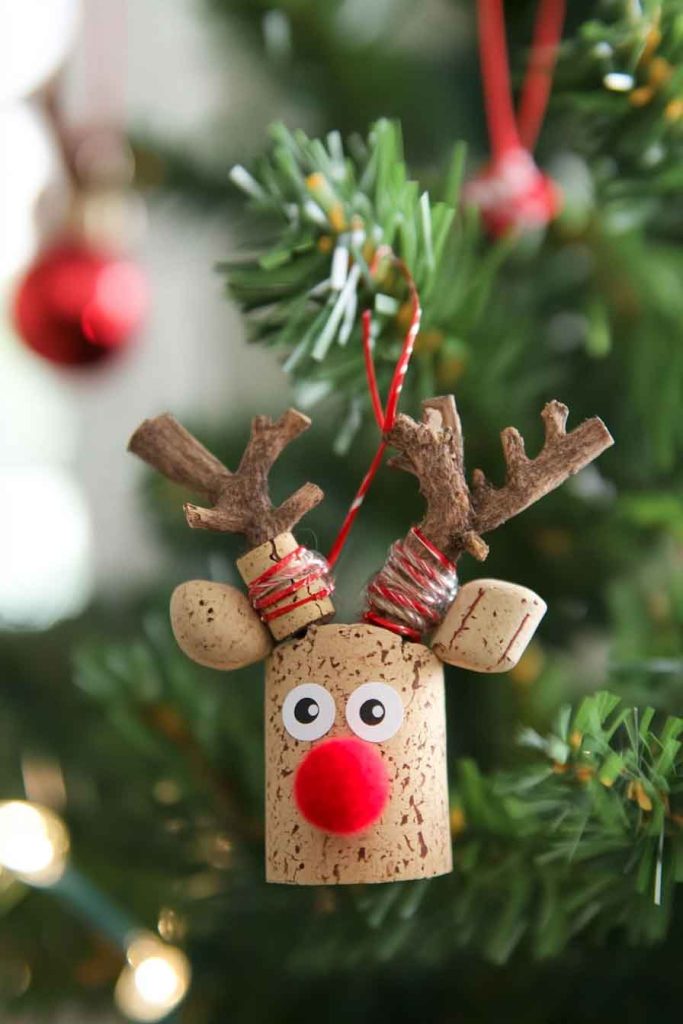
Drill small holes in the top of the cork for antler twigs, glue on facial features, and add a ribbon scarf around the neck. A hanging loop completes this easy and fun project.
The appeal of these ornaments lies in their clever repurposing of materials and their cute, whimsical character. They’re conversation starters that showcase creativity and environmental consciousness.
Tips:
- Save corks throughout the year for this project.
- Use small twigs or thin branches for realistic antlers.
- Secure googly eyes with strong craft glue.
- Add miniature scarves from ribbon or felt scraps.
9. Paper Quilled Snowflake Ornaments
Create intricate snowflake designs using the art of paper quilling, rolling thin strips of white or blue paper into coils and arranging them into delicate patterns. These ornaments look complex but use a simple technique.
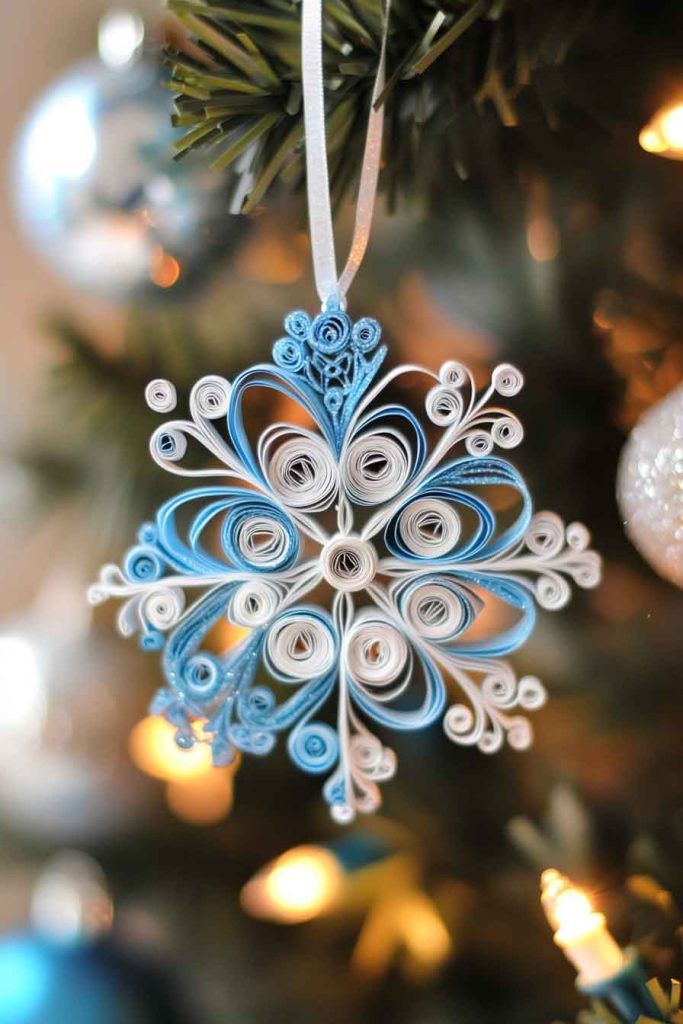
Roll paper strips around a quilling tool or toothpick, shape into teardrops or circles, and glue together to form snowflake patterns. Add a hanging loop and optional glitter for sparkle.
These ornaments showcase delicate artistry and patience. The intricate patterns catch light beautifully and add an elegant, handcrafted touch to your tree that looks far more difficult than it actually is.
Tips:
- Start with pre-cut quilling paper strips for convenience.
- Use a quilling tool for tighter, more consistent coils.
- Apply white glue with a fine-tipped applicator for precision.
- Work on a clean, flat surface to maintain symmetry.
10. Dried Orange Slice Ornaments
Preserve the natural beauty of citrus by creating ornaments from dried orange slices. Thin slices of orange dried in a low oven become translucent, sun-catching decorations with a subtle fruity scent.
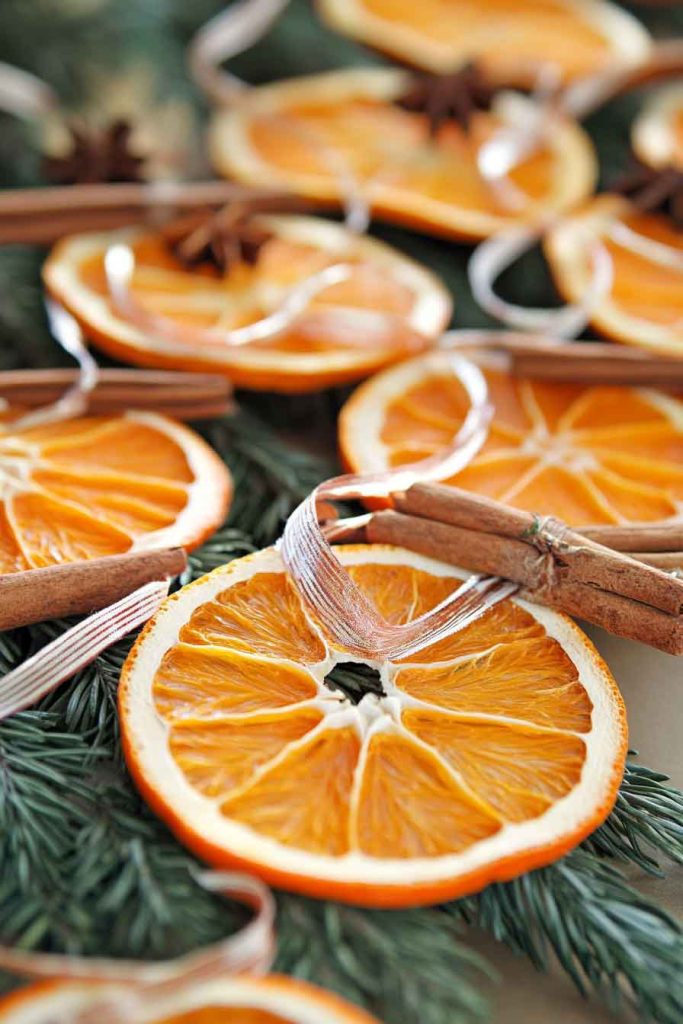
Cut oranges into quarter-inch slices, arrange on baking sheets, and dry at low temperature for several hours. Once completely dry, add ribbon loops and optional embellishments like cinnamon sticks or star anise.
These ornaments bring natural beauty and a gentle citrus fragrance to your tree. They’re completely biodegradable and showcase the beauty of simple, natural materials transformed into festive decorations.
Tips:
- Slice oranges evenly for consistent drying.
- Dry at 200°F for four to six hours, flipping halfway.
- Ensure slices are completely dry to prevent mold.
- Thread ribbon through natural holes or create new ones carefully.
11. Fabric Scrap Patchwork Ball Ornaments
Transform fabric scraps into colorful patchwork ornaments by covering foam or styrofoam balls with small fabric pieces. This no-sew method uses pins or glue to attach fabric squares in a quilted pattern.
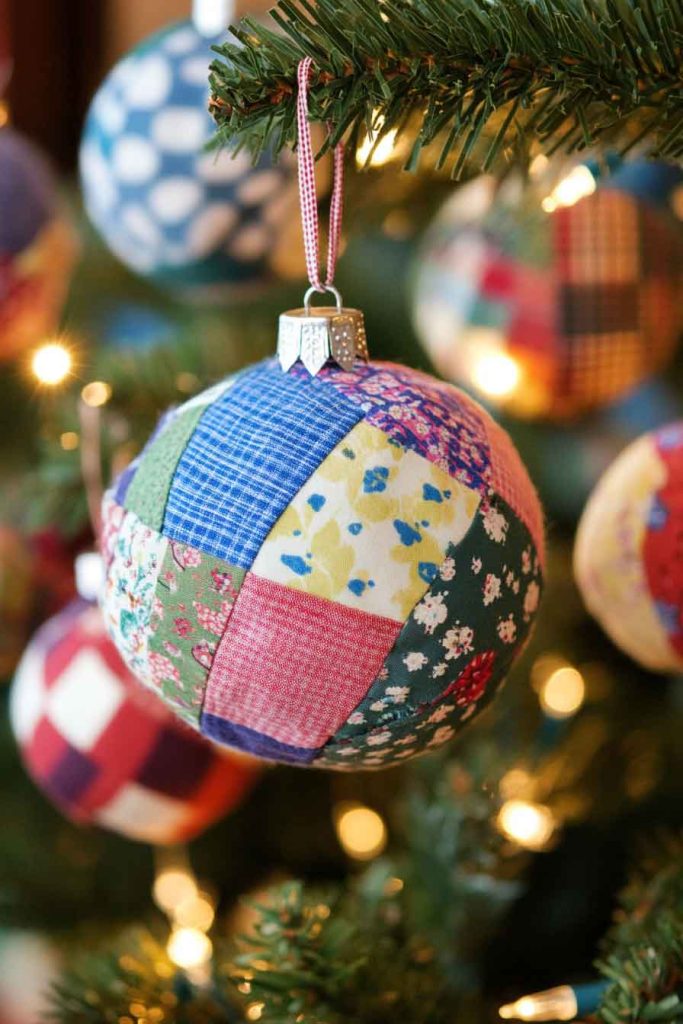
Cut fabric into small squares, fold edges under, and attach to the ball surface in rows. Mix patterns and colors for visual interest, or stick to a coordinated color scheme.
These ornaments are perfect for quilters and sewers who have fabric scraps to use. They add softness and color to your tree while showcasing your fabric collection and reducing waste.
Tips:
- Use sharp pins with decorative heads for secure attachment.
- Overlap fabric edges slightly for complete coverage.
- Mix complementary patterns for visual harmony.
- Add ribbon between fabric rows for extra decoration.
12. Clear Glass Ornament with Fake Snow Inside
Fill clear glass ball ornaments with artificial snow, small evergreen sprigs, and miniature figurines to create custom winter scenes. These store-bought clear ornaments become personalized keepsakes.
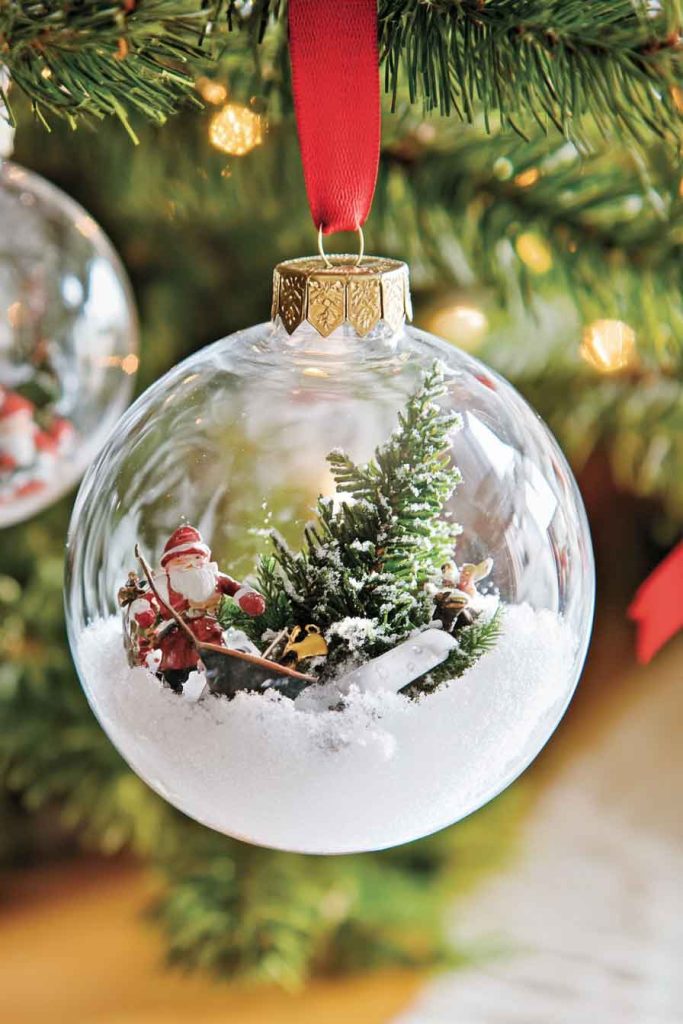
Remove the ornament top, add your chosen elements, and replace the cap. Seal if desired, then add decorative ribbon to the hanging loop for a finished look.
The beauty of these ornaments lies in their customization possibilities. Each one can be unique, telling a different story or featuring different colors and themes.
Tips:
- Purchase clear ornaments from craft stores in various sizes.
- Use a small funnel to add fine materials like fake snow.
- Don’t overfill—leave space for elements to move and settle.
- Secure tops with a drop of glue if they feel loose.
13. Yarn-Wrapped Letter Ornaments
Create personalized initial ornaments by wrapping cardboard or wooden letters with colorful yarn. These customized decorations make perfect gifts and add a personal touch to your tree.
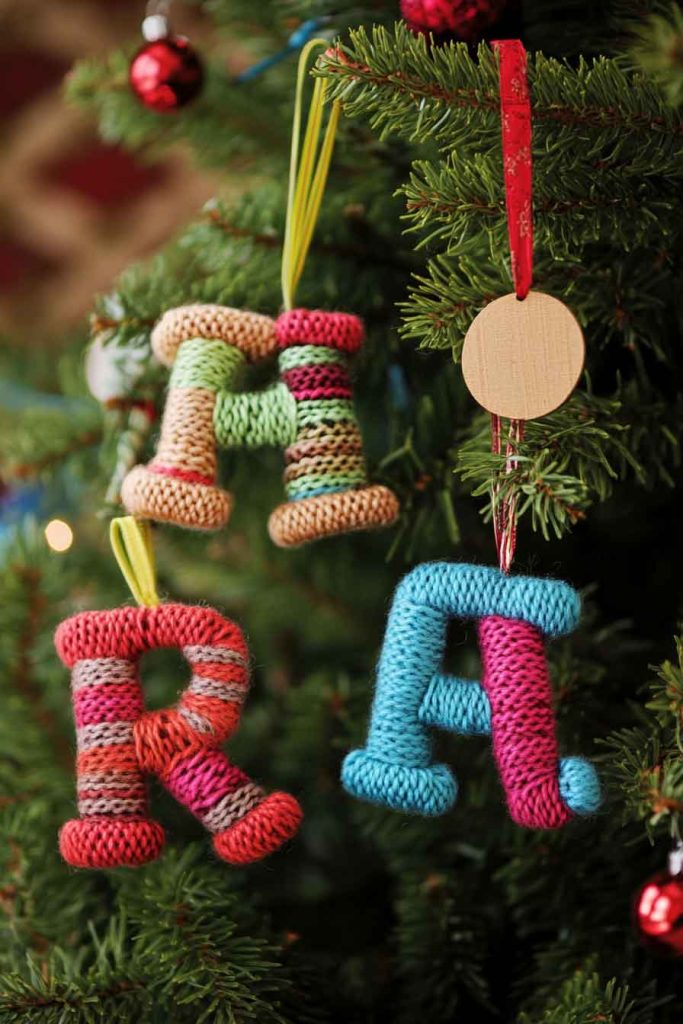
Choose letters that spell names, words, or initials, then wrap tightly with yarn in your chosen colors. Secure ends with glue and add embellishments like small jingle bells or buttons.
These ornaments celebrate individuality and make meaningful gifts for family members. They’re simple enough for children to help create while producing professional-looking results.
Tips:
- Start wrapping at the back of the letter for a cleaner look.
- Use thick yarn for faster coverage and better texture.
- Secure yarn ends with hot glue on the back.
- Add a ribbon loop at the top for hanging.
14. Button Tree Ornaments
Stack green buttons in graduated sizes on wire or thick thread to create miniature Christmas tree ornaments. Top with a star button and add a small wooden bead at the bottom for a tree trunk.
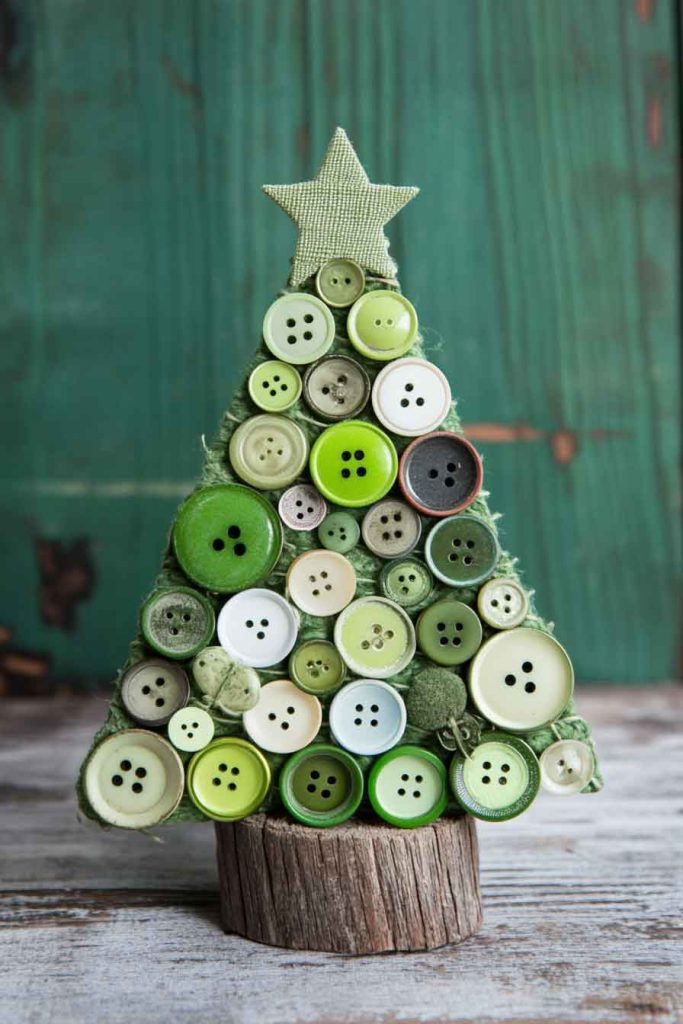
Thread buttons from largest to smallest, securing with knots or glue between layers. The varying shades of green buttons create depth and interest in these simple designs.
These ornaments are perfect for using up button collections and creating quick, easy decorations. They have a vintage, homespun quality that appeals to crafters of all ages.
Tips:
- Sort buttons by size before starting assembly.
- Use strong thread or thin wire for structure.
- Mix button shades and textures for visual interest.
- Secure the top star button firmly with extra glue.
15. Miniature Wreath Ornaments
Create tiny wreaths by wrapping grapevine or foam rings with evergreen sprigs, ribbon, and miniature decorations. These mini versions of door wreaths add traditional charm to your tree.
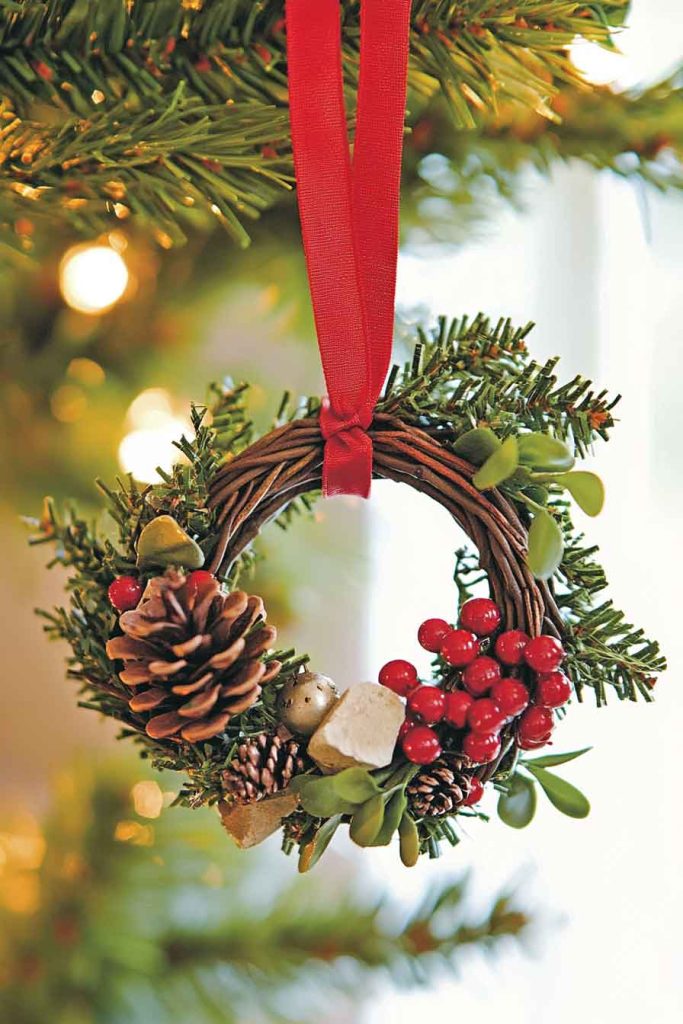
Secure greenery with floral wire or hot glue, then add small bows, berries, or pine cones. A hanging loop at the top completes these classic decorations.
The appeal of miniature wreaths lies in their traditional beauty scaled down to ornament size. They bring classic Christmas symbolism to your tree in a handmade, personal way.
Tips:
- Use small grapevine wreath forms from craft stores.
- Attach greenery with floral wire for security.
- Keep decorations proportional to the wreath size.
- Add a ribbon bow at the bottom for traditional styling.
16. Wooden Bead Garland Ornament Circles
String natural wooden beads on wire or strong thread to create circular or teardrop-shaped ornaments. These Scandinavian-inspired decorations bring minimalist elegance to your tree.
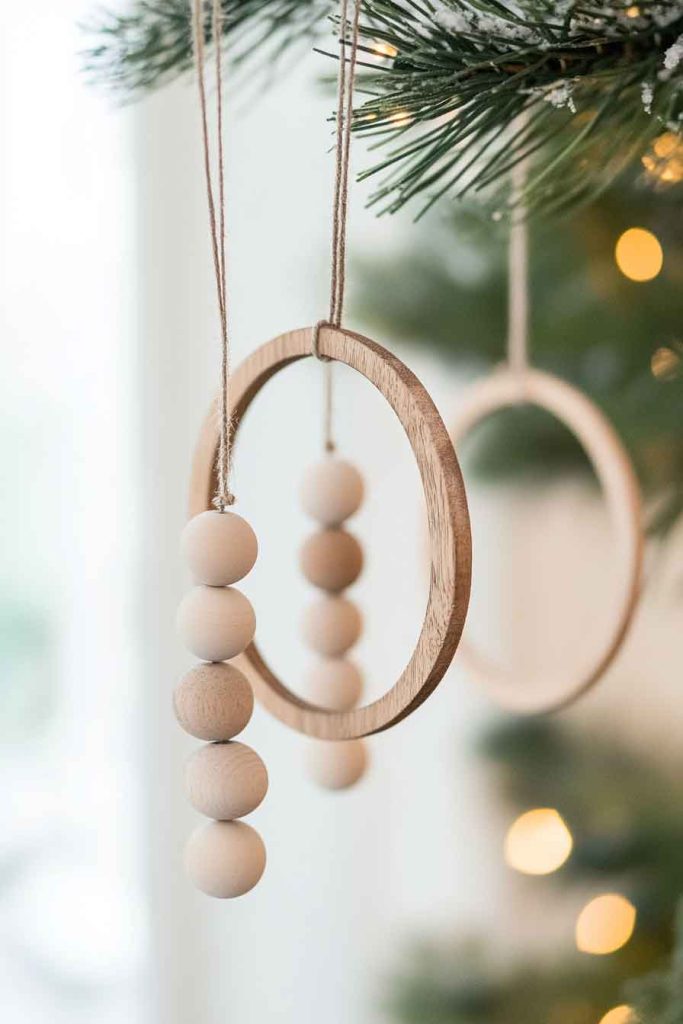
Alternate bead sizes or colors, form into circles or other shapes, and secure ends by twisting wire or knotting thread. Add a ribbon or twine loop for hanging.
These ornaments embrace simplicity and natural materials, fitting perfectly with modern farmhouse or Nordic-inspired decor. Their clean lines and neutral tones create elegant, timeless decorations.
Tips:
- Use natural, unfinished wooden beads for authentic appeal.
- Create uniform circles using a round template.
- Mix bead sizes for added visual interest.
- Secure wire ends by tucking them inside beads.
17. Glitter-Dipped Pine Cone Ornaments
Elevate simple pine cones with a glamorous makeover by dipping their tips in glue and then in fine glitter. These ornaments blend natural materials with sparkly elegance.
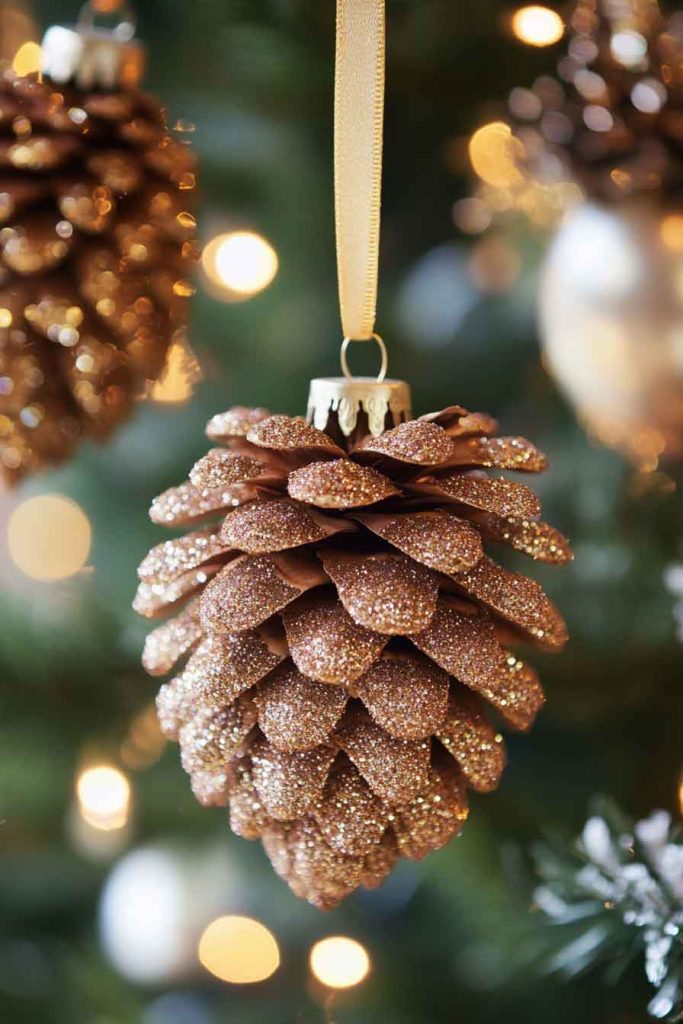
Collect pine cones, clean them thoroughly, and apply glue to the tips or edges. Roll in glitter, shake off excess, and let dry completely. Add ribbon loops for hanging.
These ornaments bridge the gap between rustic and glamorous, offering natural beauty with a touch of holiday sparkle. They’re quick to make yet look sophisticated on the tree.
Tips:
- Work over newspaper to catch excess glitter.
- Use fine glitter for a more elegant appearance.
- Apply multiple thin coats of glue for better adhesion.
- Let dry completely before handling or hanging.
18. Clothespin Angel Ornaments
Transform old-fashioned wooden clothespins into adorable angel ornaments by adding small wooden bead heads, paper or fabric wings, and simple painted details.
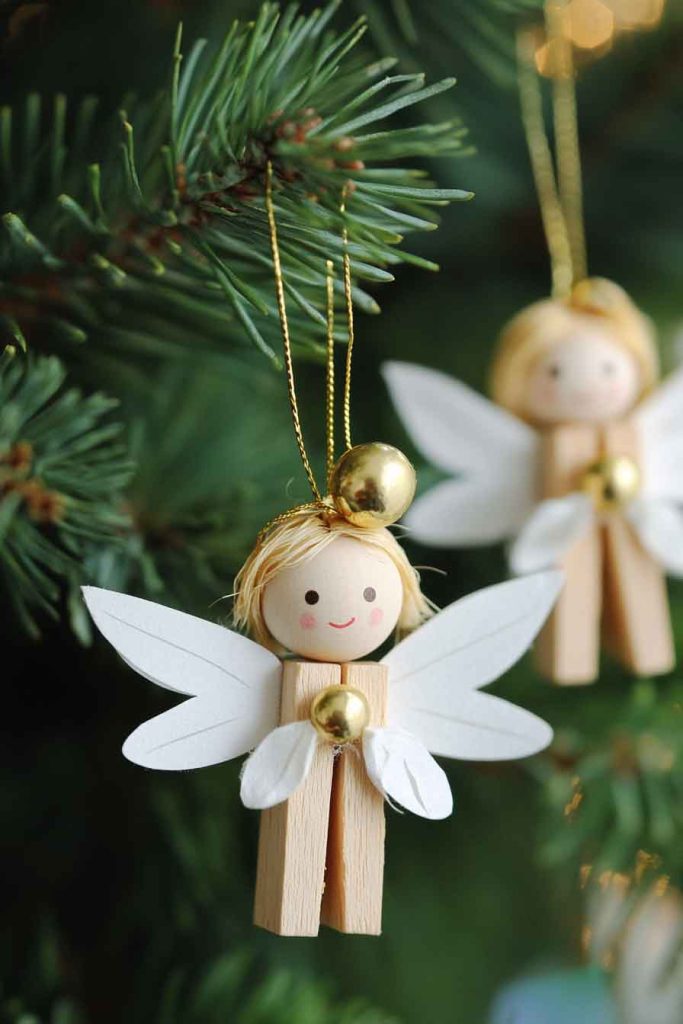
Glue a wooden bead to the top of the clothespin for a head, attach paper or felt wings at the back, and paint simple facial features. Add yarn for hair and a small halo made from gold wire.
These charming angels bring nostalgic sweetness to your tree. They’re perfect for Sunday school projects or family crafting sessions, creating simple yet meaningful decorations.
Tips:
- Use round wooden beads that fit the clothespin size.
- Create wings from white paper, felt, or coffee filters.
- Add details with fine-point markers or paint pens.
- Make halos from gold pipe cleaners or thin wire.
19. Scrabble Tile Word Ornaments
Spell out holiday words or family names using vintage or craft Scrabble tiles glued to small wooden plaques or arranged in a line and secured with wire.
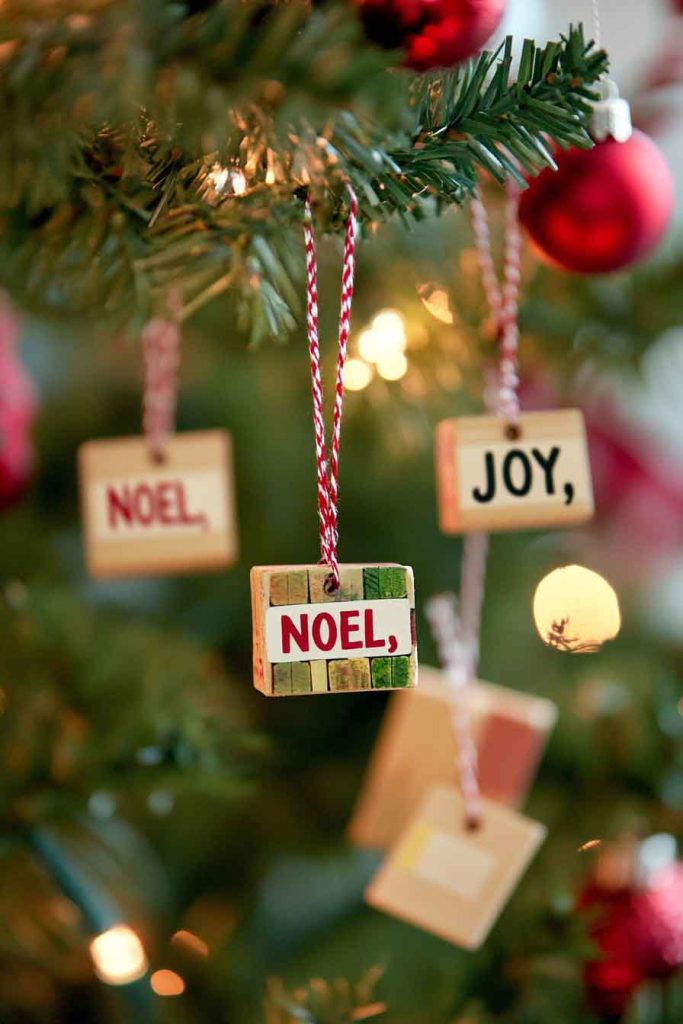
Create words like “JOY,” “NOEL,” or family member names. Attach tiles to a backing or string them together, then add ribbon for hanging.
These ornaments celebrate wordplay and personalization, making them perfect for book lovers and word game enthusiasts. They add a unique, intellectual twist to traditional decorations.
Tips:
- Purchase craft Scrabble tiles from hobby stores.
- Plan your word before gluing tiles down.
- Use strong craft glue for permanent attachment.
- Add protective coating to preserve tile appearance.
20. Crochet Snowflake Ornaments
Create delicate, vintage-inspired snowflake ornaments using white thread and basic crochet techniques. These lacy decorations bring handmade elegance to your tree.
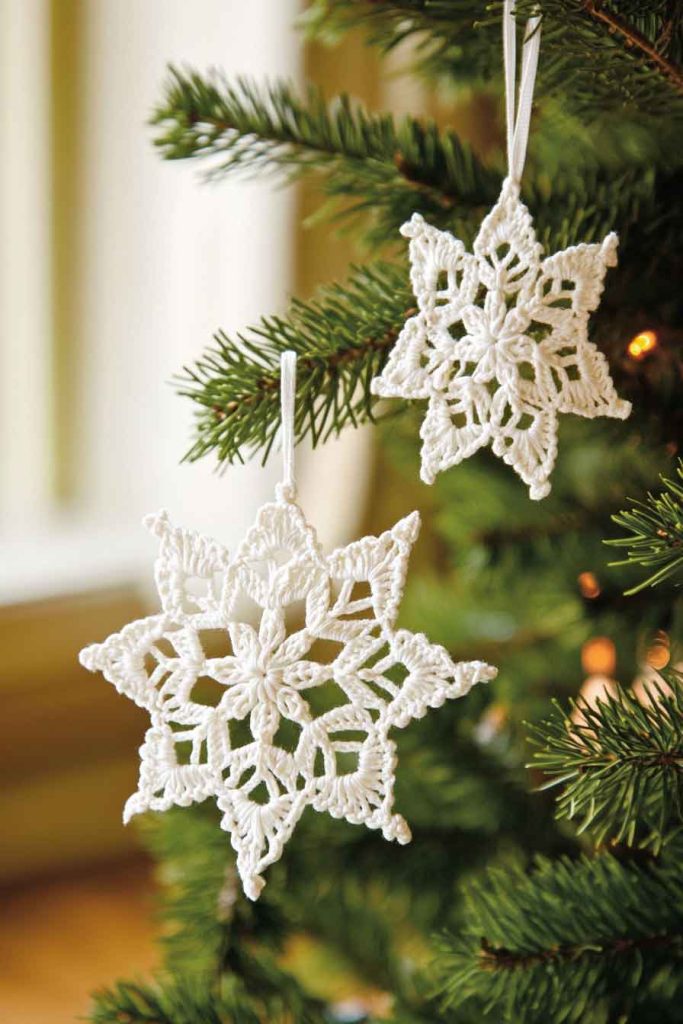
Follow simple snowflake crochet patterns, using fine white or cream thread. Block finished snowflakes with starch to maintain their shape, then add hanging loops.
These ornaments showcase traditional handcraft skills and create heirloom-quality decorations. They work beautifully on trees with vintage or shabby-chic themes and become treasured keepsakes.
Tips:
- Use fine crochet thread for delicate appearance.
- Block finished snowflakes with spray starch for stiffness.
- Pin flat while drying to maintain shape.
- Add small loops of the same thread for hanging.
21. Photo Transfer Wooden Slice Ornaments
Transfer favorite family photos onto wooden slices to create personalized, rustic ornaments. These keepsakes combine natural materials with precious memories.

Use photo transfer medium or mod podge to apply printed photos to sanded wood slices. Seal with clear coating and add hanging hardware or ribbon.
These ornaments become family treasures that commemorate special moments. They blend rustic charm with personal significance, making them perfect gifts for grandparents or family members.
Tips:
- Sand wooden slices smooth before transferring images.
- Print photos on regular paper for transfer method.
- Apply multiple thin coats of transfer medium.
- Seal completed ornament with clear acrylic sealer.
22. Felt Holly Leaf and Berry Ornaments
Cut holly leaf shapes from green felt and pair them with red felt or wooden berries to create classic Christmas ornaments. These simple designs capture holiday tradition.
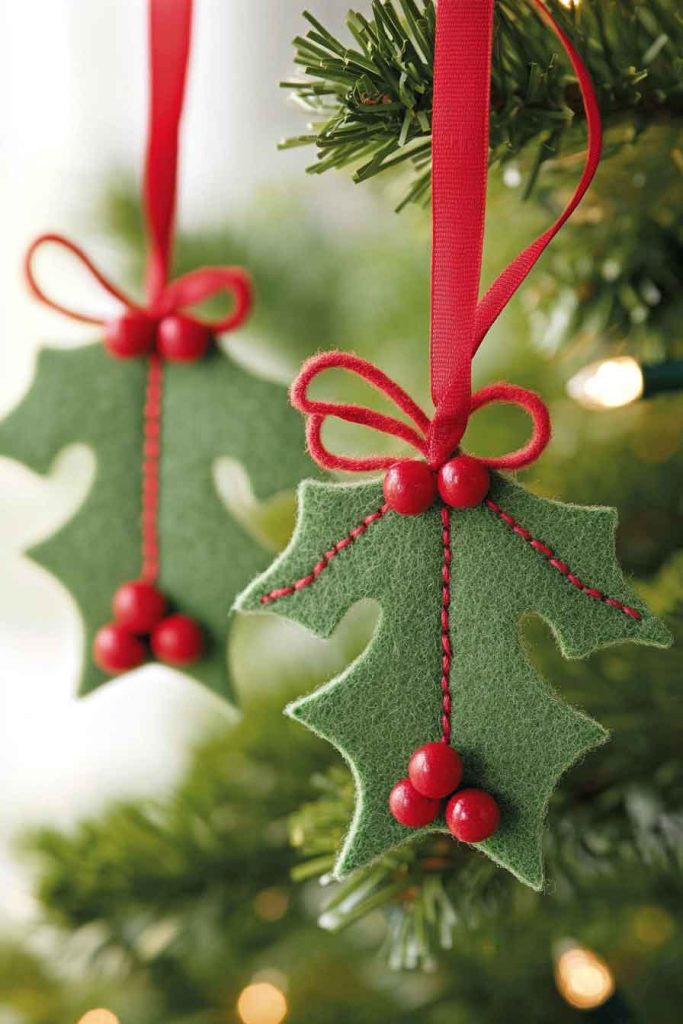
Cut two or three holly leaves, stitch or glue together at the base, and add red berries in the center. A ribbon bow completes the festive look.
These ornaments celebrate classic Christmas imagery with soft, touchable materials. They’re safe for homes with young children and quick to produce in quantities.
Tips:
- Use a template for consistent holly leaf shapes.
- Cut leaves from dark green felt for authenticity.
- Attach three red beads or felt balls for berries.
- Add a small bow at the base where leaves meet.
23. Origami Paper Star Ornaments
Fold colorful paper into three-dimensional star ornaments using origami techniques. These geometric decorations add modern style and vibrant color to your tree.

Follow origami star folding instructions, using patterned or solid colored paper. These stars can be simple five-pointed designs or more complex modular creations.
The appeal of origami ornaments lies in their crisp, geometric beauty and the meditative process of folding. They bring modern artistry to traditional holiday decorating.
Tips:
- Use origami or other thin, foldable paper.
- Follow video tutorials for complex designs.
- Press creases firmly for crisp, clean edges.
- Attach hanging thread through one point of the star.
24. Clay Stamped Ornaments
Roll out air-dry clay and use rubber stamps, textured items, or carved designs to create unique patterns on circular or shaped ornaments. Paint or leave natural after drying.
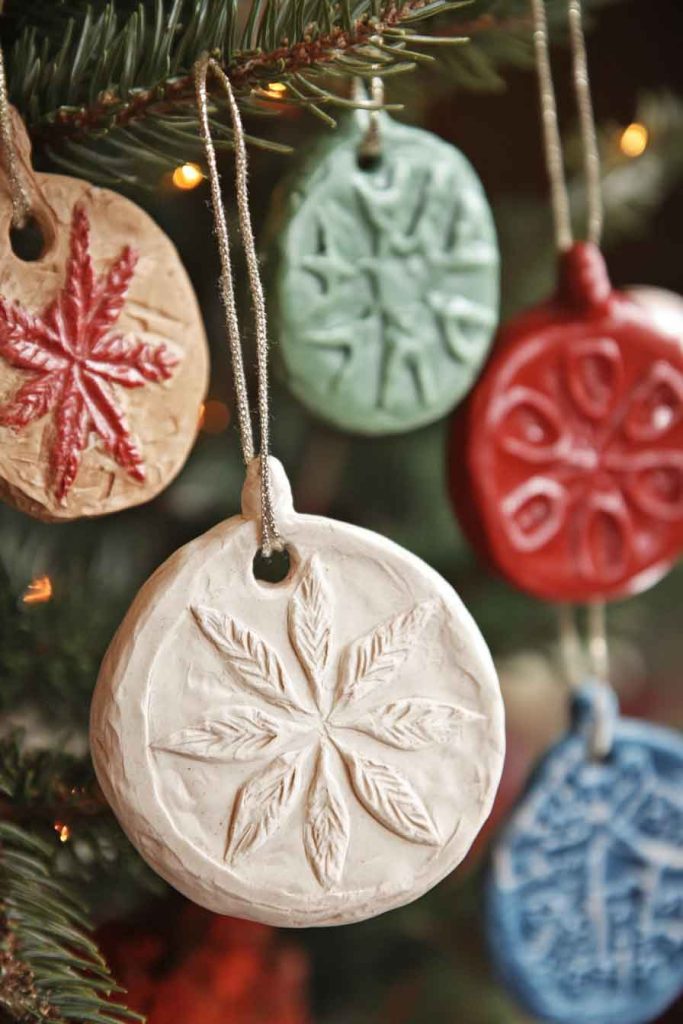
Cut shapes with cookie cutters, stamp with designs, create hanging holes, and let air dry completely. Paint with acrylics if desired, then seal.
These ornaments combine the satisfaction of working with clay with the ease of air-drying materials. Each one is unique, showcasing your chosen patterns and colors.
Tips:
- Roll clay to quarter-inch thickness for durability.
- Create hanging holes before clay dries.
- Use cookie cutters for consistent shapes.
- Seal painted designs with clear acrylic sealer.
25. Bottle Cap Snowman Ornaments
Upcycle three bottle caps into tiny snowman ornaments by painting them white and stacking them vertically. Add simple facial features and decorative scarves.
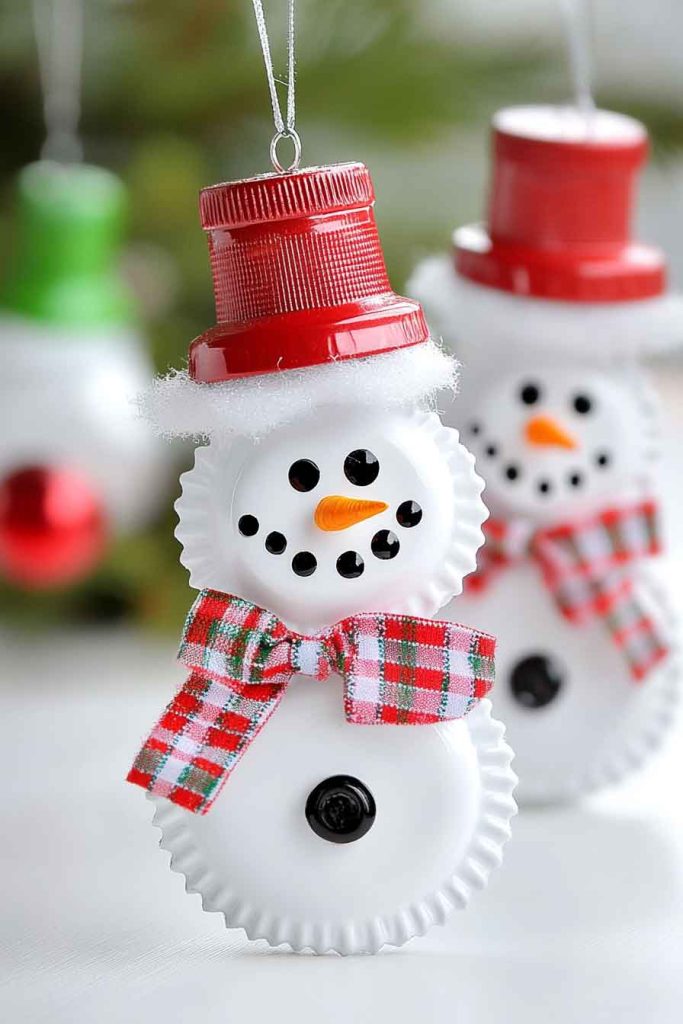
Paint bottle caps white, let dry, then glue together in a snowman formation. Add painted or marker details for face, buttons, and accessories. Attach ribbon for hanging.
These cheerful ornaments prove that holiday decorations can be made from nearly anything. They’re perfect for children’s crafts and demonstrate creative recycling.
Tips:
- Clean bottle caps thoroughly before painting.
- Use white acrylic paint for opaque coverage.
- Apply multiple thin coats for best results.
- Add tiny fabric scraps for scarves and hats.
26. Twig and Twine Rustic Star Ornaments
Gather five straight twigs and bind them together with natural twine to create simple star ornaments. These rustic decorations celebrate natural materials and outdoor connections.
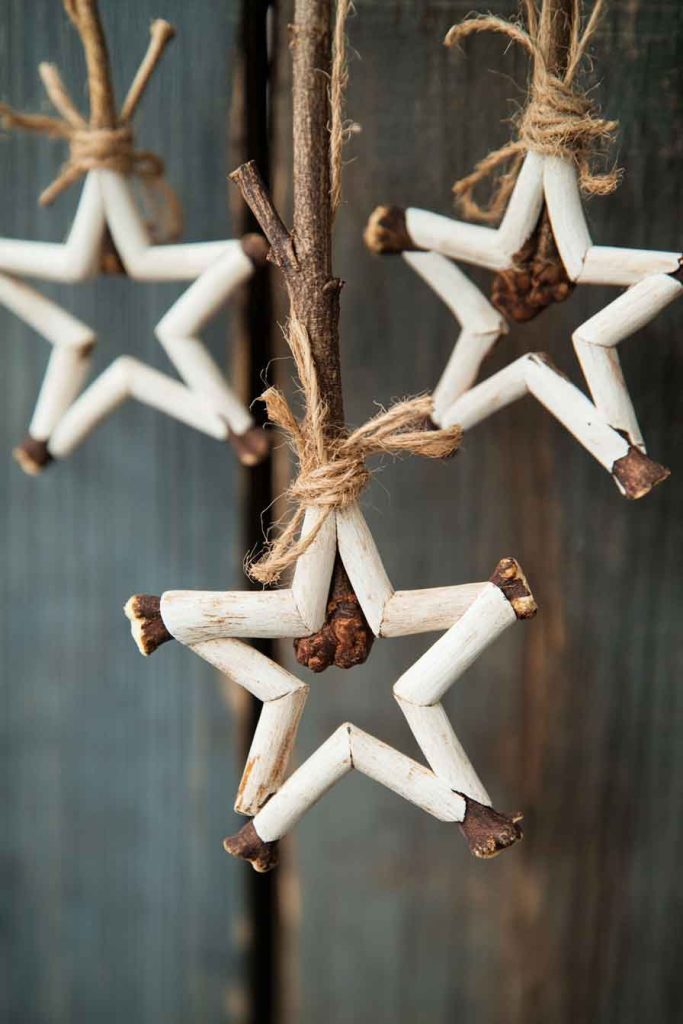
Arrange twigs in a star pattern, secure intersections with twine, and add a hanging loop. Leave natural or add small decorative touches like berries or ribbon.
The beauty of these ornaments comes from their simplicity and connection to nature. They bring the outdoors inside and work perfectly with farmhouse, rustic, or natural holiday themes.
Tips:
- Select relatively straight, similar-sized twigs.
- Wrap twine at each intersection for stability.
- Add a drop of glue under twine for extra security.
- Collect twigs during autumn nature walks.
27. Sequin and Pin Styrofoam Ball Ornaments
Create dazzling vintage-style ornaments by covering styrofoam balls with overlapping sequins held in place with pins. These labor-intensive decorations shine brilliantly.
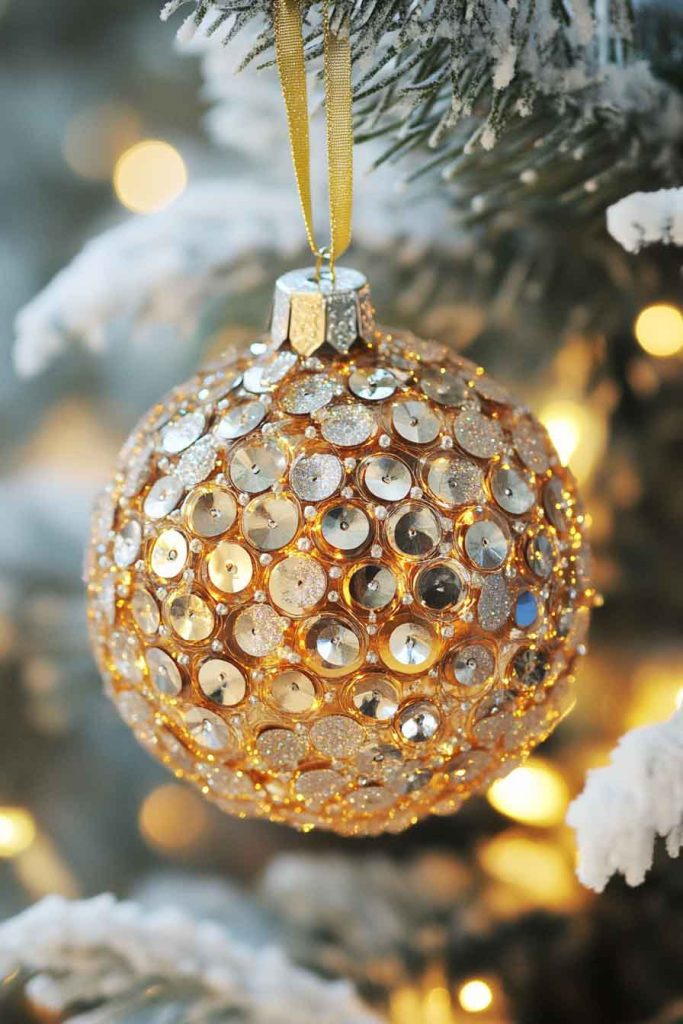
Starting at the top, pin sequins in overlapping rows around the ball. Use sequins in one color for elegance or multiple colors for variety.
These glamorous ornaments require patience but create stunning results. They have a vintage 1960s quality that adds nostalgic elegance to modern trees.
Tips:
- Use sequin pins or short straight pins with small heads.
- Overlap sequins like fish scales for full coverage.
- Work in rows from top to bottom for consistent pattern.
- Add ribbon at the top to hide the starting point.
28. Cookie Cutter Clay Ornaments
Press cookie cutters into rolled clay to create shaped ornaments in holiday forms like stars, trees, angels, and gingerbread men. Paint and decorate after drying.
Roll clay evenly, cut shapes, add hanging holes, and let air dry. Paint with holiday colors and add details like glitter, sequins, or drawn designs.
These ornaments combine the familiarity of cookie cutter shapes with the versatility of clay. They’re perfect for children’s crafts while producing lasting decorations.
Tips:
- Use cookie cutters with simple, clear shapes.
- Roll clay evenly for consistent thickness.
- Create hanging holes before drying.
- Let clay dry completely before painting.
29. Ribbon Candy Cane Ornaments
Loop striped ribbon in a candy cane shape and secure to create festive, no-sew fabric ornaments. These quick decorations use ribbon scraps effectively.
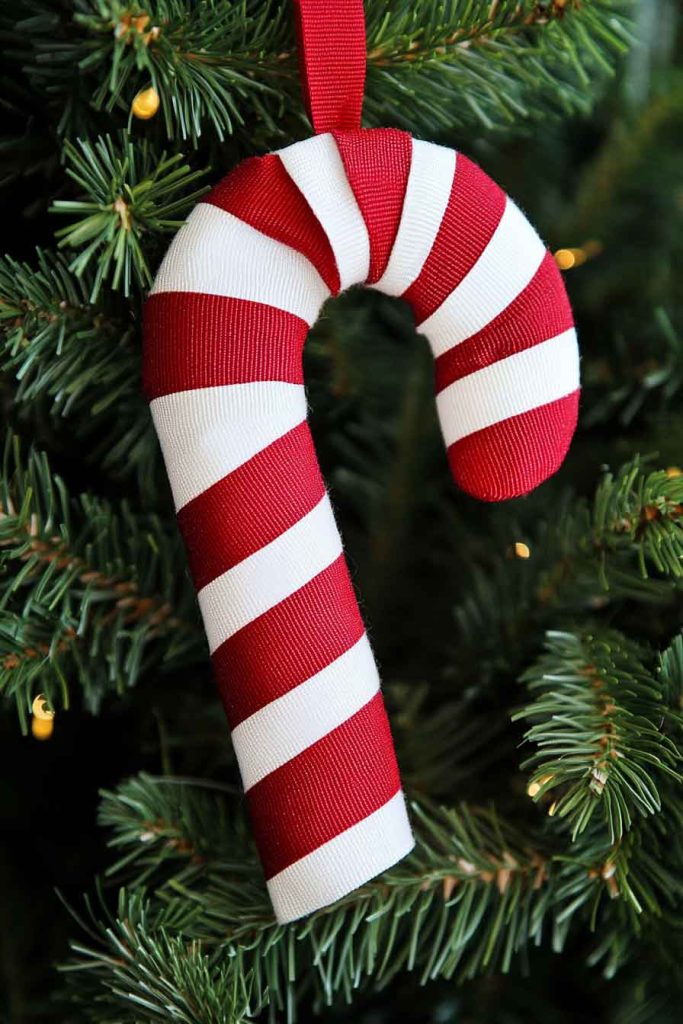
Form red and white striped ribbon into candy cane shapes, secure with glue or stitching, and add hanging loops. Stiffen with fabric stiffener if desired.
These ornaments are perfect for using ribbon leftovers and creating quick decorations. They add traditional candy cane colors and shapes without using actual candy.
Tips:
- Use wired ribbon to hold candy cane shape better.
- Apply fabric stiffener for permanent shape.
- Glue ribbon layers together at the curved top.
- Add small bows at the top for finished appearance.
30. Paper Tube Snowflake Ornaments
Cut toilet paper or paper towel tubes into rings and arrange them in snowflake patterns to create recycled ornaments. Paint white or leave kraft-colored for rustic appeal.
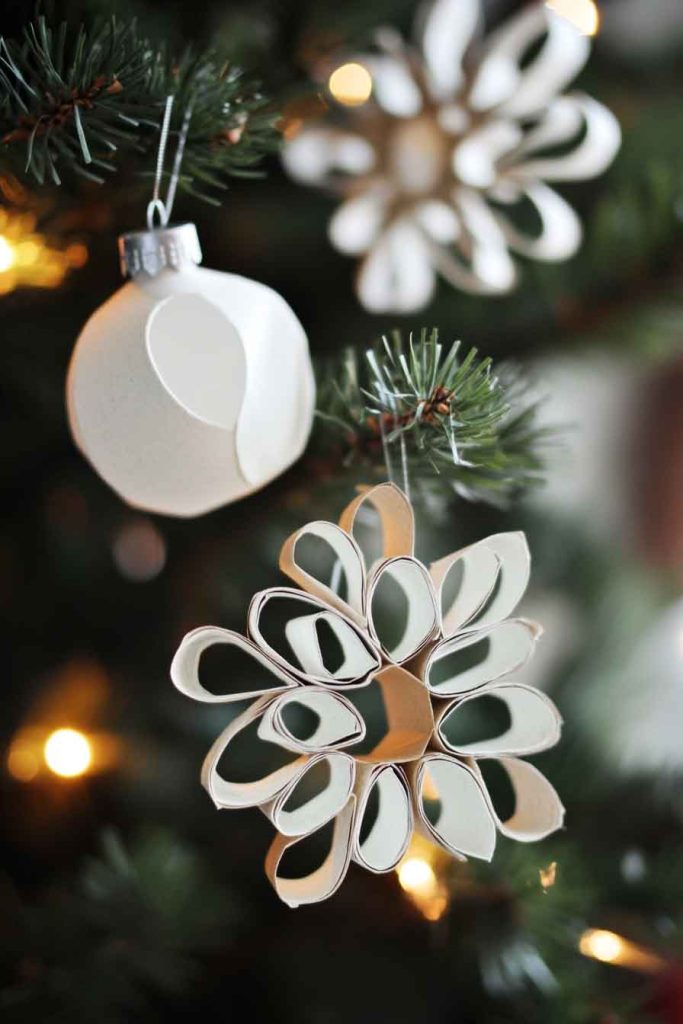
Cut tubes into half-inch rings, flatten slightly, and glue together in snowflake designs. Paint if desired and add glitter for sparkle.
These ornaments demonstrate creative recycling and produce surprisingly elegant results from humble materials. They’re perfect for teaching children about upcycling while creating beautiful decorations.
Tips:
- Cut tubes into uniform width for consistency.
- Flatten rings slightly before gluing for better contact.
- Arrange symmetrically for balanced snowflake designs.
- Paint white and add glitter for elegant finish.
Conclusion
Creating DIY Christmas ornaments is a joyful activity that brings magic to your holiday season. Each handmade decoration adds personal meaning to your tree and creates memories that last far beyond the holidays.
Whether you prefer the rustic charm of natural materials or the sparkling elegance of glittered creations, these ideas provide abundant inspiration. Don’t hesitate to experiment with these concepts, adapt them to your own style, and create unique ornaments that reflect your family’s personality and traditions.
The beauty of handmade ornaments lies not in perfection, but in the love and creativity poured into each piece. Start crafting today and build a collection of treasured decorations that will bring joy for years to come.