31 Primitive Fall Craft Ideas for a Cozy Rustic Home

If you want your home to feel warm and harvest-ready this autumn, primitive fall crafts are the most rewarding place to start. These projects draw from early American folk art traditions — using reclaimed wood, burlap, dried botanicals, and homespun fabric to create decorations that look like they’ve been in the family for generations.
What makes primitive crafts different from regular DIY fall decor is the intentional imperfection. Slightly wobbly brush strokes, visible stitching, tea-stained edges, and muted earthy tones give each piece a character that store-bought items simply can’t replicate. Every project in this list is designed to look handmade — because it is.
Whether you’re a first-time crafter or someone who decorates for fall every year, these 31 ideas range from 15-minute beginner projects to more involved afternoon builds. Let’s get into it.
What Is Primitive Craft Style?
Primitive craft style is rooted in colonial-era American folk art. It’s built around four defining characteristics: deliberately imperfect construction, naturally aged or distressed finishes, a muted earthy color palette, and traditional motifs like crows, stars, pumpkins, corn husks, and harvest imagery.
Think of it as sitting between farmhouse and folk art. Farmhouse style is clean, bright, and polished. Primitive is darker, rougher, and more handmade in appearance — the kind of decoration that looks like it was made on a kitchen table from whatever materials were available, not ordered from a catalog.
The primitive aesthetic works especially well for fall because the season’s natural tones — burnt orange, deep burgundy, mustard, and brown — are exactly the colors this style is built around.
The Primitive Fall Color Palette
Before you start any project, commit to this palette:
- Burnt orange — muted, not bright Halloween orange
- Mustard yellow — warm and slightly grayed down
- Deep burgundy and brick red
- Cream and aged white — never bright white
- Brown, tan, and natural burlap beige
- Muted black — for crow motifs, lettering, and outlines
The guiding rule: if a color looks vivid or brand new, it doesn’t belong in a primitive project. Every shade should feel like it has been sitting in a sunlit farmhouse window for a few seasons already.
Essential Supplies for Primitive Fall Crafts
Natural materials: Dried corn husks, wheat stalks, pinecones, acorns, branches, cinnamon sticks, dried apple slices, dried orange rounds, raffia, seed pods.
Fabric and fiber: Burlap, homespun plaid or checked fabric, unbleached muslin, jute twine, embroidery floss in rust, brown, cream, and olive.
Wood and metal: Reclaimed fence boards, pallet slats, unfinished wood rounds and shapes, rusty tin stars, wire, wooden dowels.
Paint and finishing: Acrylic paint in primitive colors (mustard, burnt orange, cream, black, colonial blue), dark brown antiquing wax, 80 and 220 grit sandpaper, strong brewed tea or coffee for staining, matte sealer spray.
How to Age and Distress Your Crafts
Distressing is the skill that makes everything look authentically primitive. Four techniques cover almost every project:
Dry brushing: Dip a stiff brush in paint, wipe nearly all of it off on a paper towel, then drag the nearly-dry brush across the surface. Cream over dark paint or dark brown over raw wood creates convincing wear instantly.
Sanding: Focus on edges and raised areas after painting to reveal the wood underneath. Use 80 grit for dramatic distressing, 220 grit for a subtler worn finish.
Tea or coffee staining: Submerge fabric or paper in very strong brewed tea or black coffee for 20–60 minutes. The longer it soaks, the deeper the amber tone. Crumple the fabric while it’s still wet to create natural texture variation as it dries.
Antiquing wax: Brush dark brown wax into crevices, carved lines, and recessed areas. Wipe off the excess while still wet. This one technique transforms a freshly painted surface into something that looks decades old.
31 Primitive Fall Craft Ideas
Pumpkin Crafts
1. Weathered Wooden Pumpkins Difficulty: Beginner | Time: 45 min
What you need: Old fence board or barn wood, jigsaw or scroll saw, sandpaper, muted orange or cream paint, dark antiquing wax, small branch or cinnamon stick for stem, hot glue gun.
How to make it: Cut three pumpkin shapes in graduating sizes directly from weathered wood — don’t sand the surface smooth first. The existing nicks, grain, and weathering are what give these character. Paint each one a slightly different color: one mustard, one cream, one burnt orange. Let dry fully, then sand the edges and ridges to expose bare wood underneath the paint. Work dark antiquing wax into any grooves or carved lines and buff off the excess. Hot-glue a thick cinnamon stick or short branch stub as each stem.
Pro tip: Display all three together on your porch steps, largest at the back, smallest at the front. The color variation across the three makes them look like a curated collection rather than a matching set.
2. Burlap Fall Banner Difficulty: Beginner | Time: 1 hour
What you need: Burlap fabric, scissors or pinking shears, jute twine, black acrylic paint, foam alphabet stamps or letter stencils, hot glue gun.
How to make it: Cut triangular pennants from burlap with a 5″ base and approximately 7″ sides. Fold the top edge of each pennant over a length of jute twine and hot-glue it down to create a casing, spacing each pennant about 1″ apart. Stamp or stencil one letter per pennant to spell out your chosen word — “HARVEST,” “GATHER,” “THANKFUL,” or “GIVE THANKS” all work well. Add a simple star or leaf stamp between pennants if the spacing feels too bare. Don’t worry about perfectly even ink coverage — uneven stamping looks hand-pressed and intentional.
Pro tip: Iron your burlap triangles flat before cutting and assembling. It makes the pennants hang much more cleanly and prevents the edges from curling inward.
3. Primitive Corn Husk Wreath Difficulty: Intermediate | Time: 2 hours
What you need: One bag dried corn husks, 12–14″ grapevine wreath form, hot glue gun, floral wire, dried wheat bundle, small pinecones, jute twine, burlap ribbon.

How to make it: Soak the dried corn husks in warm water for 10 minutes to restore flexibility — dry husks will crack and split when you try to fold them. Fold each soaked husk lengthwise and hot-glue or wire it to the grapevine form, working continuously around the circle. Overlap each husk to cover the attachment point of the previous one. Once the entire form is covered, wire a small bundle of wheat stalks to one side at roughly the 8 o’clock position. Tuck pinecones into the wreath in a cluster near the wheat. Finish with a simple flat burlap bow — two wide loops tied with twine rather than a fussy layered bow.
Pro tip: If the finished wreath sits in a dry environment and the husks start to feel brittle, a light misting of water restores their flexibility without affecting the appearance.
4. Distressed Painted Pumpkins Difficulty: Beginner | Time: 1 hour plus drying time
What you need: Real or craft foam pumpkins, acrylic paint in cream, mustard, or soft grey, sandpaper (both grits), dark antiquing wax, foam brush, lint-free cloth.
How to make it: Apply two full coats of paint over the entire pumpkin, letting each coat dry completely. Once the final coat is fully dry — at least 2 hours — sand in long vertical strokes from top to bottom, applying more pressure along the ridges where natural wear would occur first. Wipe away the dust with a dry cloth. Brush antiquing wax into all the grooves between the pumpkin ribs, then buff off the surface wax while leaving it concentrated in the recessed areas.
Pro tip: Cream-painted pumpkins distressed with dark wax look especially striking when grouped with raw, unpainted orange pumpkins on a porch or mantel. The contrast between the painted and natural surfaces makes both look more intentional.
5. Primitive Rag Garland Difficulty: Beginner | Time: 30 min
What you need: Homespun fabric in 3–4 coordinating fall patterns — plaids, ticking stripes, solid rust or brown, scissors, thick jute rope or twine.
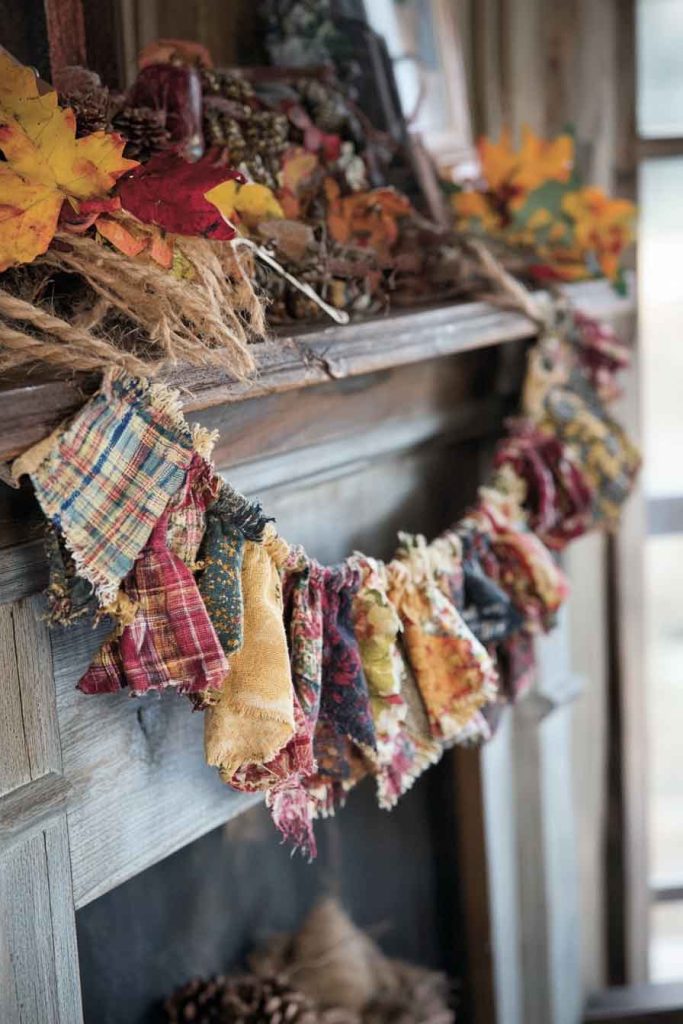
How to make it: Tear or cut fabric strips roughly 1.5″ wide and 6–8″ long. Tearing rather than cutting gives a more naturally frayed edge that suits the primitive look perfectly. Fold each strip over the rope and pull the ends through the loop to form a lark’s head knot. Alternate your fabric patterns as you work down the rope and pack the strips tightly enough that they fan out on both sides. Leave 6–8″ of bare rope at each end for tying or hanging.
Pro tip: A garland made entirely from one fabric looks flat. Using at least three different patterns — one plaid, one solid, one stripe — gives it the layered, collected-over-time look that makes primitive garlands so appealing.
6. Wooden Fall Sign Difficulty: Beginner | Time: 1 hour
What you need: Old fence board or pallet slat (roughly 6″ x 18″), black or dark brown acrylic paint, round lettering brush or letter stencil, sandpaper, dark antiquing wax or stain, sawtooth picture hanger.
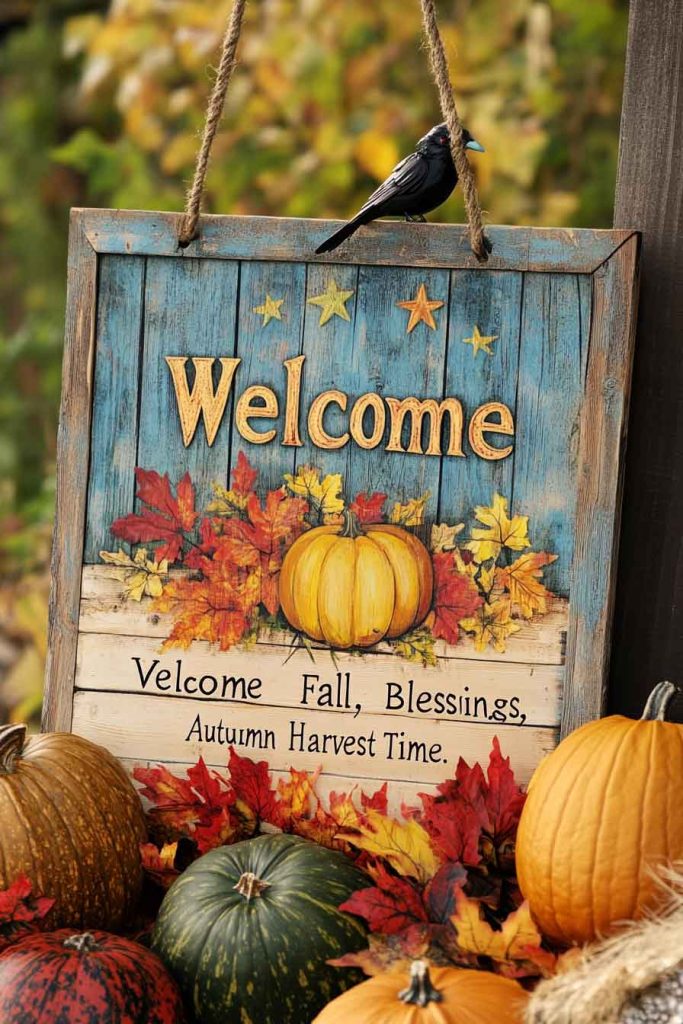
How to make it: Use the raw weathered board as-is, or paint a base coat in cream or black if the wood is too light or uniform in color. Once dry, hand-letter or stencil your phrase directly onto the board. Classic primitive choices include “Gather,” “Harvest Blessings,” “Welcome Fall,” “Give Thanks,” or “Autumn is Here.” Add small folk art details at the corners — a simple crow silhouette, a five-pointed star, or a row of dots. Sand the entire finished sign with focus on the edges and lightly over the lettering. Finish with dark wax worked into the surface and buffed back.
Pro tip: If freehand lettering feels intimidating, print your text in a simple font, tape it face-down on the board, and scribble firmly over the back with a pencil. Lift the paper and you’ll have a faint transfer outline to paint over.
7. Primitive Scarecrow Difficulty: Intermediate | Time: 2–3 hours
What you need: 36″ wooden stake, shorter crosspiece for arms, floral wire, small thrift-store shirt and jeans, straw or dried grass for stuffing, black paint, small straw hat, jute twine, Spanish moss.
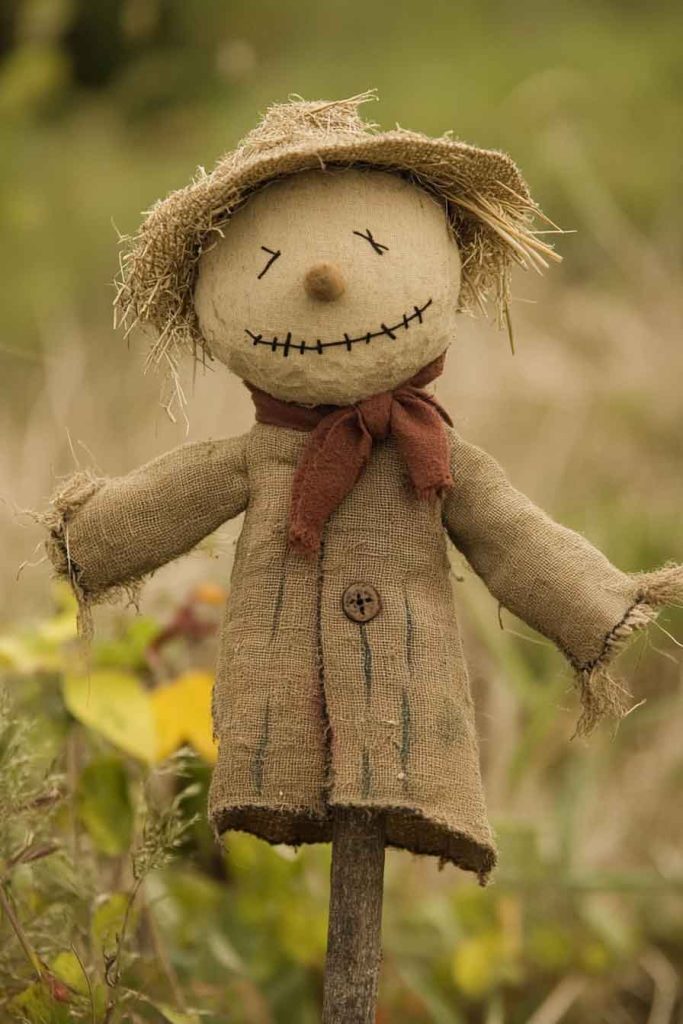
How to make it: Wire the crosspiece firmly to the main stake about one-third of the way down from the top to create a T-frame. Dress the frame in the shirt and jeans, stuffing each limb and the body generously with straw until everything holds its shape. Tie the cuffs and ankles closed with jute twine to keep the stuffing in place. Paint a simple primitive face on the top of the stake — two dot eyes, a small curved nose dot, and a slightly crooked mouth line. Nothing detailed or realistic. Tie the straw hat onto the head with a length of twine so it sits at a slight angle.
Pro tip: Plant the stake in a large galvanized tub or whiskey barrel planter and surround the base with dried corn stalks. The whole display takes about 10 minutes to assemble once the scarecrow itself is made.
8. Tea-Stained Fall Pillows Difficulty: Intermediate | Time: 3–4 hours
What you need: Unbleached muslin or natural cotton fabric, large pot, strong black tea (6–8 tea bags), salt, needle and thread or sewing machine, embroidery supplies, pillow insert.
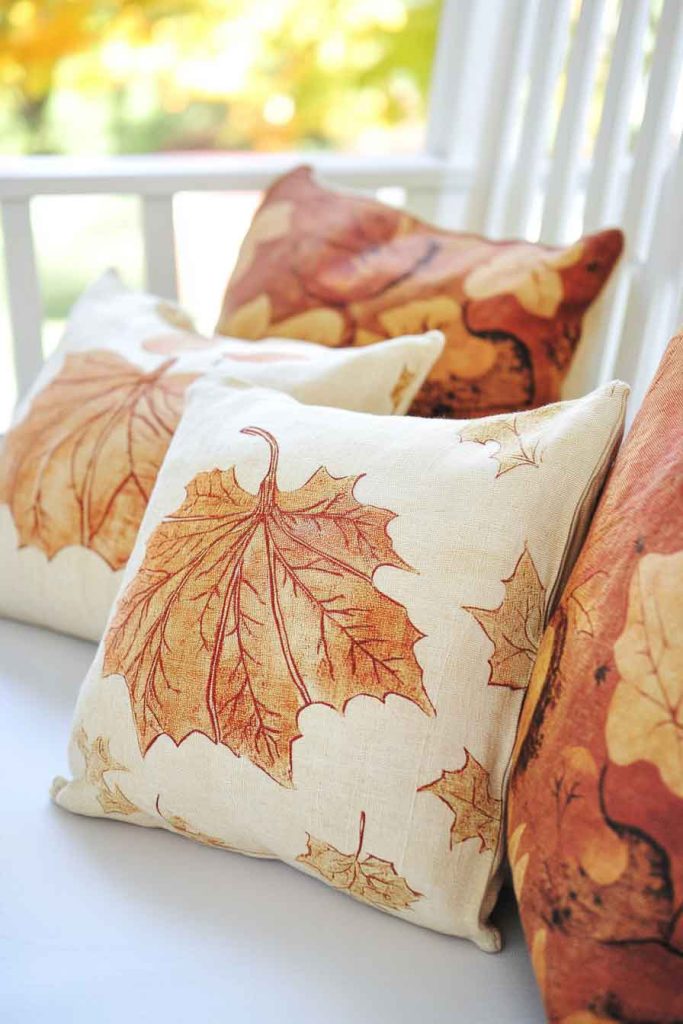
How to make it: Dissolve 2 tablespoons of salt in a large pot of very strong brewed black tea. Submerge your fabric completely and simmer on low heat for 30–45 minutes, stirring occasionally to prevent uneven staining. Remove, wring out gently, and lay flat to dry — the result should be a rich amber with subtle natural variation across the surface. Cut front and back panels to your pillow size plus half-inch seam allowance. Before assembling, add your primitive embroidered design to the front panel: a simple pumpkin, crow, star, wheat stalk, or folk art phrase. Stitch three sides closed, insert the pillow form, and slip-stitch the opening.
Pro tip: The variation in tea staining — darker in some areas, lighter in others — is part of what makes these look genuinely old. Don’t try to even it out.
9. Dried Apple Garland Difficulty: Beginner | Time: 3 hours, mostly drying
What you need: 4–6 apples, sharp knife or mandoline, lemon juice, baking sheet, parchment paper, dried orange slices, cinnamon sticks, large-eye needle, jute twine.
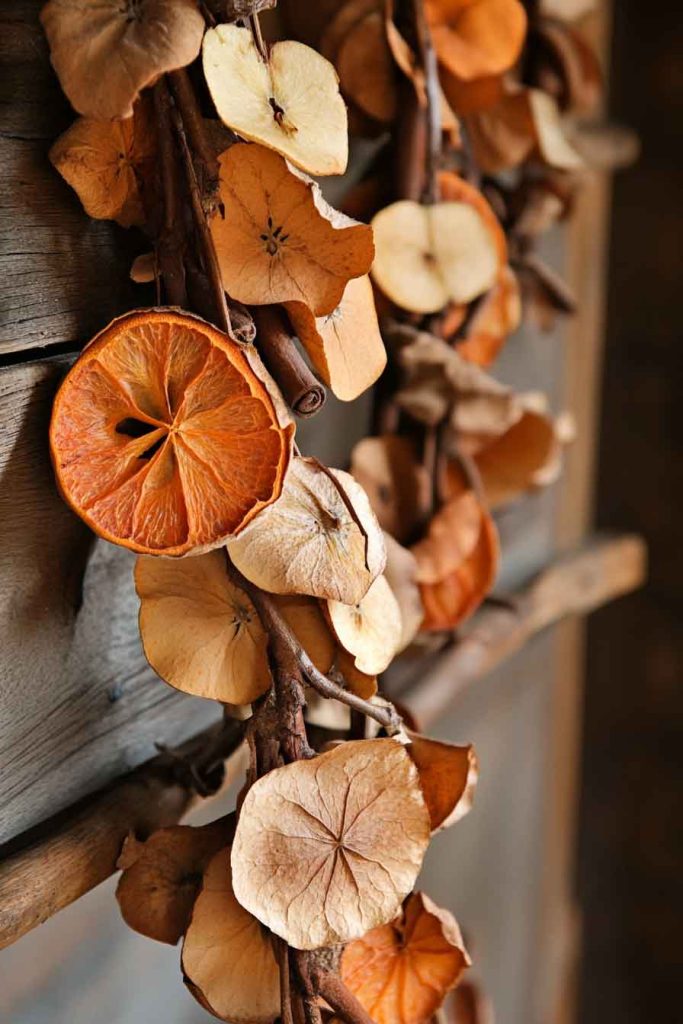
How to make it: Slice apples crosswise to about 1/4″ thickness — thinner than that and they become fragile, thicker and they take much longer to dry. Dip each slice in lemon juice immediately to prevent browning. Arrange in a single layer on a parchment-lined baking sheet and dry in the oven at 200°F for 2–3 hours, flipping once halfway through. Let cool completely before handling. Thread a large needle with jute twine and alternate apple slices, dried orange rounds, and cinnamon sticks, tying a knot between each piece to hold the spacing.
Pro tip: This garland naturally scents the room for 4–6 weeks. When the scent fades, lightly mist the dried fruit with water mixed with a few drops of cinnamon or orange essential oil to refresh it.
10. Primitive Candle Board Difficulty: Beginner | Time: 30 min
What you need: Weathered wooden board (roughly 6″ x 24″), 3 pillar candles in varying heights, metal candle plates to protect the wood, dried berry sprigs, small pinecones, rusty metal stars, jute twine coil, dark stain or antiquing wax.
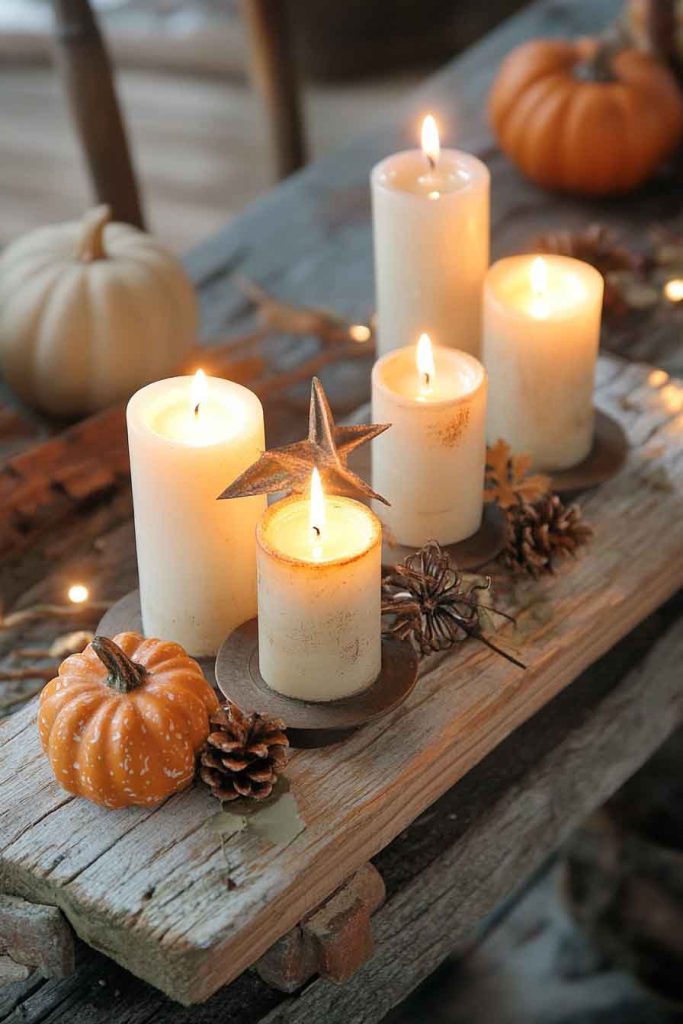
How to make it: Age the board first if it looks too new — dry-brush with dark brown paint or rub in antiquing wax and wipe back. Place the three pillar candles in a staggered line from one end to the other, tallest on one side and shortest on the other. Set each candle on a metal plate. Fill the spaces between candles with dried berry clusters, a pinecone or two, a scattered rusty star, and a loosely coiled length of jute twine. Keep everything low and asymmetrical.
Pro tip: Battery-operated pillar candles are virtually indistinguishable from real ones once surrounded by the botanicals. They can stay lit all day and all evening safely, which makes the whole display far more practical for daily fall decorating.
11. Burlap Pumpkin Pillows Difficulty: Beginner | Time: 45 min
What you need: Burlap fabric, scissors, needle and jute-colored thread, fiberfill stuffing or dried beans, cinnamon stick or twig for stem, hot glue, optional black marker or paint for face details.
How to make it: Cut two identical pumpkin shapes from burlap for each pillow. Place them together and stitch around the edges using a visible whip stitch or running stitch about 1/4″ from the edge — the stitching is meant to show, so use a contrasting thread color if you like. Leave a 3″ opening at the top. Stuff firmly with fiberfill (or dried beans for a heavier version), then stitch the opening closed. Push a cinnamon stick through the center top for a stem, securing with a dab of hot glue at the base. Add simple Jack-o’-lantern features with a black marker if desired.
Pro tip: Make a set of three in different sizes — a large pillow version, a medium decorative size, and a small bowl-filler — from the same burlap for a cohesive tiered display.
12. Primitive Fall Tree Difficulty: Beginner | Time: 45 min
What you need: 4–6 bare branches with interesting shapes (birch and oak work especially well), tall galvanized bucket or wide-mouth vase, stones or sand for ballast, small handmade ornaments, jute twine.
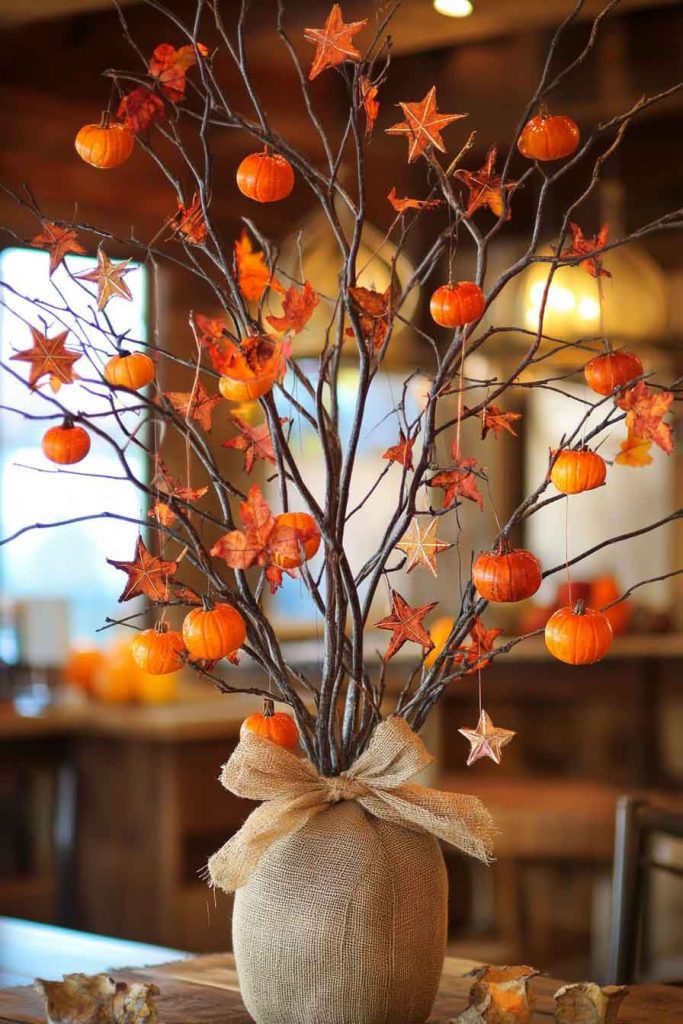
How to make it: Fill the container with stones or sand — enough to anchor the branches securely so the arrangement doesn’t tip. Push the branches in one at a time, fanning them outward to create a full silhouette. Hang small primitive ornaments from the branches on short loops of jute twine: mini burlap pumpkins, twig stars, dried apple round slices, small wooden crow cutouts, and tiny fabric hearts. Distribute them unevenly — some branches with several ornaments, some nearly bare.
Pro tip: Gather branches after a wind storm rather than cutting from living trees. Storm-dropped branches have more natural character, irregular bends, and sometimes interesting moss or lichen already growing on them.
13. Weathered Window Frame Display Difficulty: Beginner | Time: 30 min assembly
What you need: Old wooden window frame (Habitat for Humanity ReStores are the best source), muted paint in colonial blue or cream, sandpaper, jute twine, wire, small primitive fall decorations.
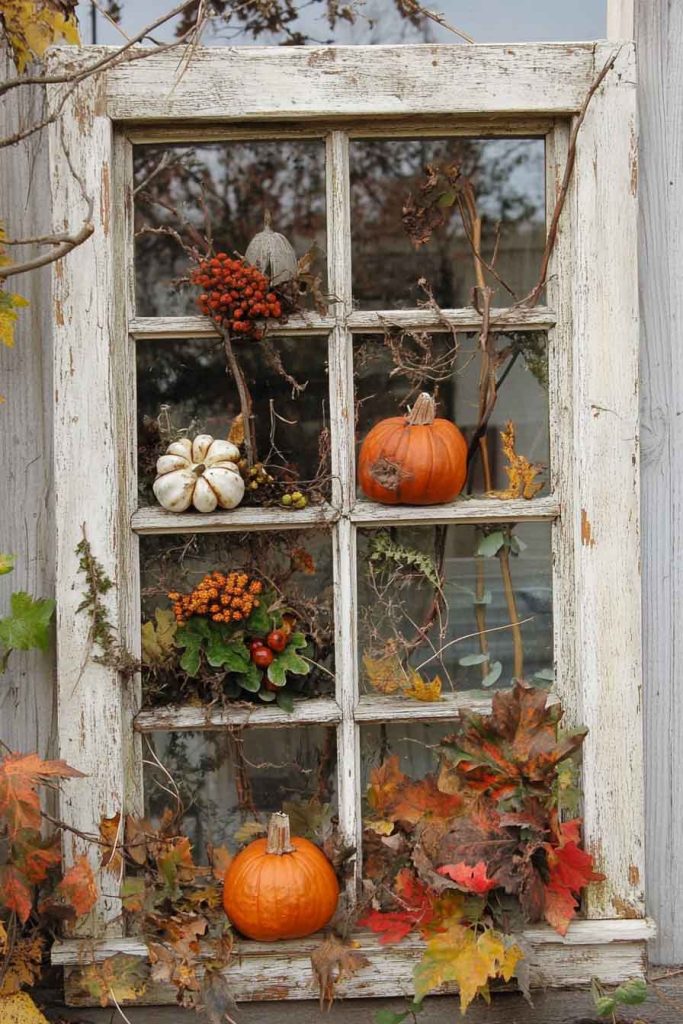
How to make it: If the frame is in good condition and needs aging, apply a single coat of muted paint and sand back aggressively once dry — the goal is a surface that looks 80% bare wood with just a ghost of color. Stretch horizontal lengths of jute twine across each pane opening, securing with small eye hooks or staples at each side, to create display ledges. Wire or tie small primitive decorations to the twine: twig stars, tiny burlap pumpkins, dried berry clusters, small crow cutouts, and miniature wooden signs.
Pro tip: Lean the frame casually against a wall rather than mounting it. A leaned frame reads as collected and intentional; a perfectly hung one can look more like a store display.
14. Homespun Fabric Pumpkins Difficulty: Beginner | Time: 30 min
What you need: Plaid or checked homespun fabric (fat quarters are the perfect size), scissors, needle and thread, fiberfill, cinnamon stick, jute twine, hot glue.
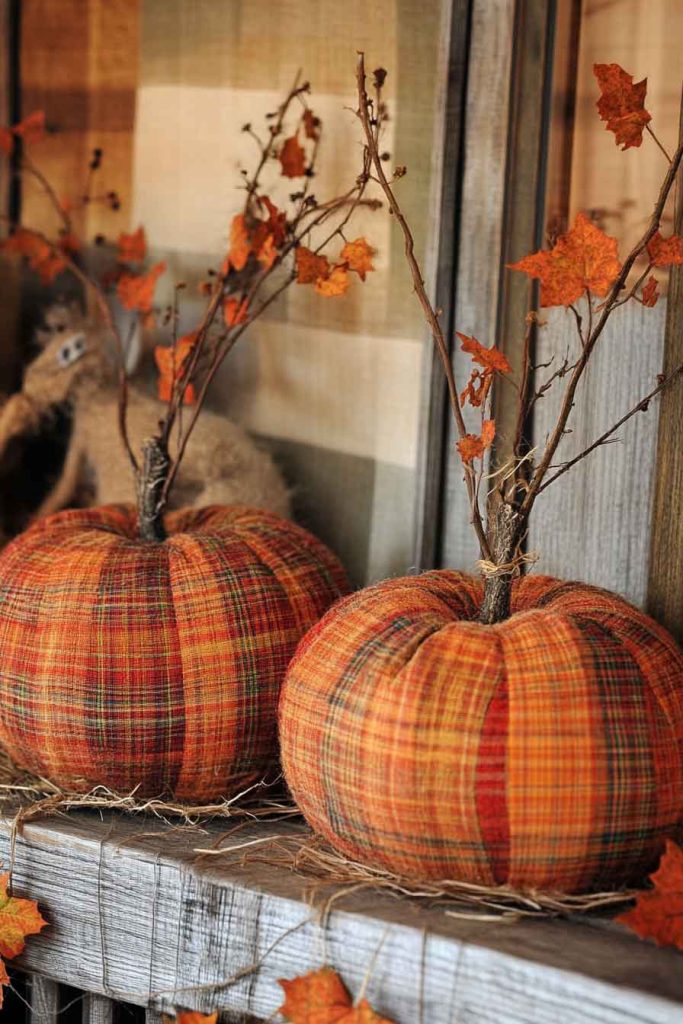
How to make it: Cut a circle approximately 12″ across from the fabric — the size of a dinner plate works as a template. Run a hand-gathering stitch around the full perimeter, leaving long thread tails on both ends. Place a generous handful of fiberfill in the center of the fabric circle. Pull both thread tails firmly to gather the fabric up around the stuffing, shaping it into a round pumpkin form. Tie off tightly with several knots. Push a cinnamon stick down through the gathered center top for a stem, securing the base with a drop of hot glue. Tie a small bow of jute twine around the base of the stem.
Pro tip: The plaid or check pattern on homespun fabric creates natural vertical lines when gathered that mimic the ridges of a real pumpkin — choose a fabric with a pattern scaled to your pumpkin size for the most realistic effect.
15. Primitive Crow on Pumpkin Difficulty: Intermediate | Time: 1.5 hours
What you need: Medium painted wooden or real pumpkin, black wool felt, wire for legs and feet, small black buttons for eyes, fiberfill, needle and black thread, hot glue gun, optional small kraft paper hat.
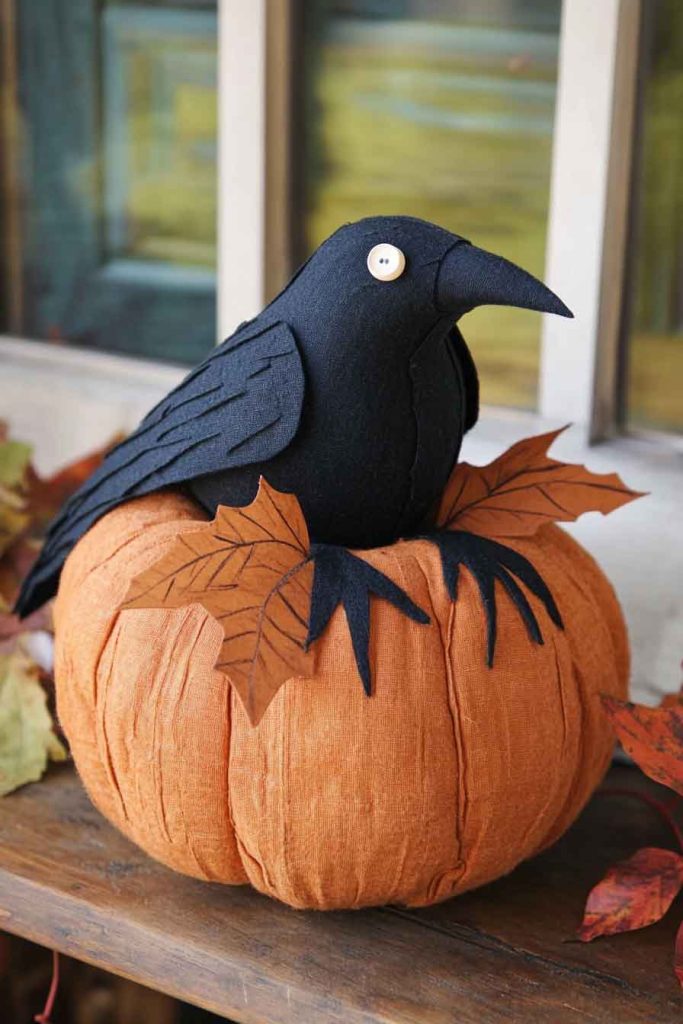
How to make it: Cut two matching bird body shapes and two small wing shapes from black wool felt. Stitch the two body pieces together using a visible whip stitch with black thread — in primitive crafts this exposed stitching is intentional decoration, not a flaw to hide. Leave the bottom open, stuff lightly with fiberfill for a little dimension, and stitch closed. Bend a short length of wire into legs with three-toed feet at the bottom. Push the wire legs up through the base of the bird and secure with hot glue. Add black button eyes. Position the crow on the pumpkin top and hot-glue in place with the wings slightly lifted as if it just landed.
Pro tip: Roll a small piece of kraft paper into a cone, flatten it into a brim-and-crown hat shape, and perch it on the crow’s head with a tiny dab of glue. It takes 2 minutes and transforms the piece from simple to genuinely folk-art quality.
Wreaths & Garlands
16. Rustic Wheat Bundle Centerpiece Difficulty: Beginner | Time: 20 min
What you need: Dried wheat bundle (one bunch from a craft or floral supply store), burlap ribbon or jute twine, galvanized bucket or wooden crate or primitive wooden box, 2–3 small gourds or pumpkins, one pillar candle.
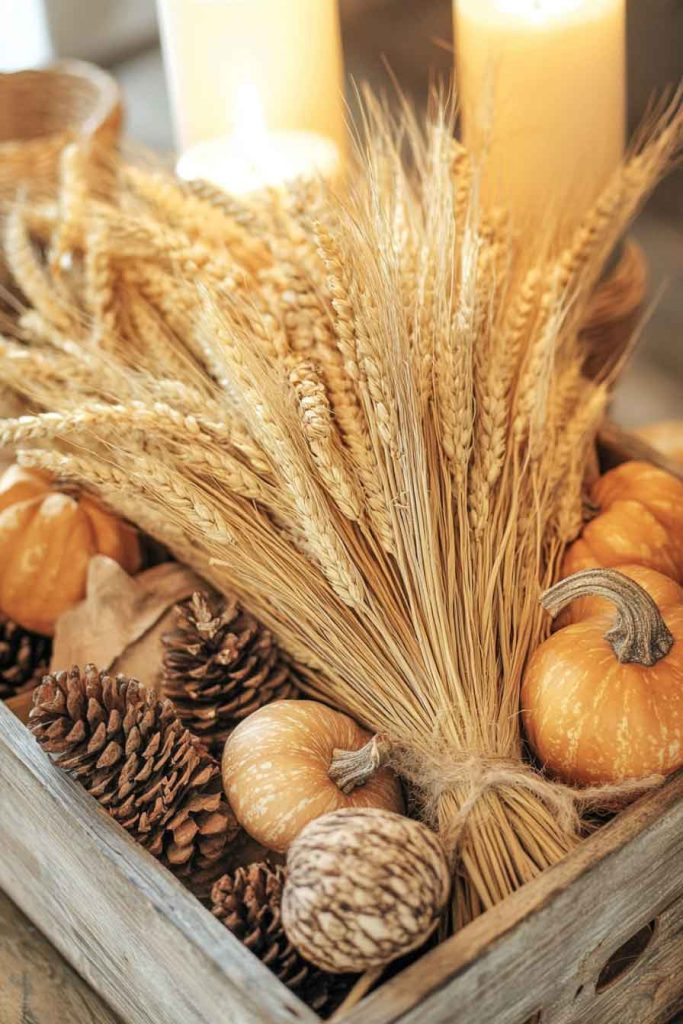
How to make it: Fill your container with florist foam or crumpled newspaper to give the arrangement structure and height. Insert the wheat bundle at a slight angle, positioned off-center rather than dead center. Tuck 2–3 small gourds or pumpkins against the base of the wheat on one side. Place the pillar candle on the opposite side from the gourds. The left-right asymmetry is the key detail here — a perfectly centered, balanced arrangement looks designed; an asymmetrical one looks naturally gathered.
Pro tip: Glycerin-treated wheat retains its golden color and soft texture for years without becoming brittle. It costs slightly more at the craft store but is worth it if you plan to store and reuse this centerpiece.
17. Hand-Stitched Fall Table Runner Difficulty: Intermediate | Time: 2–3 hours
What you need: Homespun plaid or solid fabric (cut to 15″ x 60″ for a standard dining table), pinking shears, embroidery floss in rust, brown, and cream, embroidery needle, iron.
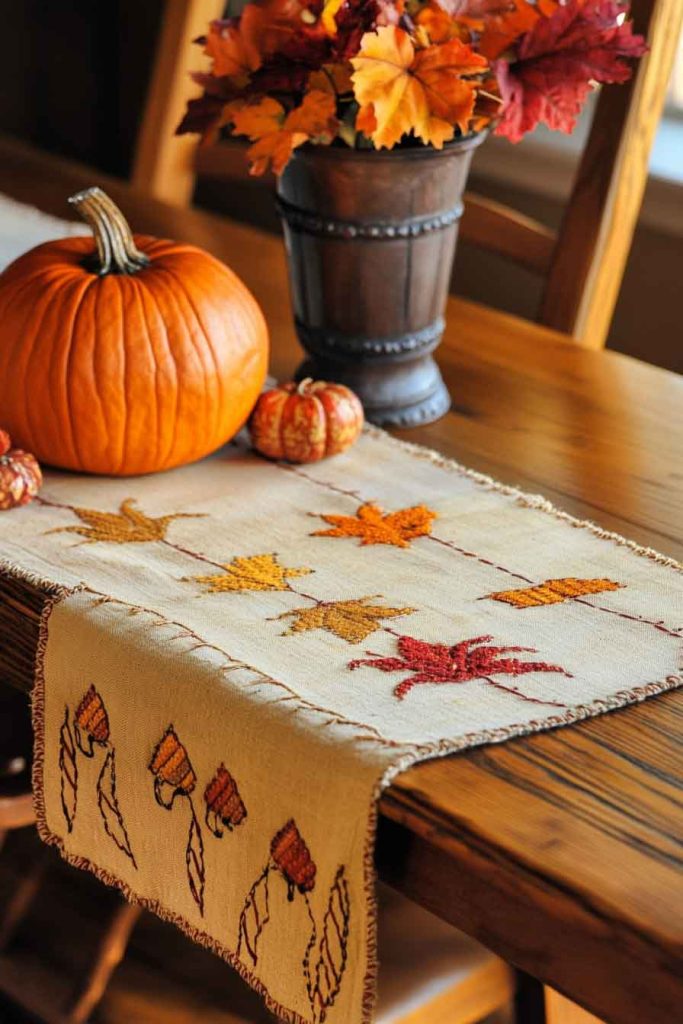
How to make it: Cut the fabric to size using pinking shears on all four edges — the zigzag finish prevents fraying without any hemming and looks appropriately rustic on its own. Press flat with an iron. Using a simple running stitch, embroider a border line about 1″ in from all four edges in a contrasting thread color. At each short end of the runner, add a small primitive motif: a simple pumpkin outline, a five-pointed star, or a small crow — worked in two thread colors maximum for a clean folk art look.
Pro tip: Deliberately vary your stitch length slightly as you work the border. Perfectly even, machine-like stitches undermine the handmade quality. A little inconsistency is exactly right.
18. Primitive Painted Gourds Difficulty: Beginner | Time: 1 hour plus drying
What you need: Dried gourds (natural or craft store), acrylic paint in muted primitive colors, fine detail brush, sandpaper, antiquing wax, wooden bowl or dough bowl for display.
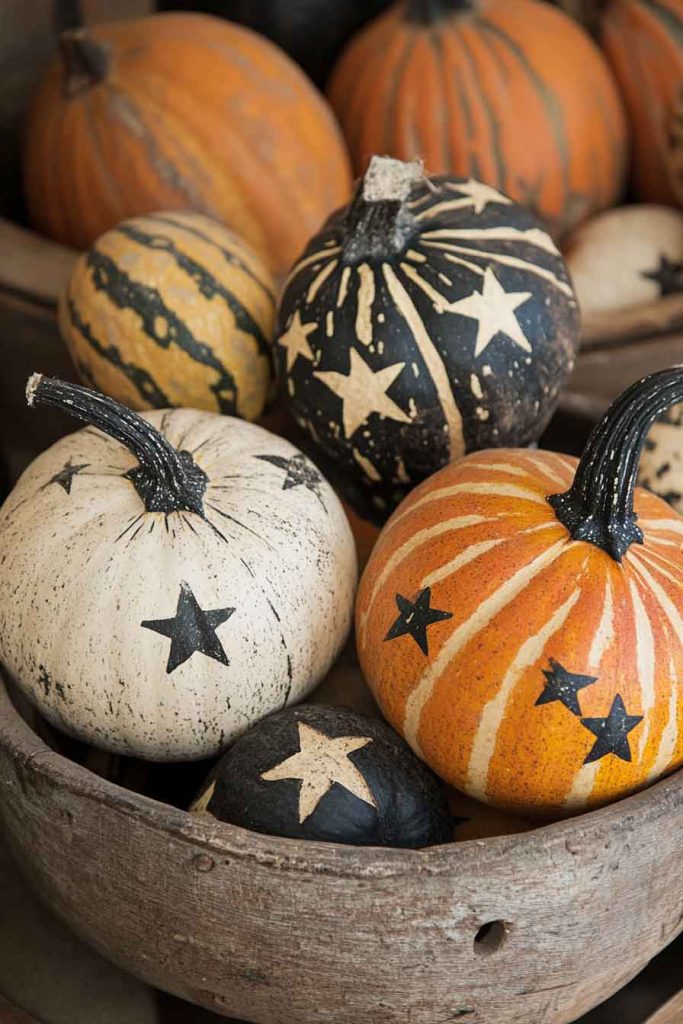
How to make it: Paint each gourd a solid base color and let dry completely. Using a fine brush and a contrasting color, add simple hand-painted surface designs: evenly spaced dots around the middle, a row of small five-pointed stars, loose crosshatch lines, or simple wavy stripes. Keep the designs repetitive and geometric rather than pictorial — primitive painted gourds use pattern, not illustration. Once the design is fully dry, lightly sand the entire gourd to soften the edges of the painted design and give the surface a uniformly aged look. Finish with a thin coat of antiquing wax.
Pro tip: A grouping of five gourds in different shapes, all painted in the same limited color palette but with different surface patterns, looks far more cohesive than gourds painted in different colors.
19. Burlap Fall Wreath with Berries Difficulty: Beginner | Time: 45 min
What you need: Foam wreath form (12–14″), 4″-wide burlap ribbon, straight pins or hot glue, dried or high-quality faux berry stems in deep burgundy and rust, small distressed wooden tag, jute twine, black marker.
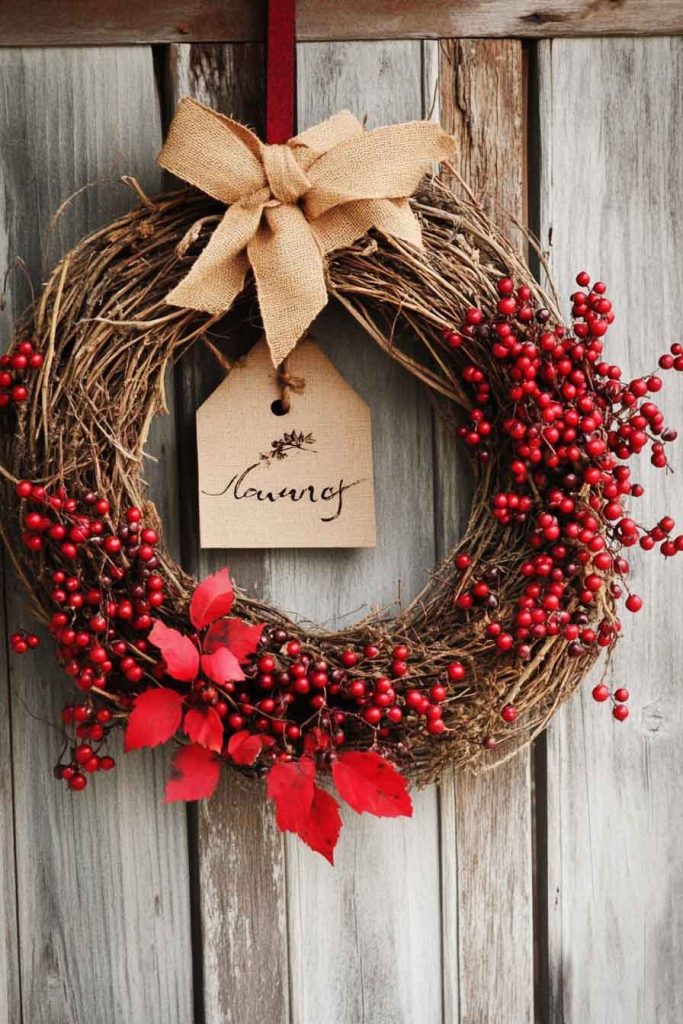
How to make it: Wrap the foam form tightly and evenly with burlap ribbon, securing every 3–4 inches with a straight pin pushed in at an angle. Tuck and pin the ribbon ends neatly on the back. Add 4–5 berry stem clusters around the wreath, spacing them so the eye moves around the circle without landing on a perfectly symmetrical arrangement. Write a single word — “Gather,” “Harvest,” or “Fall” — on the wooden tag with a black marker. Lightly sand the tag edges for a worn look and tie to the wreath with a short length of jute twine.
Pro tip: Tuck short sprigs of dried eucalyptus or preserved cedar between the burlap folds in a few places. It adds texture, a subtle herbal scent, and a color variation that keeps the wreath from looking too one-dimensional.
20. Primitive Pumpkin Stack Difficulty: Beginner | Time: 1 hour
What you need: Three wooden discs or circles in graduating sizes (3″, 5″, and 7″ work well), drill, 12–14″ wooden dowel, wood glue, acrylic paint in three different muted fall colors, antiquing wax, gnarled twig or thick branch stub for top stem, jute twine.
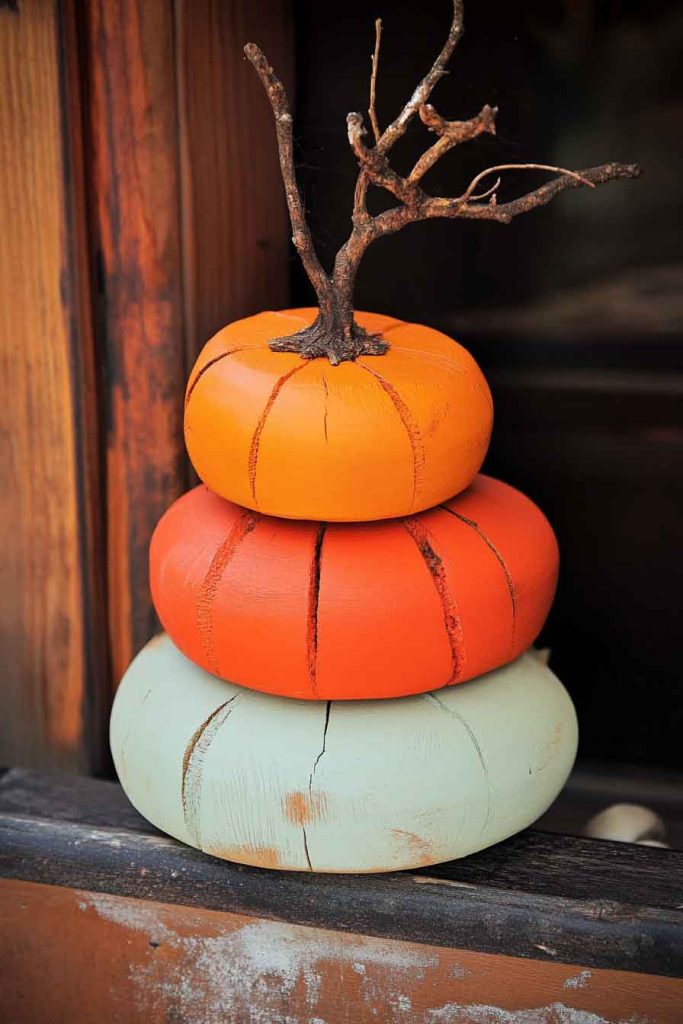
How to make it: Paint each disc a different color — try mustard on the largest, burnt orange on the middle, and cream on the smallest — and distress each one with sandpaper once dry. Drill a hole through the center of each disc sized to fit your dowel snugly. Thread the dowel through all three from bottom to top with the largest at the bottom. Secure each disc with a bead of wood glue and let cure. Push a gnarled twig into the very top of the dowel as a stem and wrap its base several times with jute twine, tying off with a simple knot.
Pro tip: Set this on your porch in a galvanized bucket filled with Spanish moss or dried leaves so the bottom disc sits slightly elevated. It reads as a complete vignette rather than a craft project sitting on the ground.
21. Corn Husk Dolls Difficulty: Intermediate | Time: 1.5 hours plus 24 hrs drying
What you need: Dried corn husks (soaked in warm water for 15 min to restore flexibility), jute twine, small fabric scraps for clothing, optional thin wire for arms, fine-tip black marker for facial details.
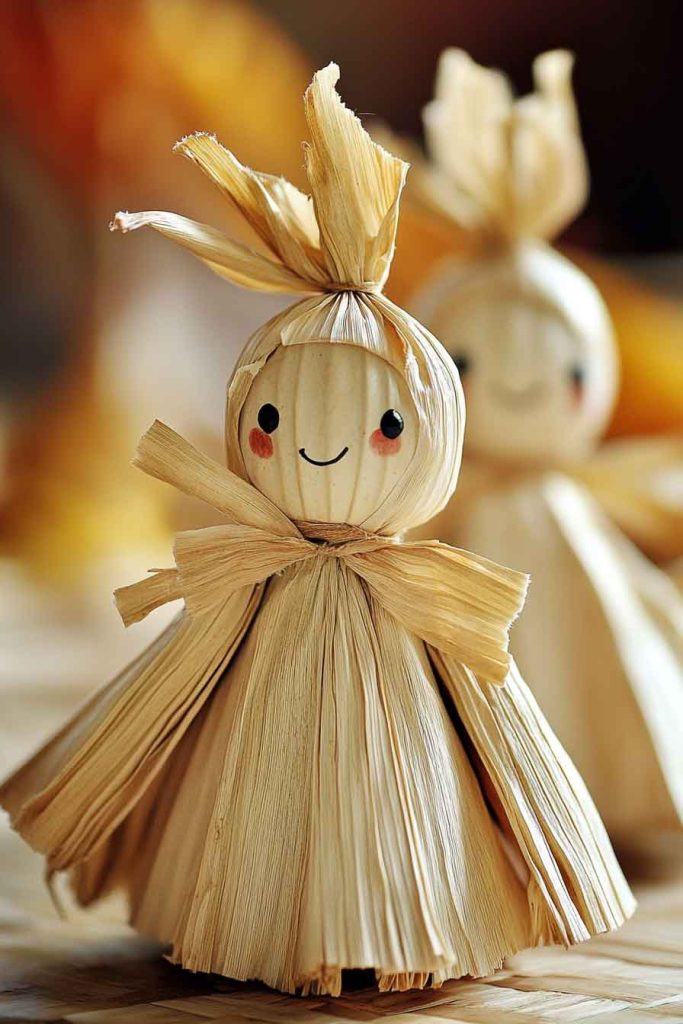
How to make it: Gather 6–8 soaked husks and fold them together over a short length of twine at their midpoint. Pull the twine down about 1.5″ from the fold and tie firmly to create a rounded head shape. Divide the lower husks into two equal groups for legs — twist or braid each group slightly and tie at the ankle with twine. For arms, take one narrow husk and roll it lengthwise into a tight tube. Slide this arm piece horizontally behind the body husks just below the head and tie at the neck and waist to secure it in position. Allow to dry completely — at least 24 hours — before adding small fabric clothing pieces tied on with twine.
Pro tip: Corn husk dolls have been crafted in North America for thousands of years, making them one of the most historically authentic primitive projects on this list. They make genuinely meaningful handmade gifts packaged in kraft paper with a jute bow.
22. Weathered Ladder Display Difficulty: Beginner | Time: 30 min setup
What you need: Old wooden step ladder (garage sales and thrift stores are full of them), sandpaper, optional dry-brush paint, homespun fabric, dried corn stalks, wheat bundles, small primitive signs and ornaments.
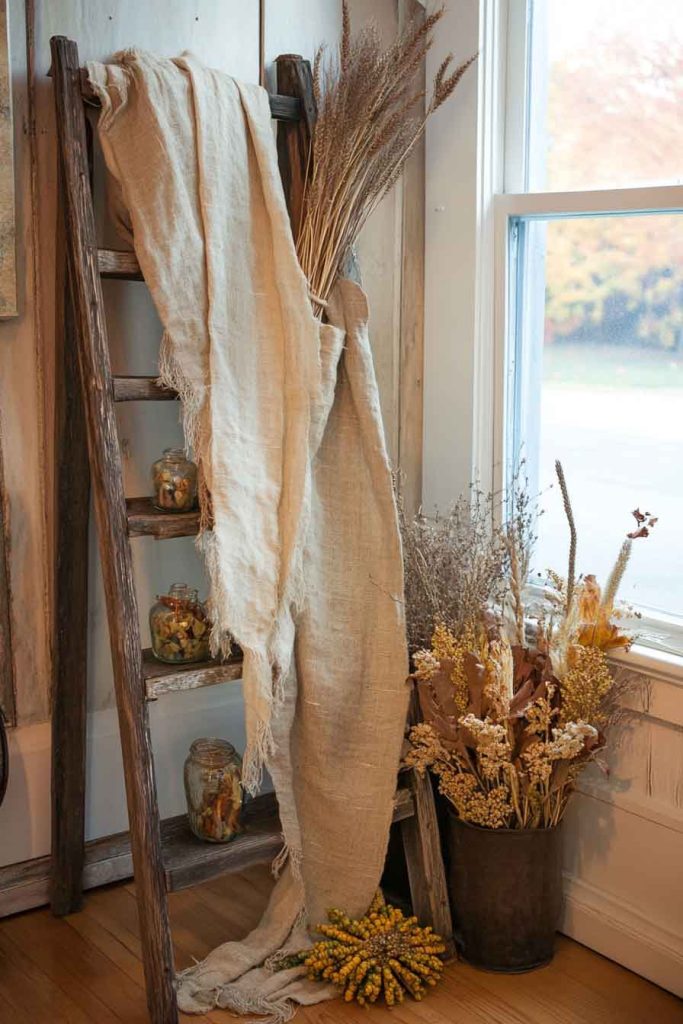
How to make it: If the ladder looks too new or uniform in color, dry-brush a little cream or grey paint across the rungs and rails and sand lightly once dry. Lean the ladder against your porch wall or an interior wall at a slight angle — it should look casually placed rather than carefully positioned. Drape a length of homespun plaid loosely over one of the middle rungs so it hangs down on both sides. Lean dried corn stalks against one side of the ladder base. Hang twig stars, burlap pumpkins, and small signs from the rungs on short lengths of jute twine.
Pro tip: A vintage two-step step stool works just as well in tighter spaces and is far easier to find at thrift stores than a full step ladder. It also fits on a small porch or in a corner without dominating the space.
23. Primitive Fall Pillar Candles Difficulty: Beginner | Time: 15 min
What you need: Plain pillar candles in three varying heights, burlap strips cut to the height of each candle, jute twine, dried berry sprigs, cinnamon sticks, wooden tray or board for display, wood slice rounds for elevating candles.

How to make it: Wrap a strip of burlap around each candle, securing the back seam with a small dab of hot glue. Tie a length of jute twine around each wrapped candle and knot it at the front. Tuck a dried berry sprig or cinnamon stick under the front knot on each candle. Arrange all three on a wooden tray, using wood slice rounds under the shorter candles to create height variation. The three-candle grouping should form a gently staggered diagonal line across the tray rather than a straight row.
Pro tip: Battery pillar candles wrapped in burlap are indistinguishable from real ones once they’re in a display. They can run all day and evening, never melt, and won’t cause any fire concerns — which makes this display genuinely practical, not just decorative.
24. Hand-Painted Wooden Leaves Diffculty: Beginner | Time: 1.5 hours
What you need: Thin craft wood or basswood sheets, leaf-shaped templates, pencil, jigsaw or craft knife, acrylic paint in muted fall colors, fine detail brush, sandpaper, small drill bit, jute twine.
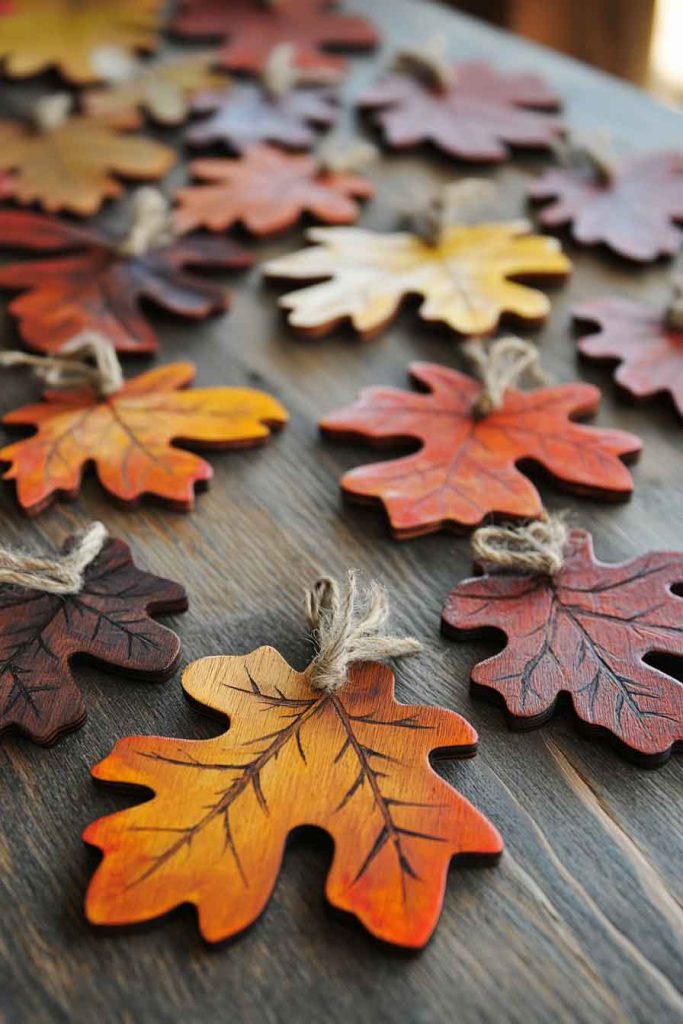
How to make it: Trace leaf shapes onto thin wood using real pressed leaves or cut templates as guides — oak, maple, and elm shapes all work well. Cut out each leaf carefully. Paint each one a different muted fall color and add simple veins using a fine brush and a slightly darker version of the same color while the base coat is still slightly tacky, so the lines blend softly into the surface. Once fully dry, sand the edges with 220 grit sandpaper to create a worn border effect. Drill a small hole at the stem end of each leaf. String onto jute twine with knots between each one for a garland, or leave individual for scattering across a table.
Pro tip: Scatter a mix of wooden painted leaves and real pressed leaves across your dining table for a Thanksgiving table setting that takes under 10 minutes to arrange and costs almost nothing.
25. Primitive Pumpkin Pocket Hanger Difficulty: Intermediate | Time: 1.5 hours
What you need: Homespun fabric (for the pocket), weathered board (roughly 8″ x 12″), staple gun or hammer and small nails, hand-painted pumpkin motif or stencil for the board, dried flowers, wheat stalks, and small gourds for filling the pocket, jute twine for hanging.
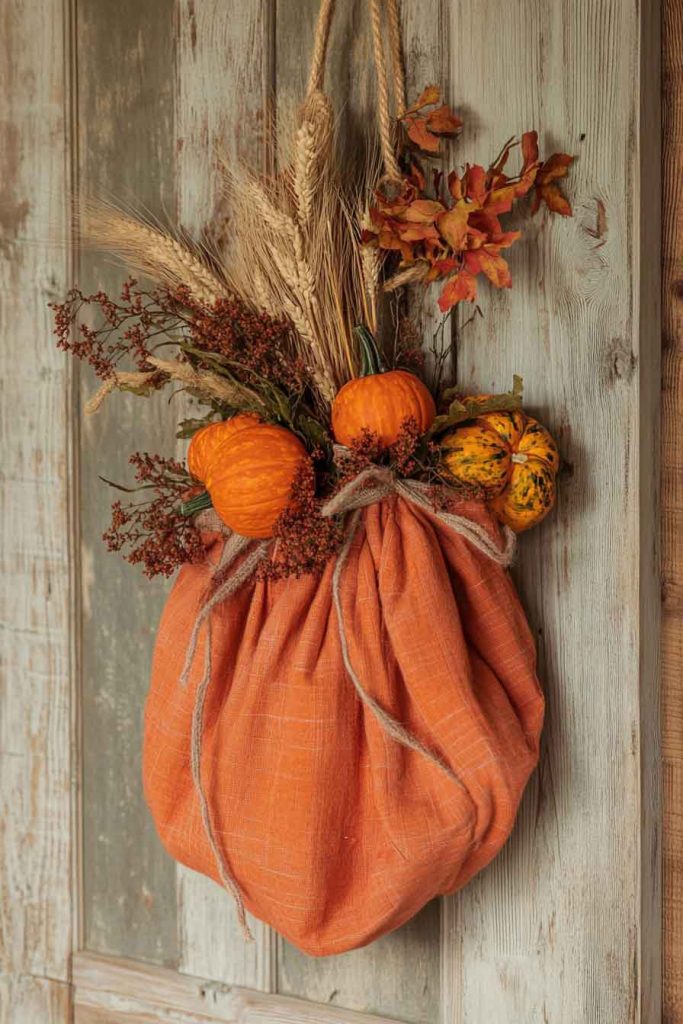
How to make it: Cut a rectangle of homespun fabric to about 8″ x 6″. Fold up the bottom third to create the pocket, then stitch or staple the sides securely. Attach the pocket to the lower portion of the weathered board using a staple gun or small nails through the top edge of the pocket only, leaving the opening free. Hand-paint or stencil a simple pumpkin above the pocket on the board’s face, or paint a short phrase like “Gather” or “Fall.” Age the board with sandpaper and dark wax. Drill two small holes at the top corners of the board and thread jute twine for hanging. Fill the pocket with dried flowers, small wheat stalks, and a miniature gourd.
Pro tip: Change what’s in the pocket as the season progresses — start with dried summer flowers in early fall, shift to wheat and berries at harvest, and add a sprig of dried orange slice and cinnamon for late November.
26. Rustic Twig Stars Difficulty: Beginner | Time: 20 min per star
What you need: Five straight twigs of equal length per star (8–10″ for wall stars, 4–6″ for ornaments or garland), pruning shears, jute twine.

How to make it: Cut all five twigs to exactly the same length — use one as a template for cutting the rest. Arrange them on a flat surface into a five-pointed star shape, with each twig crossing over the one to its right at every intersection point. There will be five intersection points total. At each one, wrap jute twine tightly in an X pattern and finish with a square knot. Trim the twine ends close. The star should feel firm with no wobbling at the joints.
Pro tip: Make stars in three sizes — 4″, 7″, and 10″ — and group them together on a wall with varying amounts of space between them. The size variation creates visual interest that a set of identically-sized stars can’t achieve.
27. Primitive Fall Lanterns Difficulty: Beginner | Time: 15 min
What you need: Old metal or wooden lanterns from thrift stores (the more battered the better), battery-operated pillar candles, dried berry sprigs, short wheat stalks, jute twine, small twig star or metal crow ornament, dark antiquing wax.
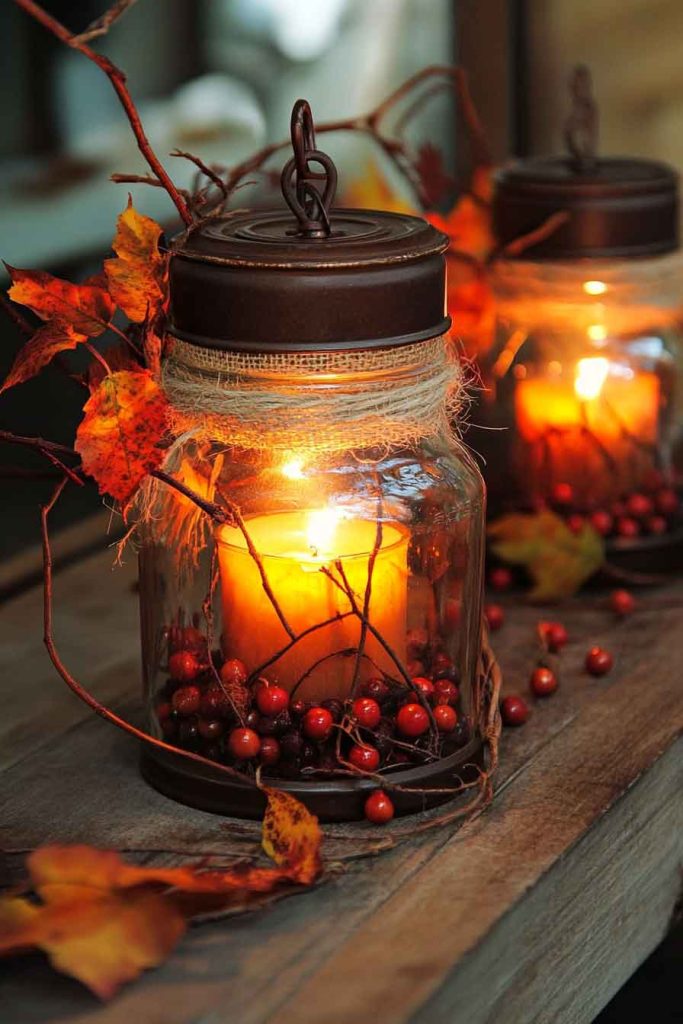
How to make it: Place a battery pillar candle inside each lantern. If the lantern looks too shiny or new, rub dark antiquing wax over the metal surfaces, working it into any embossed details, and buff off the excess — this ages painted or galvanized metal almost instantly. Tie a small bundle of wheat stalks and dried berries to the outside of the lantern handle with jute twine. Attach a small twig star or wire crow to the handle clasp as a finishing detail.
Pro tip: A grouping of three lanterns in different sizes arranged on your porch steps — one on the top step, one on the middle, one at the base — creates a welcoming fall entrance that looks well thought out but takes less than 20 minutes to set up.
28. Weathered Wheelbarrow Display Difficulty: Beginner | Time: 20 min
What you need: Old wooden or metal wheelbarrow, Spanish moss, pumpkins and gourds in at least three different sizes, dried corn stalks, wheat bundle, dried leaves or branches.
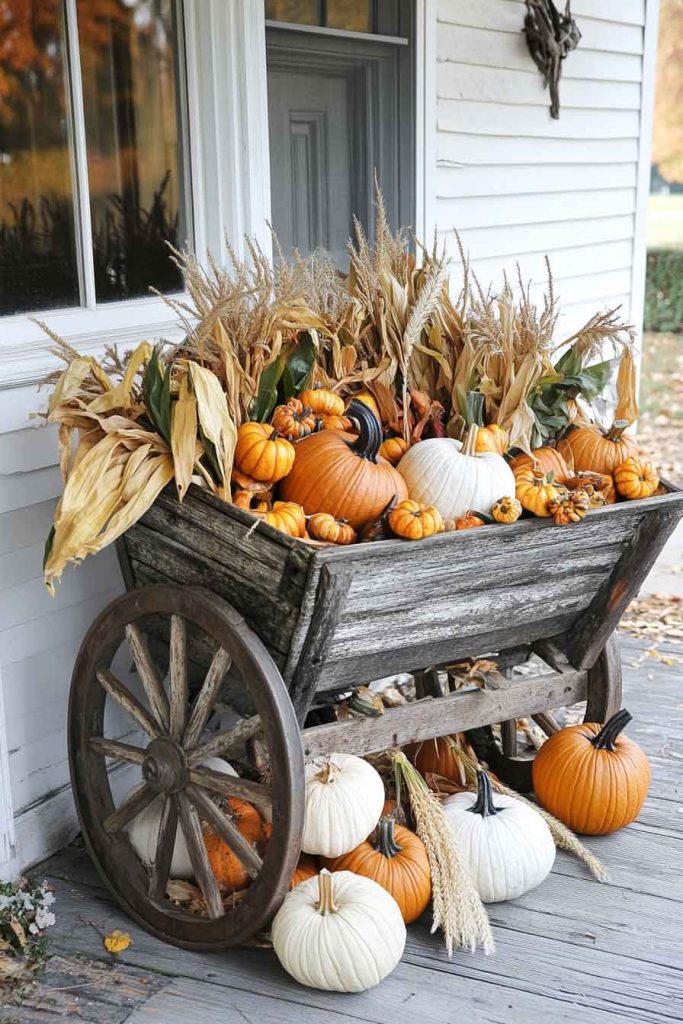
How to make it: Line the body of the wheelbarrow with a generous layer of Spanish moss as a base — it fills gaps, looks natural, and prevents smaller items from rolling around. Arrange pumpkins starting with your largest at the back of the wheelbarrow and letting smaller ones cascade naturally toward the front lip. Lean 3–4 dried corn stalks against the wheelbarrow handles. Tuck a wheat bundle into one corner of the display and add loose dried leaf branches for height and movement.
Pro tip: Use odd numbers of pumpkins — three or five — and choose at least two different colors or varieties. All-orange identical pumpkins look like a store display; a mix of orange, white, and green in different shapes looks genuinely harvested.
29. Primitive Stitched Samplers Difficulty: Intermediate | Time: 3–5 hours
What you need: Tea-stained muslin or homespun fabric, embroidery hoop, embroidery floss in rust, brown, cream, and olive green, embroidery needle, light pencil for transferring design, distressed wooden frame.
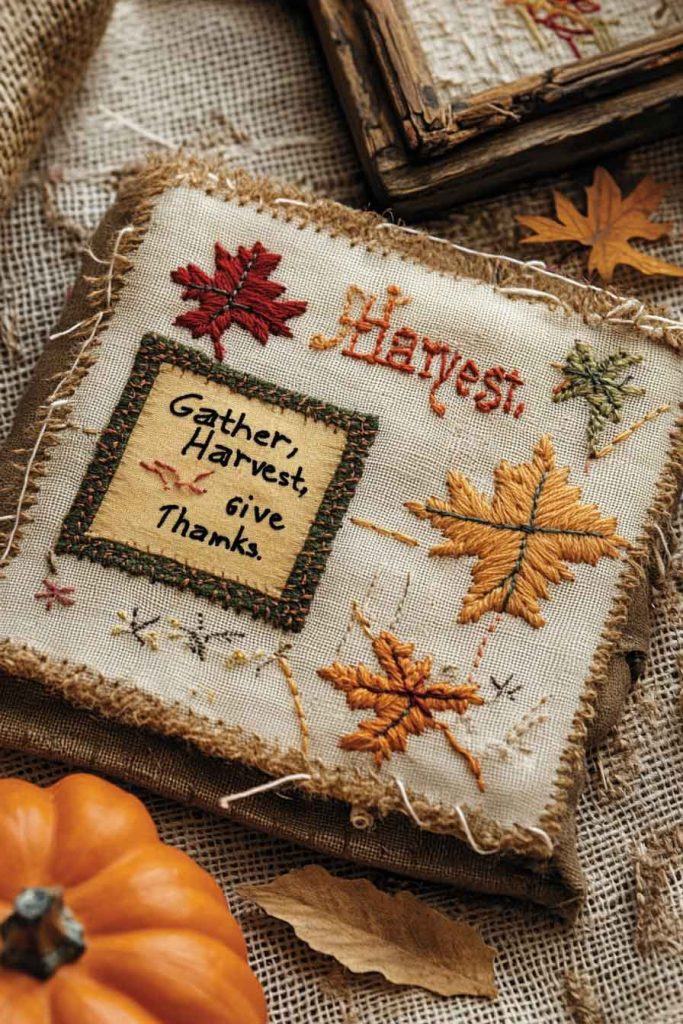
How to make it: Soak your fabric in strong tea first for a genuine aged base. Once dry, stretch it in the embroidery hoop and lightly sketch your design in pencil — keep it simple: a pumpkin, wheat stalk, crow on a branch, simple house shape, or a folk art phrase like “Home Sweet Harvest” or “Give Thanks.” Work the design using basic stitches: backstitch for all outlines, satin stitch for small filled areas, French knots for berries, dots, or seed details, and a simple cross stitch for any border elements. Frame in a distressed wooden frame when complete.
Pro tip: Limit yourself to three thread colors maximum. Primitive samplers derive their character from strong shapes and visible stitching, not complex color gradients. Rust, brown, and cream cover almost everything you’d want to stitch.
30. Rustic Apple Basket Display Difficulty: Beginner | Time: 20 min
What you need: Old wooden crate, worn wicker basket, or primitive wooden bowl, real apples (small varieties like Macintosh, Cortland, or Winesap for the best colors), dried leaves, pinecones, cinnamon sticks.
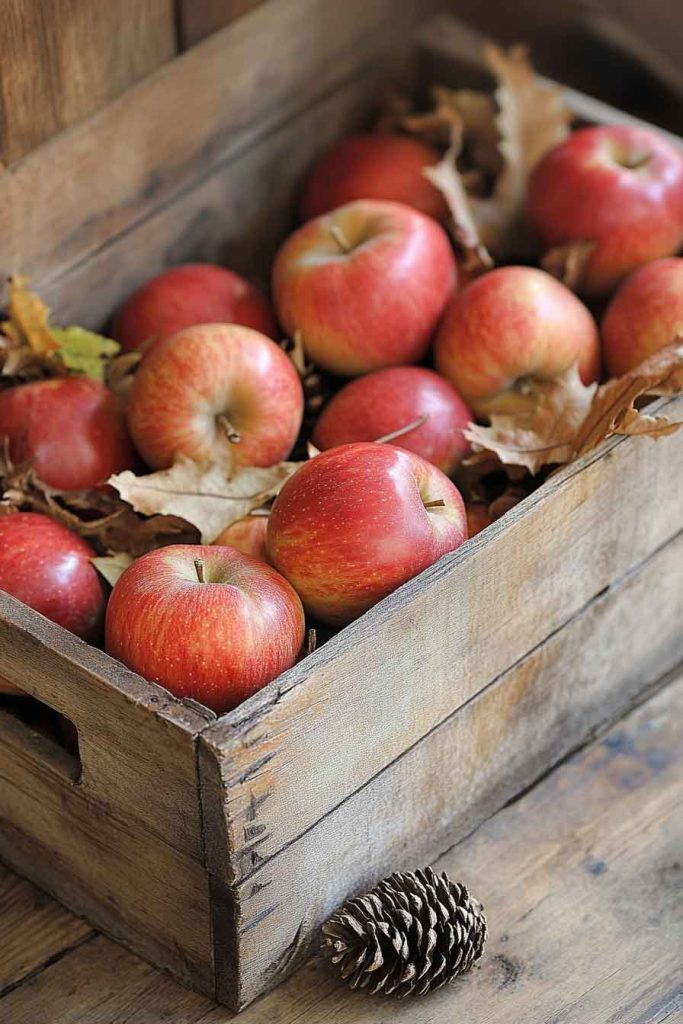
How to make it: Fill the container with real apples, piling them generously so they’re slightly mounded above the rim. Tuck dried autumn leaves into the gaps between apples around the outer edges. Scatter a handful of small pinecones across the top and lay 4–5 cinnamon sticks over the apples in a loose crisscross pattern. The whole display should look like someone just brought it in from an orchard.
Pro tip: Replace the apples every 7–10 days to keep the display looking fresh. In the meantime, the cinnamon sticks and dried elements at the edges can stay in place — just swap out the fruit at the center.
31. Primitive Fall Broom Decoration Difficulty: Beginner | Time: 30 min
What you need: Small decorative broom (craft stores carry these in fall), burlap ribbon, dried berry sprigs, dried wheat stalks, floral wire, jute twine, small wooden tag, black marker, sandpaper.
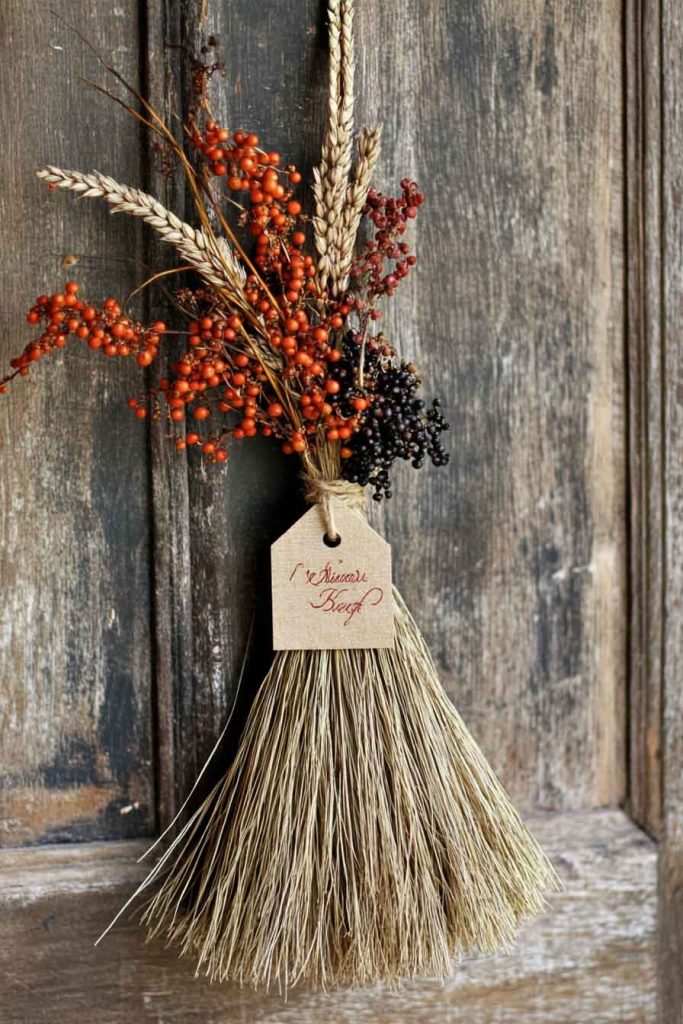
How to make it: Starting at the top of the handle, wrap burlap ribbon around the broom handle in overlapping downward spirals, securing the starting end with a dab of hot glue. Stop wrapping about 4″ above the bristles and secure the ribbon end. Gather a small bundle — 3–4 wheat stalks, 2 berry sprigs — and wire it tightly to the broom just above the bristle line. Tie a bow of jute twine over the wire to hide it. Write “Welcome” or “Harvest Blessings” on the small wooden tag with a black marker, lightly sand the edges for a worn look, and hang it from the bundle with a short loop of twine.
Pro tip: Two or three decorated brooms standing together in a galvanized bucket by your front door look far more impactful than a single broom. It takes less than an hour to make all three and the materials cost is minimal.
Tips for Displaying Primitive Fall Crafts
Work in odd numbers. Groups of three or five always look more natural than pairs or evens. This applies to pumpkins on a porch, candles on a board, lanterns on steps, and ornaments on a branch tree.
Vary height within every grouping. A flat arrangement at one level reads as a shelf. Varying heights — using wood rounds, crates, or stacked books under a cloth — creates depth and visual interest.
Mix textures deliberately. Rough burlap against smooth painted wood. Dried naturals against distressed metal. Soft fabric pumpkins next to hard wooden ones. Texture contrast is what makes primitive vignettes feel layered and collected rather than matched.
Use jute twine for everything. Replace ribbon with jute twine in every single project. It’s inexpensive, looks genuinely primitive, and works for hanging, tying, wrapping, and stitching.
Source materials from the right places. Thrift stores and Habitat ReStores for old wood, vintage windows, and metal pieces. Estate sales for homespun fabric and old tools. Your backyard and local parks for branches, pinecones, acorns, and seed pods. Dollar Tree for seasonal pumpkins, corn husks, and burlap ribbon that works perfectly for these projects.
Store properly between seasons. Keep fabric pieces in airtight bins with cedar blocks. Wrap wooden pieces in kraft paper, not bubble wrap, to prevent moisture buildup. Store dried naturals like wheat and corn husks in rigid boxes — they’re fragile when dry. Label everything by room or display location so next fall’s setup takes minutes.
Frequently Asked Questions
What is the difference between primitive and farmhouse decor? Farmhouse style is cleaner, brighter, and more polished — think shiplap, clean white paint, and simple bold fonts. Primitive style is darker, rougher, and more folk-art inspired. Primitive uses muddy muted colors rather than bright white, traditional motifs like crows and five-pointed stars rather than clean typography, and materials that look genuinely old or handmade rather than stylishly rustic. Both use natural materials, but primitive deliberately avoids anything that looks new or refined.
Do I need sewing experience to make these crafts? No. More than half the projects on this list require no sewing at all — hot glue, jute twine, wire, and staples handle most of the assembly. The projects that do involve stitching (fabric pumpkins, table runners, samplers, tea-stained pillows) use only the most basic straight stitches. In primitive crafts, visible and slightly uneven stitching is considered a quality, not a flaw.
What colors are used in primitive fall decorating? Burnt orange (muted, not bright), mustard yellow, deep burgundy, rust, cream, aged white, brown, and tan. Muted black for crow motifs, lettering, and outlines. The guiding principle is that every color should feel like it has slightly faded from years of natural light and use — nothing vivid or fresh-looking belongs in a primitive fall palette.
How do you make crafts look authentically old? Combine two or three of these on the same piece: dry-brush a contrasting paint color across the surface, sand the edges and raised areas to expose bare material underneath, apply dark brown antiquing wax into crevices and buff back the excess, or tea-stain fabric and paper for a deep amber vintage tone. Using all four techniques on a single piece produces the most convincing aged result.
Where can I find free or inexpensive supplies? Nature is your first stop — branches, pinecones, acorns, seed pods, and dried leaves are all free. Thrift stores and estate sales for aged wood, vintage fabric, old tools, and rusty metal. Craft stores for burlap, jute, and unfinished wood pieces — Hobby Lobby and Michaels run 40–50% off sales on these basics regularly. Dollar Tree stocks seasonal items like small pumpkins, corn husks, and burlap ribbon each fall that work perfectly for primitive projects at minimal cost.
How long do primitive fall crafts last? Wooden and metal pieces last indefinitely with proper storage. Fabric items last for many seasons if stored in airtight containers away from moisture. Dried naturals — wheat, corn husks, apple garlands — typically last one to two full seasons before becoming too brittle or faded to display. The dried fruit garland has the shortest lifespan but is inexpensive to remake each year.
Final Thoughts
Primitive fall crafts are one of the most rewarding ways to decorate for autumn because the style actively rewards you for not overthinking things. The wobbly hand-lettering on a wooden sign, the uneven stitching on a fabric pumpkin, the irregular shape of a twig star — these are not mistakes to correct. They’re the details that make each piece feel real and made by human hands.
Start with two or three beginner projects from this list. The weathered wooden pumpkins, the rag garland, and the mason jar lanterns are all under an hour and require no special tools or skills. Once you see how distressing techniques and natural materials work together, the more involved projects follow naturally.
By your second fall season you’ll have enough handmade pieces to build complete room vignettes — a mantel arrangement, a porch display, a dining table centerpiece — rather than scattering individual decorations. That collected, layered quality is exactly what the primitive style is about, and it’s only possible with pieces you made yourself.